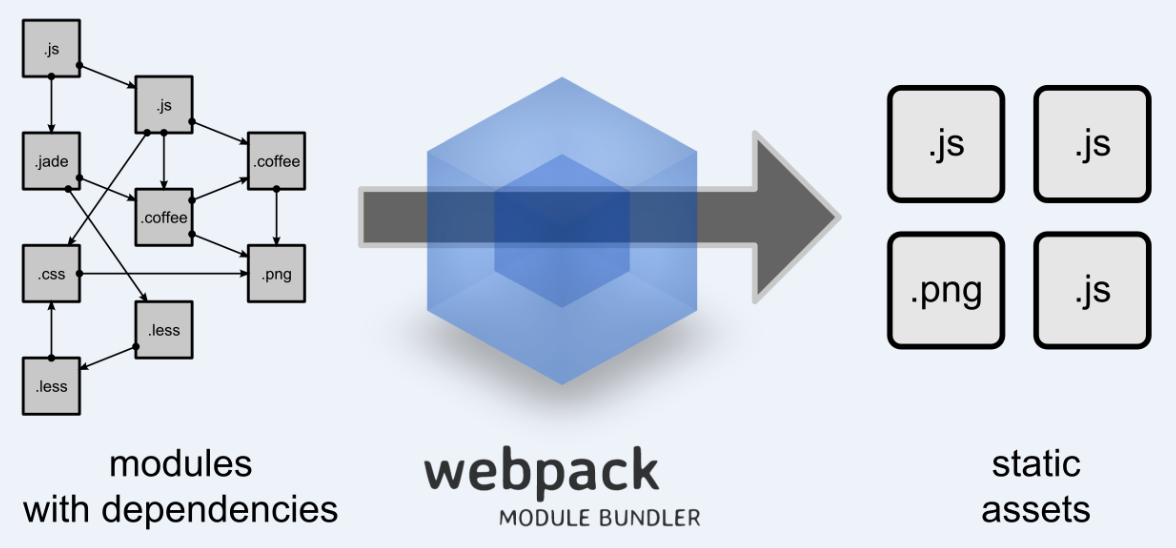
Webpack 是前端资源模块化管理和打包工具。它可以将许多松散的模块按照依赖和规则打包成符合生产环境部署的前端资源。
- 拆分依赖树成块并按需加载
- 让初始化加载时间更少
- 每一个静态资源应该是一个模块
- 能够集成第三方类库
- 适用于大型项目
- 能够定制模块打包的每一个部分
- 丰富的插件,方便进行开发工作
- 大量的加载器,包括加载各种静态资源
- 代码分割,提供按需加载的能力
- 发布工具
初始化:npm init ,生成package.json,包含对应项目的配置信息。
安装webpack,并且加在依赖中:npm install webpack --save-dev
-
首先创建一个静态页面index.html 和一个 JS 入口文件 entry.js
<!DOCTYPE html> <html lang="en"> <head> <meta charset="UTF-8"> <title>Document</title> </head> <body> <script src="../build/bundle.js"></script> </body> </html> -
新建entry.js
document.write('hello webpack') -
执行webpack
webpack app/entry.js build/bundle.js -
index页面显示结果
hello webpack
Loader 可以理解为是模块和资源的转换器,它本身是一个函数,接受源文件作为参数,返回转换的结果。这样,我们就可以通过 require 来加载任何类型的模块或文件,比如 CoffeeScript、 JSX、 LESS 或图片。
-
新建style.css
body{ color:red; } -
修改entry.js
require('style-loader!css-loader!less-loader../less/style.less'); document.write('hello webpack') -
安装loaders
npm install style-loader css-loader less-loader --save-dev -
执行webpack
webpack app/entry.js build/bundle.js -
index页面显示结果
样式改变
-
const webpack = require('webpack') const config = { entry: './app/entry.js', output: { path: './build', filename: 'bundle.js' }, module:{ //加载器配置 rules: [ { test: /\.less$/, //合并 use:{( fallback: "style-loader", use: ["css-loader","less-loader"] )} }, }; module.exports = config; -
现在可以直接使用webpack命令打包,不需要在命令行中输入
webpack -
通过配置文件,显示结果与之前index页面显示结果一致
hello world样式改变
-
安装插件
npm install html-webpack-plugin --dev-save -
在webpack.config.js里面进行配置
  const webpack = require('webpack')
  const htmlwebpackplugin = require('html-webpack-plugin');

  const config = {
  	entry: {
  		index:'./app/entry.js',
  		}
  	output: {
  		  path: './build',
  		  filename: 'bundle.js'
  		},
  //加载器配置
  module:{
  	rules: [
  	{
  		test: /\.less$/,
  		//合并
   	   use:{(
  			fallback: "style-loader",
  			use: ["css-loader","less-loader"]
  			)}
  	},
  },
  //插件
  plugins:[
  		new htmlwebpackplugin({
  			title:'webpack2',
  			filename:'index.html',
  			inject:true,
  			//模板引擎
  			//template:path.resolve(__dirname,'app/tpl/layout.jade'),
  			hash:true,
  			chunks:['index']
  		}),
  module.exports = config;
webpack-dev-server是一个小型的Node.js Express服务器,它使用webpack-dev-middleware来服务于webpack的包,除此自外,它还有一个通过Sock.js来连接到服务器的微型运行时.
-
安装插件
npm install webpack-dev-server --dev-save -
在webpack.config.js里面进行配置
const webpack = require('webpack') const htmlwebpackplugin = require('html-webpack-plugin'); const ExtractTextPlugin = require('extract-text-webpack-plugin'); const config = { entry: { index:'./app/entry.js', } output: { path: './build', filename: 'bundle.js' }, //加载器配置 module:{ rules: [ { test: /\.less$/, //合并 use:{( fallback: "style-loader", use: ["css-loader","less-loader"] )} }, }, //插件 plugins:[ new htmlwebpackplugin({ title:'webpack2', filename:'index.html', inject:true, //模板引擎 //template:path.resolve(__dirname,'app/tpl/layout.jade'), hash:true, chunks:['index'] }), module.exports = config; -
运行服务器
webpack webpack-dev-server --line -hot -
在package.json 中进行配置
"scripts": { "test": "echo \"Error: no test specified\" && exit 1", "start": "webpack-dev-server --line -hot" }, -
运行服务器
npm start