All instructions are based on
Real Sense 2.17.1usingDepth Camera D435.
- Intel.RealSense.Viewer.exe
- Executable depth camera control program
- Configure depth camera and color camera parameters
- Intel.RealSense.SDK.exe
- Installer with
Intel RealSense Viewer and Quality Tool,C/C++ Developer Package,Python 2.7/3.6 Developer Package,.NET Developer Packageand so on. - You can find some demos in the root directory of the installation.
- Installer with
- Source Code: Contains a folder named
librealsense-2.17.1 - Need to use
CMakefor source code compilation- Create a new folder
buildunder folderlibrealsense-2.17.1 - Folder
librealsense-2.17.1is the source code path - Folder
librealsense-2.17.1\buildis the build path - Visual Studio Solution:
librealsense2.sln(C++)- in the root directory
librealsense-2.17.1
- in the root directory
- Visual Studio Solution:
LANGUAGES.sln(C#)- in the directory
librealsense-2.17.1\build\wrappers\csharp
- in the directory
- Create a new folder
- https://realsense.intel.com/intel-realsense-downloads
- Best Known Methods for Tuning Intel RealSense Depth Cameras D415 and D435
All instructions are based on
NUITRACK 1.3.8.
- Website: SDK & Samples
- https://nuitrack.com
- Unity, Unreal Engine, C++, C#
- Online documentation
-
- Download and run nuitrack-windows-x86.exe (for Windows 32-bit) or nuitrack-windows-x64.exe (for Windows 64-bit). Follow the instructions of the NUITRACK setup assistant.
- Re-login to let the system changes take effect.
Normally, only the two steps need to be performed if your computer has been installed
Visual Studio.
- nuitrack_console_sample/src/main.cpp
- nuitrack_csharp_sample/Program.cs ⭐
- nuitrack_gl_sample/src/main.cpp
- nuitrack_ni_gl_sample/src/main.cpp
All codes are based on
.NET Framework 4.6.1usingVisual Studio.
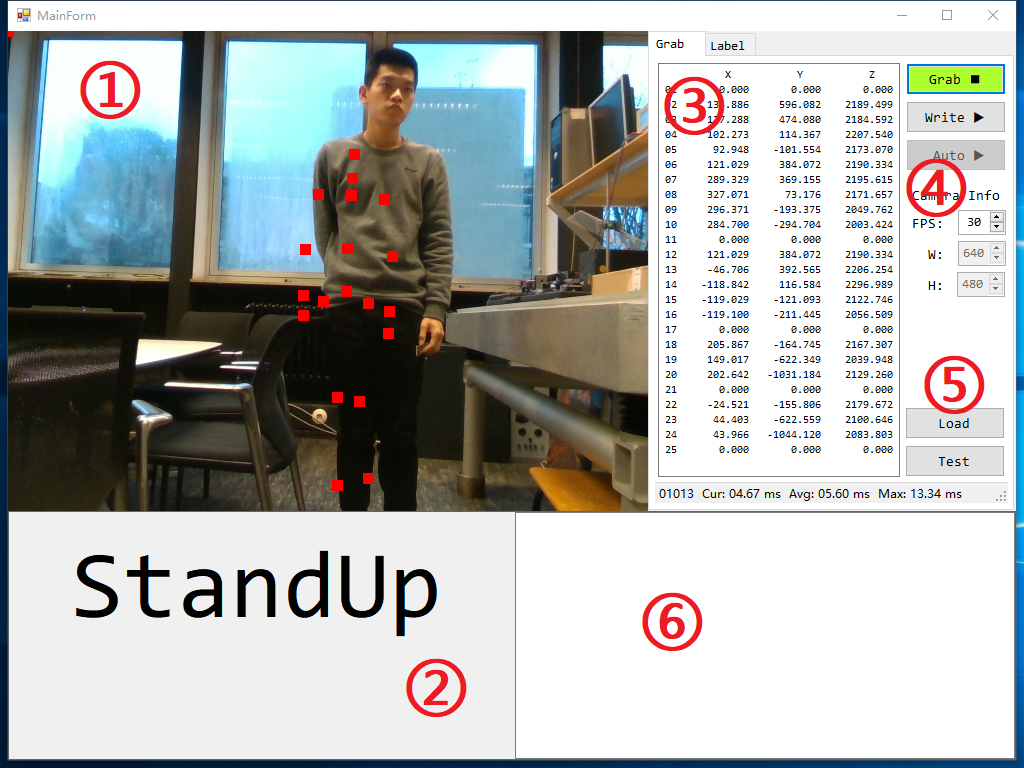
- ①: Display the color image and the skeleton data with red square dots.
- ②: Display the judged gesture:
Standing,Sitting,Walking,StandUp,SitDown,TurnBack. - ③: Display the skeleton data, 25 points (XYZ, 75 float data) per frame.
- ④: The main control
Grab: Start or stop the camera grab.Write: Enabled or disabled write skeleton data.Auto: Enabled or disabled recognize the gesture automatically.FPS: Frame per second, also timer grab interval equals1000.0 / FPS.W: The width of image, read only.H: The height of image, read only.
- ⑤: Load and test
.pbmodelLoad: Load a.pbmodel.Test: Test a sample using the loaded model.
- ⑥: Output window, not used yet.
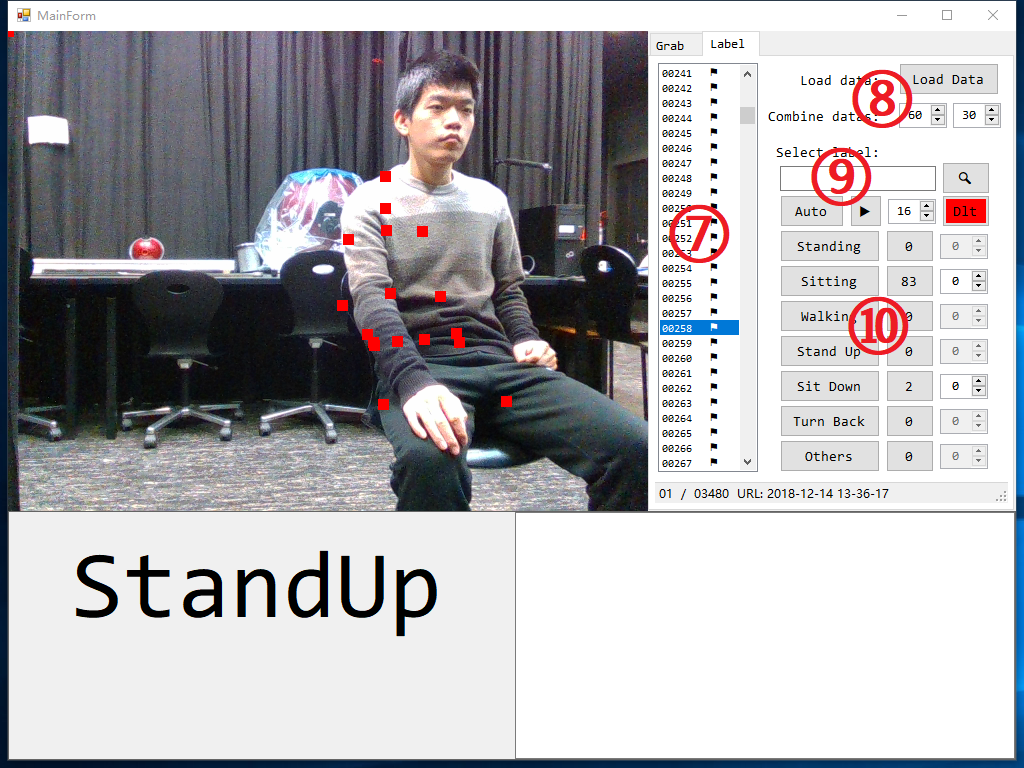
- ⑦: Display the skeleton data index. The small flag indicates that the data under the index is valid.
- ⑧: Load and config data.
Load: Select a.txtfile, see 3-2 Output Folder Tree for more instructions.- Combine data:
1st numberindicates that the data of each 60 frames is combined into one sample.2nd numberindicates that overlaps the data of 30 frames between every two samples.
- ⑨: Search and select data.
Search: Search and display the images of the sample.Auto: Auto select the next batch images,batchSize = CombineData(1st number).▶: Display the select data and images.Delay: The delay time of display image.Dlt: Delete useless images after labeling.
- ⑩: Labeling, 3 buttons per label.
1st button: Write label data.2nd button: Open label folder.3rd button: Display label sample.
graph TD
	A(Application.StartupPath)
	B1(Model: Save the pb model)
	B2(Output: Save the skeleton data)
	C0(Model Files: yyyy-MM-dd HH-mm-ss.pb)
	D0(All: Save the skeleton data)
	Dx(yyyy-MM-dd HH-mm-ss: Save the skeleton data)
	E1(Images: Images for each label)
	E2(Labels: Txt and md files for each label)
	E3(Data Infos: Data.txt)

	A --> B1
	A --> B2
	B1 --> C0
	B2 --> D0
	B2 --> Dx
	D0 --> E1
	D0 --> E2
	D0 --> E3
	Dx --> E1
	Dx --> E2
	Dx --> E3
- Make sure the computer is connected to the depth camera.
- Click
Grabbutton, the images will be displayed in real time.
- Click
Writebutton, the folder will be created under theOutputfolder with the format of current timeyyyy-MM-dd HH-mm-ssas the folder name. For example, creating a folder named2019-01-10 10-40-54. - Further, in the
2019-01-10 10-40-54folder, two folder namedImagesandLabelsare created and a txt file namedDatais generated.Images: The color image with the joint position of the body using square red dots.Labels: Txt and md files for each label.Data.txt: The information of the skeleton data. Normally, only the wordSkeleton data (X, Y, Z) * 25 points..
- Click
Grabbutton to capture image, at the same time, write images and data. Which one of theGrabbutton and theWritebutton is pressed first, there is no requirement for use.
- After writing the data, stop
GrabandWrite, switch to interface 2, click theLoad Databutton, and select thedata.txtfile under the selected folder. - In the interface ⑦, all the skeleton data lists under the selected folder are displayed. The small flag indicates that the data under the index is valid.
- Next, you need to select enough continuous data manually, or use the
Autobutton to let the program select the data automatically. - While you select the data, Interface ① will display the images, determine the current gesture manually based on the image information, and click the corresponding
1st buttonin interface ⑩. after that, a sample will be automatically saved.
- Same as
labeling, click theLoad Databutton, and select thedata.txtfile under the selected folder. - Click the corresponding
2nd buttonin interface ⑩, the program will automatically open the save path of the selected label's sample. - Click the corresponding
3rd buttonin interface ⑩, the program will automatically display the images of the selected sample in interface ①.
- Click the
Loadbutton in interface ⑤ and select the.pbmodel file to be tested. - The first call to the model requires 3000ms to run, and the next run is less than 10ms. I do not know why. So when I load the model, I will call the model once to ensure that it will not time out when it is running automatically.
- Click the
Testbutton in interface ⑤ and select a sample, then the result will be displayed in ②.
- Click the
Autobutton in interface ④, the program will automatically load the preset model, the model path can be modified by them_PB_URLvariable. - Click
Grabbutton. - Start your performance.
All codes are based on
Python 3.6.7 64-bit (TendorFlow)usingVisual Studio Code.
A DNN(Deep Neural Network) architecture. (Multilayer perceptron 多层感知器)
def dnn_5(inputs, num_classes=6, is_training=True, dropout_keep_prob=0.8, reuse=tf.AUTO_REUSE, scope='dnn_5'):
    ''' A DNN architecture with 4 hidden layers.

        input --> (hidden layer) x 4 --> output

        hidden_layer_notes = [4096, 1024, 256, 64]
        1 x 4500 --> 1 x 4096 --> 1 x 1024 --> 1 x 256 --> 1 x 64 --> 1 x num_output

        Args:
            inputs           : The input data sets whose shape likes [1 x 4500].
            num_classes      : The number of output classes.
            is_training      : Is training, if yes, it will ignore dropout_keep_prob.
            dropout_keep_prob: The value of dropout parameter.
            reuse            :
            scope            :

        Return:
            net: The output of the net which do not input tf.nn.softmax.

        Raise:

    '''
    with tf.variable_scope(scope, 'dnn_5', [inputs], reuse=reuse):
        ### hidden_layer_notes
        hidden_layer_notes = [4096, 1024, 256, 64]

        ### 1: hidden layer 1
        # 1 x 4500 --> 1 x 4096
        with tf.variable_scope('hidden1'):
            net = slim.fully_connected(inputs, hidden_layer_notes[0], scope='fc')
            net = slim.dropout(net, dropout_keep_prob, is_training=is_training, scope='dropout')

        ### 2: hidden layer 2
        # 1 x 4096 --> 1 x 1024
        with tf.variable_scope('hidden2'):
            net = slim.fully_connected(net, hidden_layer_notes[1], scope='fc')
            net = slim.dropout(net, dropout_keep_prob, is_training=is_training, scope='dropout')

        ### 3: hidden layer 3
        # 1 x 1024 --> 1 x 256
        with tf.variable_scope('hidden3'):
            net = slim.fully_connected(net, hidden_layer_notes[2], scope='fc')
            net = slim.dropout(net, dropout_keep_prob, is_training=is_training, scope='dropout')

        ### 4: hidden layer 4
        # 1 x 256 --> 1 x 64
        with tf.variable_scope('hidden4'):
            net = slim.fully_connected(net, hidden_layer_notes[3], scope='fc')
            net = slim.dropout(net, dropout_keep_prob, is_training=is_training, scope='dropout')

        ### 5: output layer
        # 1 x 64 --> 1 x num_classes
        with tf.variable_scope('output'):
            net = slim.fully_connected(net, num_classes, activation_fn=None, scope='fc')

        ### return
return net| Standing | Sitting | Walking | StandUp | SitDown | TurnBack | All | |
|---|---|---|---|---|---|---|---|
| train | 227 | 229 | 135 | 193 | 194 | 150 | 1128 |
| vld | 0 | 0 | 0 | 0 | 0 | 0 | 0 |
| test | 51 | 70 | 30 | 43 | 57 | 30 | 281 |
| All | 278 | 299 | 165 | 236 | 251 | 180 | 1409 |
# ----------------------------------------------------------------------- #
# ------------------------ Run net at 2018-12-19 ------------------------ #
# ----------------------------------------------------------------------- #
# ---------------- train_step: 15000
# ---------------- batch_size: 32
# ---------------- learning_rate: 0.0001
# ---------------- dropout_keep_prob: 1.0

# ---------------- Test accuracy: 93.5943 %
In my current experiment, the height of the camera is about 75 cm, and the angle of the camera is horizontal forward. All data collected is based on this premise.
This causes the gesture recognition result to deteriorate when the camera height or the camera angle is changed.
For example, when raising the height of the camera,
Standingis easily judged asSitting.
- I think the initial work should be to determine where the camera is installed.
- Fix camera position, like fixing the camera to the corner of the ceiling of the room, which can make sure the field of view to cover the entire room.
- Or calibration of the relative position between the camera and the human body (20190130).
Now, I only have 1409 samples. For deep learning, this number is too small.
- The XYZ coordinates of some joints are always
(0, 0, 0), but I do not know why. - I suggest finding more people and collecting more data after fixing the camera.
I combine 60 frames of images with 25 points (75 float numbers) per frame, so 4500 float numbers are combined into a vector sample.
- The composition of the sample needs to be optimized.
- May be able to form a two-dimensional matrix, then you can use convolution.
The network architecture is based on
Multilayer Perceptron.
- It is the simplest network, so there is still a lot of optimization space.
In the automatic running state, the gesture name displayed on interface ② has obvious delay.
- Demo program bug, I will fix it as soon as possible.

