This project was done as part of Udacity's Self-Driving Car Nanodegree Program. The performance of the model with the simulator on track 1 can be viewed by clicking here.
- Use the simulator to collect data of good driving behavior
- Build, a convolution neural network in Keras that predicts steering angles from images
- Train and validate the model with a training and validation set
- Test that the model successfully drives around track one without leaving the road
###Files Structure My project includes the following files:
- model.py containing the script to create and train the model
- drive.py for driving the car in autonomous mode
- model.h5 containing a trained convolution neural network
- README.md summarizing the results
Using the Udacity provided simulator and my drive.py file, the car can be driven autonomously around the track by executing
python drive.py model.h5The model.py file contains the code for training and saving the convolution neural network. The file shows the pipeline I used for training and validating the model, and it contains comments to explain how the code works. I also added the details of the preprocessing strategy in the beginning of the code.
I used a variation of the model presented in this nvidia paper as discussed in the lectures.
In order to gauge how well the model was working, I split my image and steering angle data into a training and validation set. I found that my first model had a low mean squared error on the training set but a high mean squared error on the validation set. This implied that the model was overfitting.
To combat the overfitting, I modified the model with dropout layers (model.py code lines 116-135). The model was tested by running it through the simulator and ensuring that the vehicle could stay on the track.
The final step was to run the simulator to see how well the car was driving around track one. At the end of the process, the vehicle was able to drive autonomously around the track without leaving the road. There were still minor corrections needed for trouble spots after the bridge. I tried to collect additional data but since I had bad keyboard control, it made matters worse.
The final model architecture (model.py lines 18-24) consisted of a convolution neural network with multiple layers. Here is a tabular description of the keras architecture:
| Layer | Description |
|---|---|
| Lambda | Normalizing image pixels x/255-0.5 |
| Lambda | Cropping image 70 pixels from top 25 from bottom |
| Convolution2D | 2x2 stride, valid padding, 24@5x5 |
| RELU | |
| Dropout | 0.5 |
| Convolution2D | 2x2 stride, valid padding, 36@5x5 |
| RELU | |
| Dropout | 0.5 |
| Convolution2D | 2x2 stride, valid padding, 48@5x5 |
| RELU | |
| Dropout | 0.5 |
| Convolution2D | 2x2 stride, valid padding, 64@3x3 |
| RELU | |
| Dropout | 0.5 |
| Convolution2D | 2x2 stride, valid padding, 64@3x3 |
| RELU | |
| Dropout | 0.5 |
| Flatten | |
| Dense | 100 |
| Dropout | 0.2 |
| Dense | 50 |
| Dropout | 0.2 |
| Dense | 1 |
The model used an adam optimizer, so the learning rate was not tuned manually (model.py line 25).
###Training and Validation Data Training data provided by Udacity was chosen to keep the vehicle driving on the road. I collect my own data trying to stay in the middle of the road over several laps but since I didn't have good keyboard control, the data didn't seem to perform well. Therefore, I chose to stick to the Udacity provided data since I was getting better resutls with that.
The ideal number of EPOCHS seemed to be higher than 10 so I chose 15 EPOCHS with built-in keras early stopping function.
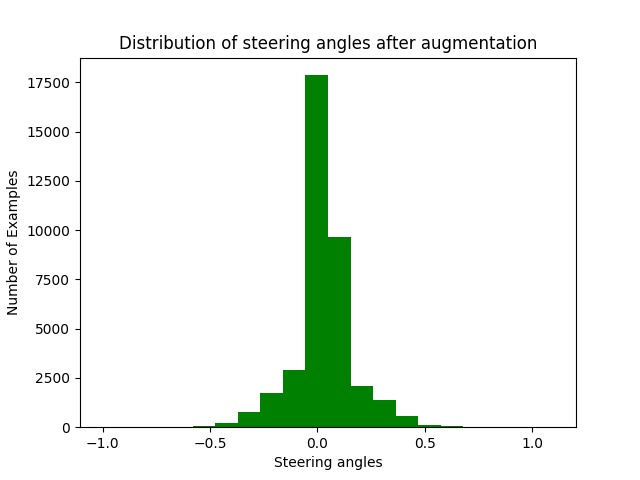
##Data Preprocessing To augment the data sat, I used flipped images with negative steering angles thinking that this would help provide additional information in exact opposite scenario. Following that, I used left and right images with steering angle correction of 0.1 to further augment the data. After many trials of values between 0.08 to 0.2, I figured that this was probably the best value. To reduce very strong dependency on this correction factor (as in give higher weights to center images), I appended the data with left and right images by randomly adding left and right images and their flipped versions only 2 our 3 times.
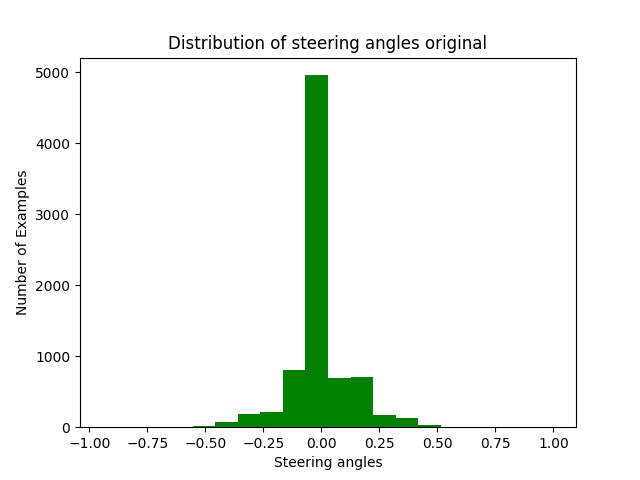
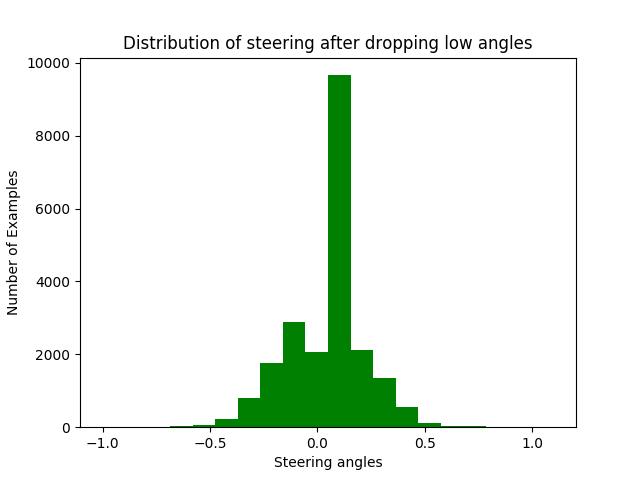
Next, I noticed that the data was heavily skewed with more data points with near zero steering angles. Therefore, as suggested by many on class forums, I decided to randomly drop rows (with probability 0.8) with steering angle magnitudes of less than 0.05.
Here is the distribution of steering angles in the original data set:
Here is the distribution of steering angles after augmenting data:
Here is the distribution of steering angles after dropping the low steering angles:
I finally randomly shuffled the data set and put 20% of the data into a validation set. In my keras model, I also cropped the image top and bottom pixels by 70 and 25 pixels each to remove unnecessary things such as trees, rocks etc.
##Final Results
After training for 15 epochs, my training accuracy was recorded to be 0.0138 and test accuracy 0.0134. Here is a graph showing the training and validation loss vs epochs.

The performance of the model with the simulator on track 1 can be viewed on Youtube.
##Further thoughts First of the all trained model doesn't seem to work well on track 2 so there is still room to improve the model. Secondly, there are one or two trouble spots. Althought I tried to collect additional data, it doesn't seeem to help. So I need to investigate that further


