Recommended Blog: Geek Notes - Roman Bogachev
Great presentation on CH: Introduction to the Mysteries of ClickHouse Replication, By Robert Hodges and Altinity Engineering Team
This manual uses specific, working examples, the general concept of which:
Clients --> Events --> (Nginx + Rsyslog) --> Golang middleware --> Apache Kafka

                 | <---> Shard O  \
--> Apache Kafka | <---> Shard I   | <---> Distributed Server <---> Analyst
| <---> Shard II /--> Apache Kafka
--> CH Kafka Engine Table
--> Main Consummer (Materialized View) --> Main Storage Table
\..> First Aggregate MV --> ReplicatedSumminMergeTree
\..> Second Aggregate MV --> ReplicatedAggregatingMergeTree- ClickHouse
- Apache Kafka
- Zookeeper
- Cluster and Replicated
- Import from MySQL to ClickHouse
- Rsyslog && Nginx
- MAIN
- Distributed Table
- Materialized View
- Queue Table (Kafka ENGINE)
- Stat Table (Merge Tree, Replicated Merge Tree)
- GoLang Data Generator
- 1️⃣ Check SSE:
grep -q sse4_2 /proc/cpuinfo && echo "SSE 4.2 supported" || echo "SSE 4.2 not supported" - 2️⃣
deb http://repo.yandex.ru/clickhouse/trusty/ dists/stable/main/binary-amd64/- or
↘️ echo "deb [ arch=amd64 ] http://repo.yandex.ru/clickhouse/deb/stable/ main/" | tee /etc/apt/sources.list.d/clickhouse.list
- or
- 3️⃣ APT
- 1️⃣
sudo apt-key adv --keyserver hkp://keyserver.ubuntu.com:80 --recv E0C56BD4 - 2️⃣
sudo apt-get update - 3️⃣
sudo apt-get install clickhouse-client clickhouse-server
- 1️⃣
- 📯
sudo service clickhouse-server start

- 2019.06.08 Анализ производительности запросов в ClickHouse. Доклад Яндекса
- 2018.11.22 Использование ClickHouse в VK, или Зачем мы написали KittenHouse
- 2017.02.27 ClickHouse: очень быстро и очень удобно
- 2016.11.07 Как запустить ClickHouse своими силами и выиграть джекпот
- 2016.11.07 Масштабирование ClickHouse, управление миграциями и отправка запросов из PHP в кластер
- 2018.06.25 Как VK вставляет данные в ClickHouse с десятков тысяч серверов
- Масштабирование ClickHouse, управление миграциями и отправка запросов из PHP в кластер
- Как мы в ivi переписывали etl: Flink+Kafka+ClickHouse
sudo apt install default-jrejava -version- Download from https://kafka.apache.org/quickstart and
tar -xvzf /path/to/kafka_tmp/kafka.tgz --strip 1
-
nano ~/kafka/config/server.properties -
Add lines to end of file:
delete.topic.enable = true -
The server.properties file defines the following important properties required for Kafka broker:
# Broker identifier. This should be a unique number for each broker.
Broker.id = 0
# Listening port
port = 9092
# Directory where log files will be stored
log.dir = /tmp/kafka-logs
# By default, the number of sections of magazines per topic.
num.partitions = 2
# Zookeeper connection string
zookeeper.connect = localhost:2181
-
Zookeeper service:
sudo nano /etc/systemd/system/zookeeper.service- insert next lines (only example) ❗️
[Unit]
Requires=network.target remote-fs.target
After=network.target remote-fs.target

[Service]
Type=simple
User=kafka
ExecStart=/kafka/kafka/bin/zookeeper-server-start.sh /kafka/kafka/config/zookeeper.properties
ExecStop=/kafka/kafka/bin/zookeeper-server-stop.sh
Restart=on-abnormal

[Install]
WantedBy=multi-user.target
-
Kafka service:
sudo nano /etc/systemd/system/kafka.service- insert (example) ❗️
[Unit]
Requires=zookeeper.service
After=zookeeper.service

[Service]
Type=simple
User=kafka
ExecStart=/bin/sh -c '/kafka/kafka/bin/kafka-server-start.sh /kafka/kafka/config/server.properties >       /kafka/kafka/kafka.log 2>&1'
ExecStop=/kafka/kafka/bin/kafka-server-stop.sh
Restart=on-abnormal

[Install]
WantedBy=multi-user.target
- Create topic:
bin/kafka-topics.sh --create --zookeeper localhost:2181 --replication-factor 1 --partitions 1 --topic myTopicName - Run consumer:
bin/kafka-console-consumer.sh --bootstrap-server localhost:9092 --topic myTopicName --from-beginning - Run producer:
bin/kafka-console-producer.sh --broker-list localhost:9092 --topic myTopicName - Delete topic:
bin/kafka-topics.sh --zookeeper localhost:2181 --delete --topic myTopicName - Get topic list:
bin/kafka-topics.sh --list --zookeeper localhost:2181 - Get count messages of topic:
bin/kafka-run-class.sh kafka.tools.GetOffsetShell --broker-list localhost:9092 --topic statopic001 --time -1

Creating a topic in production is an operative task that requires awareness and preparation. In this tutorial, we’ll explain all the parameters to consider when creating a new topic in production.
Setting the partition count and replication factor is required when creating a new Topic and the following choices affect the performance and reliability of your system.
Create a topic
kafka/bin/kafka-topics.sh --create \
--zookeeper localhost:2181 \
--replication-factor 2 \
--partitions 3 \
--topic unique-topic-name
PARTITIONS Kafka topics are divided into a number of partitions, which contains messages in an unchangeable sequence. Each message in a partition is assigned and identified by its unique offset.
Partitions allow us to split the data of a topic across multiple brokers balance the load between brokers. Each partition can be consumed by only one consumer group, so the parallelism of your service is bound by the number of partition the topic has.
The number of partitions is affected by two main factors, the number of messages and the avg size of each message. In case the volume is high you will need to use the number of brokers as a multiplier, to allow the load to be shared on all consumers and avoid creating a hot partition which will cause a high load on a specific broker. We aim to keep partition throughput up to 1MB per second.
Set Number of Partitions
--partitions [number]
REPLICAS
Kafka optionally replicates topic partitions in case the leader partition fails and the follower replica is needed to replace it and become the leader. When configuring a topic, recall that partitions are designed for fast read and write speeds, scalability, and for distributing large amounts of data. The replication factor (RF), on the other hand, is designed to ensure a specified target of fault-tolerance. Replicas do not directly affect performance since at any given time, only one leader partition is responsible for handling producers and consumer requests via broker servers.
Another consideration when deciding the replication factor is the number of consumers that your service needs in order to meet the production volume.
Set Replication Factor (RF) In case your topic is using keys, consider using RF 3 otherwise, 2 should be sufficient.
--replication-factor [number]
sudo apt-get update- Check Java
java --version - If Java is not installed:
apt-get install default-jre- If you need a Java development kit (JDK) that is needed to compile Java applications (for example: Apache Ant, Apache Maven, Eclipse or IntelliJ IDEA), then you need to install:
apt-get install default-jdk
- Download from (https://www.apache.org/dyn/closer.cgi/zookeeper/) example:
wget -P /home/master/zookeepertmp/ http://apache-mirror.rbc.ru/pub/apache/zookeeper/stable/apache-zookeeper-3.5.5-bin.tar.gz - Example unpack:
tar -xvzf /home/master/zookeepertmp/apache-zookeeper-3.5.5-bin.tar.gz --strip 1
- Copy config file:
cp /path/to/zookeeper/conf/zoo_sample.cfg /path/to/zookeeper/conf/zoo.cfg - Delete comments (OPTIONAL)
example config:
tickTime=2000
initLimit=5
syncLimit=2
dataDir=/clh/zookeeper/data
clientPort=2181
bin/zkServer.sh start
-
0️⃣ On each server, you need to add a local IP address to the Clickhouse hosts configuration /etc/clickhouse-server/config.xml:
<listen_host>::1</listen_host> <!-- or ipv4 -->
<listen_host>--local-ip-here--</listen_host>
-
1️⃣ Configure Zookeeper config on each replica server, example:
<zookeeper>
   <node>
      <host>--host or ip address here--</host>
      <port>2181</port>
   </node>
</zookeeper>
-
2️⃣ Configure macros file, or macros section:
- First replica on first shard:
<macros>
     <layer>01</layer>
     <shard>01</shard>
     <replica>clh-01</replica>
</macros>
- Second replica on second shard:
<macros>
     <layer>01</layer>
     <shard>02</shard>
     <replica>clh-02</replica>
</macros>
-
3️⃣ We create identical tables on each replica server, see: https://gist.github.com/zikwall/764673dfcd3c5fa4225b57a1a2899311#file-stat-sql
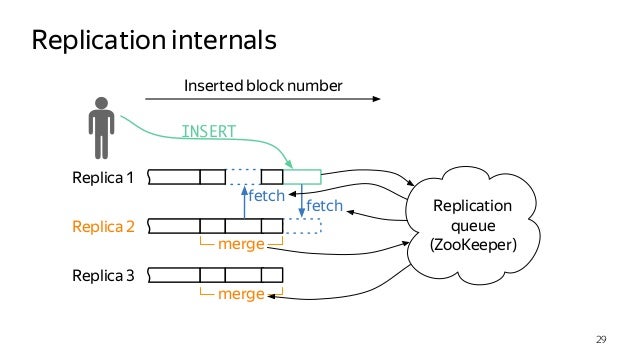
Those. each server will store a piece of the table (also called shards). But in this case, the work with the table becomes more complicated. After all, how to make a selection that processes all the data at once? For this, Clickhouse has a special table engine - Distributed. It just addresses the indicated problem. Instead of the functions of a regular table, it sends requests to different servers and collects data from them. Then the collected data is further processed locally (for example, grouped) and the results are returned to the client.
On a separate server (from which we will send requests) we will configure a cluster that points to shard servers. To do this, add the following to the <remote_servers> block in the settings file (/etc/clickhouse-server/config.xml):
- 1️⃣ Edit config.xml section remote servers or clickhouse_remote_servers.xml
example:
<remote_servers>
   <monit_cluster> <!--  cluster name -->
      <!-- first shard, one replica -->
      <shard>
         <replica>
            <host>--host_or_ip_address--</host>
            <port>9000</port>
            <password>--password_here--</password> <!-- for user default required -->
         </replica>
      </shard>
      <!-- second shart, one replica -->
      <shard>
         <replica>
            <host>--host_or_ip_address--</host>
            <port>9000</port>
            <password>--password_here--</password>
         </replica>
      </shard>
   </monit_cluster>
 </remote_servers>
You can fill in data from non-shard tables that could be generated by a GoLang script
Export table from not Replicated table, example: clickhouse-client -h::1 -udefault --password=passwordhere --max_threads=1 --query="select * from monit.stat where day_begin >= 1563310800 and day_begin <= 1563829200 FORMAT Native" > /home/bduser/clh_exports/stat_1563310800_1563829200.native
You may encounter errors, for example, a password entry field will be written to the dump. To fix you can do this trick
sed '1d' stat_1563397200.csv | clickhouse-client -h::1 -udefault --password=passhere --query="INSERT INTO monit.stat FORMAT CSV"This error can be resolved immediately by specifying the password in the command line when connecting clickhouse client
Import: clickhouse-client -h::1 -udefault --password --max_threads=1 --query="INSERT INTO monit.stat FORMAT Native" < stat_1563310800_1563829200.native
Import to Click House Server: cat table.tsv | clickhouse-client --query="INSERT INTO first_base.table_name FORMAT CSV" -h::1 --password
Export from MySQL to TSV: mysql -Bse "select all_fields_here from db_name.table_name_here" > table.tsv -h hostname -u username -p
Export from MySQL table (as CSV) AND INSERT TO Click House Table: mysql -u username -p --compress -ss -e "SELECT all_fields_here FROM db_name.table_name" test | sed 's/\"//g;s/\t/","/g;s/^/"/;s/$/"/' | clickhouse-client --query="INSERT INTO first_base.table_name FORMAT TSV" -h hostname
Setup action: /etc/rsyslog.d/default.conf
local6.* action(type="omprog" binary="/path/to/hadnler/(php), (go), (peyhton)")
Nginx setup: /etc/nginx/sites-available/your-service.conf
access_log syslog:server={ip:port},facility=local6 example_name_here;
Example PHP Handler @see: Here