- An officical implementation of AutoScale localization-based method, you can find regression-based method from here.
- AutoScale leverages a simple yet effective Learning to Scale (L2S) module to cope with significant scale variations in both regression and localization.
AutoScale_localization
|-- data            # generate target
|-- model           # model path
|-- README.md       # README
|-- centerloss.py
|-- config.py
|-- dataset.py
|-- find_contours.py
|-- fpn.py
|-- image.py
|-- make_npydata.py
|-- rate_model.py
|-- val.py
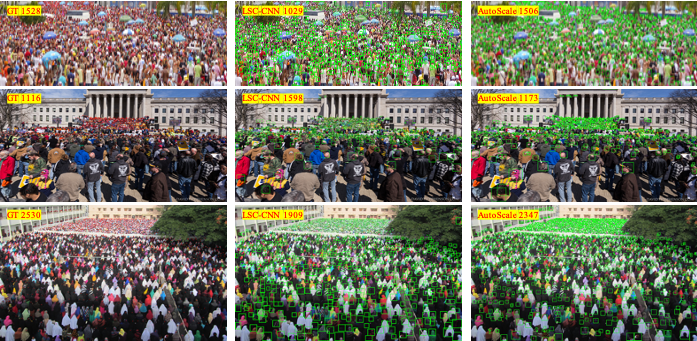
Qualitative visualization of distance label maps given by the proposed AutoScale.
Red points are the ground-truth. To more clearly present our localization results, we generate bounding boxes (green boxes) according to the KNN distance of each point, which follows and compares with LSC-CNN.
python >=3.6
pytorch >=1.0
opencv-python >=4.0
scipy >=1.4.0
h5py >=2.10
pillow >=7.0.0
imageio >=1.18
- Download ShanghaiTech dataset from Baidu-Disk, passward:cjnx
- Download UCF-QNRF dataset from Google-Drive
- Download JHU-CROWD ++ dataset from here
- Download NWPU-CROWD dataset from Baidu-Disk, passward:3awa
cd data
Edit "distance_generate_xx.py" to change the path to your original dataset folder.
python distance_generate_xx.py
“xx” means the dataset name, including sh, jhu, qnrf, and nwpu.
- QNRF link, passward:bbpr
- NWPU link, passward:gupa
- JHU link, passward:qr07
- ShanghaiA link, passward : ge32
- ShanghaiB link, passward : 2pq0
-
git clone https://github.com/dk-liang/AutoScale.git
cd AutoScale
chmod -R 777 ./count_localminma -
Download Dataset and Model
-
Generate target
-
Generate images list
Edit "make_npydata.py" to change the path to your original dataset folder.
Run python make_npydata.py
- Test
python val.py --test_dataset qnrf --pre ./model/QNRF/model_best.pth --gpu_id 0
python val.py --test_dataset jhu --pre ./model/JHU/model_best.pth --gpu_id 0
python val.py --test_dataset nwpu --pre ./model/NWPU/model_best.pth --gpu_id 0
python val.py --test_dataset ShanghaiA --pre ./model/ShanghaiA/model_best.pth --gpu_id 0
python val.py --test_dataset ShanghaiB --pre ./model/ShanghaiB/model_best.pth --gpu_id 0
More config information is provided inconfig.py
coming soon.
If you are interested in AutoScale, please cite our work:
@article{xu2019autoscale,
  title={AutoScale: Learning to Scale for Crowd Counting},
  author={Xu, Chenfeng and Liang, Dingkang and Xu, Yongchao and Bai, Song and Zhan, Wei and Tomizuka, Masayoshi and Bai, Xiang},
  journal={arXiv preprint arXiv:1912.09632},
  year={2019}
}
and
@inproceedings{xu2019learn,
  title={Learn to Scale: Generating Multipolar Normalized Density Maps for Crowd Counting},
  author={Xu, Chenfeng and Qiu, Kai and Fu, Jianlong and Bai, Song and Xu, Yongchao and Bai, Xiang},
  booktitle={Proceedings of the IEEE International Conference on Computer Vision},
  pages={8382--8390},
  year={2019}
}

