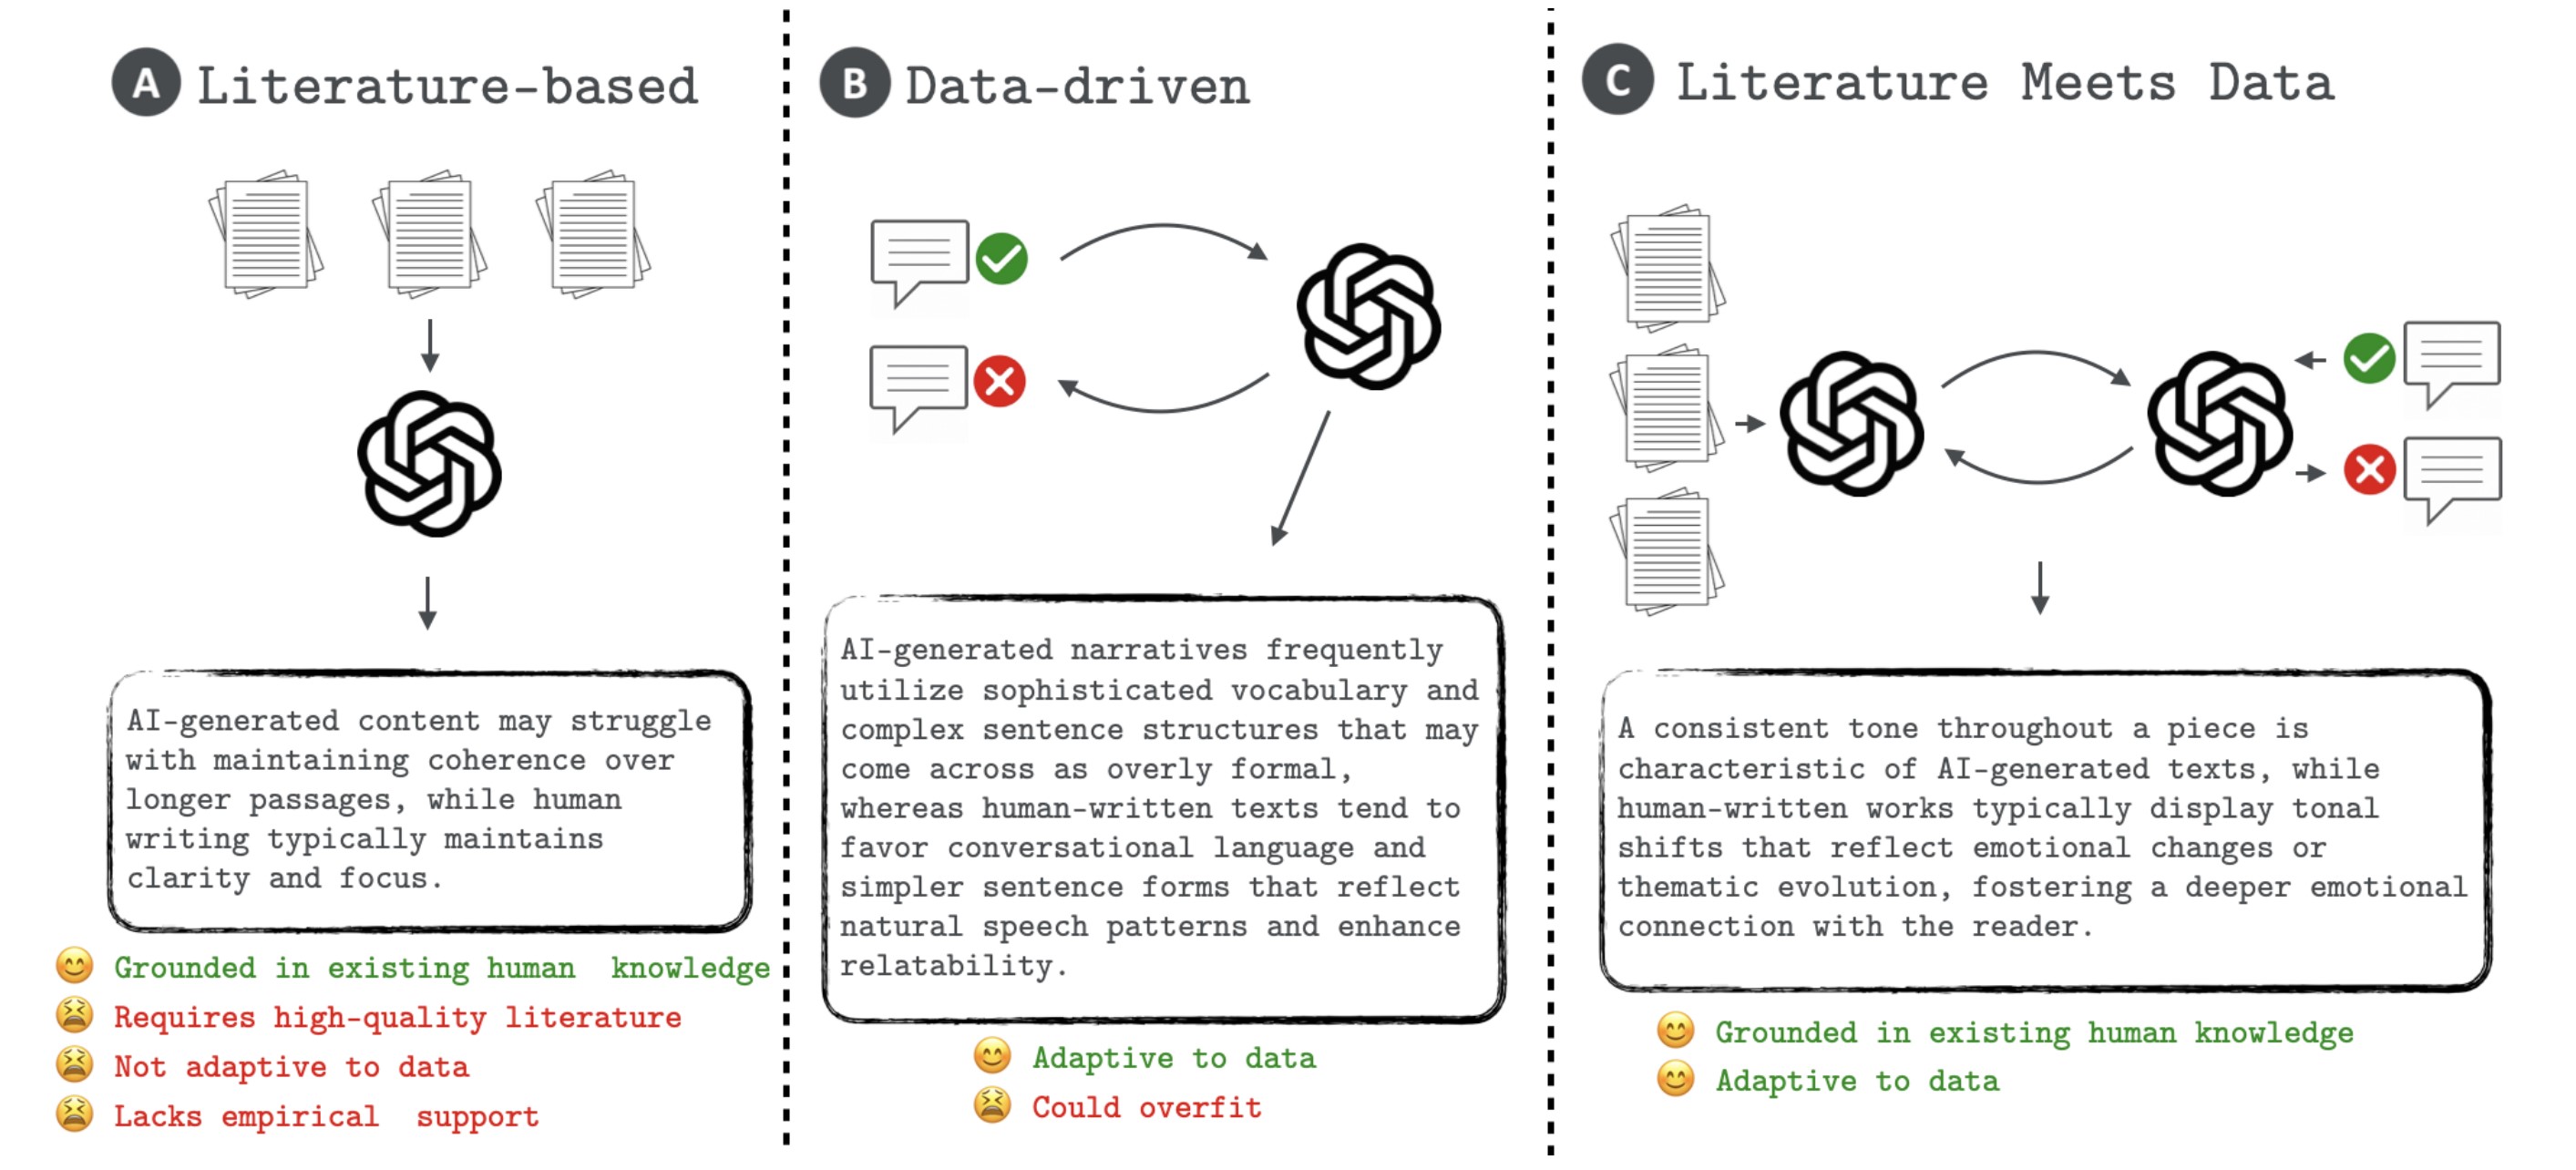
[Oct'24] Literature Meets Data: A Synergistic Approach to Hypothesis Generation
[Apr'24] Hypothesis Generation with Large Language Models
This repository is dedicated to the exploration and development of novel methodologies using large language models (LLMs) to generate hypotheses, a foundational element of scientific progress. Our works introduce frameworks for generating hypotheses with LLMs, specifically HypoGeniC (Hypothesis Generation in Context) is a data-driven framework that generates hypotheses solely based on given datasets, while HypoRefine is a synergistic approach that incorporates both existing literature and given datasets in an agentic framework to generate hypotheses. Additionally, modules of two Union methods Literature∪HypoGeniC and Literature∪HypoRefine are provided that mechanistically combine hypotheses from literature only with hypotheses from our frameworks. Our work highlights the capability of LLMs to assist and innovate in the hypothesis generation process for scientific inquiry.
- Install environment
- Optional: set up Redis server for caching LLM responses
- Usage
- Use HypoGeniC in your code
- Add a new task or dataset
You can directly install HypoGeniC using the following commands:
conda create --name hypogenic python=3.10
conda activate hypogenic

pip install hypogenic
OR
We recommend using the following installation procedure for easy update and customizability
git clone https://github.com/ChicagoHAI/hypothesis-generation.git
cd hypothesis-generation

conda create --name hypogenic python=3.10
conda activate hypogenic

pip install -r requirements.txt
pip install -e .
[Optional]: set up Redis server for caching LLM responses
To save computation or API cost, we use Redis server to cache prompt & response pairs.
Install Redis server from source using the following commands:
Note: Please install in the directory of PATH_PREFIX.
wget https://download.redis.io/redis-stable.tar.gz
tar -xzvf redis-stable.tar.gz
cd redis-stable
makeThe datasets used in our works are at HypoGeniC-datasets.
For replicating the results in the paper, you can follow the steps below:
The default port used by HypoGeniC is 6832. If you want to use a different port, please specify the port number in the --port argument.
cd $PATH_PREFIX/redis-stable/src
./redis-server --port 6832For help with the arguments, run:
hypogenic_generation --helpFor help with the arguments, run:
hypogenic_inference --helpWe will support command lines for HypoGeniC on new tasks and datasets in a later release.
To use HypoGeniC with you own code, tasks, and datasets, you can follow the steps below:
git clone https://github.com/ChicagoHAI/HypoGeniC-datasets.git ./data
python ./examples/generation.py
To use HypoRefine or Union methods, follow the steps below:
(There will be 3 hypothesis banks generated: HypoRefine, Hypotheses solely from literature, and Literature∪HypoRefine.)
git clone https://github.com/ChicagoHAI/Hypothesis-agent-datasets.git ./data
python ./examples/union_generation.py
To run default (best hypothesis) inference on generated hypotheses:
python ./examples/inference.pyTo run multiple-hypothesis inference on generated hypotheses:
python ./examples/multi_hyp_inference.pyMore examples can be found in examples/ directory.
- To use HypoGeniC, we require users to provide a dataset in the HuggingFace datasets format:
<TASK>_train.json: A json file containing the training data.<TASK>_test.json: A json file containing the test data.<TASK>_val.json: A json file containing the validation data.- The json file should have keys:
'text_features_1', ...'text_features_n','label'. The values corresponding to each key should be a list of strings.
For HypoRefine or Union methods, it is required for users to provide relevant literature PDFs and preprocess them following the steps below:
- Add PDF files to the directory: literature/YOUR_TASK_NAME/raw/
- Run the following lines:
bash ./modules/run_grobid.shIf you haven't set up grobid before:
bash ./modules/setup_grobid.shThen:
python ./examples/pdf_preprocess.py --task_name YOUR_TASK_NAME(We will support automated literature search in a later release.)
Create the config.yaml file in the same directory as the dataset. In the config.yaml file, please specify the following fields:
Note: For running a basic generation, you will need to write prompt templates for observations, batched_generation, and inference.
task_name: <TASK>

train_data_path: ./<TASK>_train.json
val_data_path: ./<TASK>_test.json
test_data_path: ./<TASK>_val.json

prompt_templates:
  # You can use keys in your dataset as placeholders in the prompt templates
  #   For example, if your dataset has a key 'text_features_1', you can use it as ${text_features_1}
  EXTRA_KEY1: <VALUES>
  EXTRA_KEY2: <VALUES>
  # ...

  # You can use EXTRA_KEYs above as placeholders in the prompt templates
  #   For example, You can use ${EXTRA_KEY1} in the prompt templates
  # Additionally, you can use the following placeholders in the prompt templates
  #   ${num_hypotheses}: Number of hypotheses to generate
  # The prompt templates are formatted as follows:
  #   [
  #     {"role": "role1", "content": "<ROLE1_PROMPT_TEMPLATE>"},
  #     {"role": "role2", "content": "<ROLE2_PROMPT_TEMPLATE>"},
  #     ...
  #   ]
  batched_generation:
    role1: <ROLE1_PROMPT_TEMPLATE>
    role2: <ROLE2_PROMPT_TEMPLATE>
    # ...
  few_shot_baseline:
    role1: <ROLE1_PROMPT_TEMPLATE>
    role2: <ROLE2_PROMPT_TEMPLATE>
    # ...
  inference:
    role1: <ROLE1_PROMPT_TEMPLATE>
    role2: <ROLE2_PROMPT_TEMPLATE>
    # ...
  is_relevant:
    role1: <ROLE1_PROMPT_TEMPLATE>
    role2: <ROLE2_PROMPT_TEMPLATE>
    # ...
  adaptive_inference:
    role1: <ROLE1_PROMPT_TEMPLATE>
    role2: <ROLE2_PROMPT_TEMPLATE>
    # ...
  adaptive_selection:
    role1: <ROLE1_PROMPT_TEMPLATE>
    role2: <ROLE2_PROMPT_TEMPLATE>
# ..../headline_binary/headline_binary_test.json
{
  "headline_1": [
    "What Up, Comet? You Just Got *PROBED*",
    "..."
  ],
  "headline_2": [
    "Scientists Everywhere Were Holding Their Breath Today. Here's Why.",
    "..."
  ],
  "label": [
    "Headline 2 has more clicks than Headline 1",
    "..."
  ]
}
./headline_binary/config.yaml
TODO: Instructions for customizing prompt to be updated
task_name: headline_binary

train_data_path: ./headline_binary_train.json
val_data_path: ./headline_binary_test.json
test_data_path: ./headline_binary_val.json

prompt_templates:
  observations: |
    Headline 1: ${headline_1}
    Headline 2: ${headline_2}
    Observation: ${label}

  # More EXTRA_KEYs

  batched_generation:
    system: |-
      ...
      Please propose ${num_hypotheses} possible hypotheses and generate them in the format of 1. [hypothesis], 2. [hypothesis], ... ${num_hypotheses}. [hypothesis].

    user: |-
      Here are the Observations:
      ${observations}

      Please generate hypotheses that can help determine which headlines have more clicks.
      Please propose ${num_hypotheses} possible hypotheses.

      Generate them in the format of 1. [hypothesis], 2. [hypothesis], ... ${num_hypotheses}. [hypothesis].

      Proposed hypotheses:

  # few_shot_baseline
  inference:
    system: |-
      ...

    user: |-
      ...

  # is_relevant
  # adaptive_inference
# adaptive_selectionAs we show in examples/generation.py, you can create a new task by using our BaseTask constructor (line 63). You need to implement the extract_label function for your new task. The extract_label function should take a string input (LLM generated inference text), and return the label extracted from the input.
If no extract_label function is provided, the default version will be used, which looks for final answer:\s+<begin>(.*)<end> in the LLM generated text.
Note: you need to make sure the extracted label are in same format with the 'label' in your dataset, since the extracted label will be compared with the true label to check correctness of each LLM inference.
