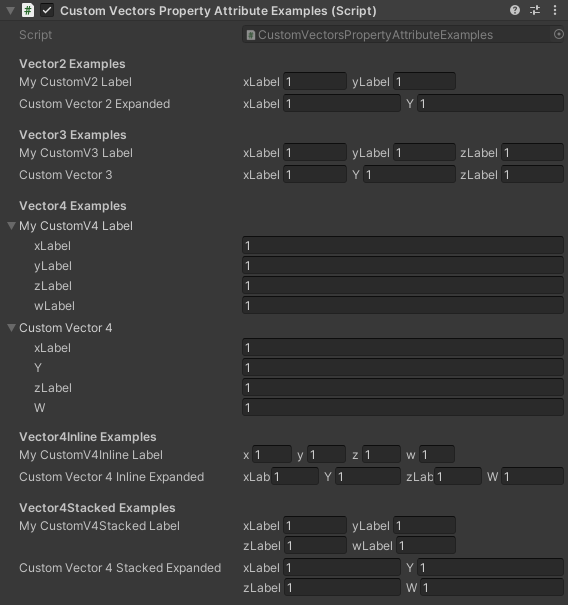
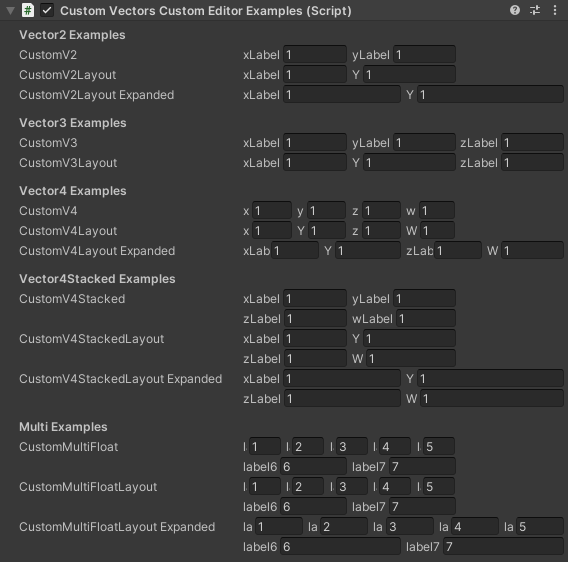
Custom Vectors provides you with various Vector property attributes and custom Editor GUI Vector fields for use in the Unity Editor.
Custom Vectors will grant you more flexibility for displaying Vector fields in the Unity Editor. This includes property attributes that can be used to change the prefix label, sub-labels, and field styling. There are also Custom Vectors fields that can be used in a custom editor to create Editor GUI Vector fields that better represent your intended usage. Lastly, Custom Vectors also has an enhanced version of the MultiFloatField and MultiIntField that allows you additional customization and formatting.
Note: This does NOT change the underlying structure of a Vector. The variables X, Y, Z, etc will remain the same when accessing the Vector itself. Custom Vectors only changes how a Vector is displayed in the Unity Editor.
To install this package using Unity's Package Manager follow these steps:
-
Access the Package Manager window from the Window menu. More Info
-
Click the add (+) button in the status bar then select Add package from git URL button. More Info
-
Enter the Git URL in the text box and click Add. More Info
Git URL: https://github.com/Dabblesoft-Dan/unity-editor-custom-vectors.git
Note: If Unity was able to install the package successfully, the package now appears in the package list with the git tag. If Unity was not able to install the package, the Unity Console displays an error message. More Info
First, it is recommended that you go to the Examples folder and look over the example scripts. These scripts have detailed examples in them and provide a reference for setting things up.
Note: If you want to edit these scripts be sure to make a copy of them into your Assets folder first and apply your edits there. You may need to change the script names as well.
To use Custom Vectors as a property attribute follow these steps:
- Add the Custom Vectors namespace to the top of your script:
using Dabblesoft.Unity.Editor.CustomVectors;- Above any public Vector variable type in the Custom Vectors attribute that fits your Vector type. For example, if you have a public Vector2 or Vector2Int variable you would type:
[CustomVector2()]- Pass in any arguements you would like to use to customize this Vector. For example, to pass in custom labels for the prefix label and sub-labels enter:
[CustomVector2("MyCustomVector2Name", "MyCustomXLabel", "MyCustomYLabel")]Tip: If you only want to pass in specific arguements then define it with the parameter name first. For example to change only the X sub-label and display expanded fields you would enter:
[CustomVector2(xLabel: "MyCustomXLabel", expandWidth: true)]To use Custom Vectors as a Editor GUI field follow these steps:
- Add the Custom Vectors namespace to the top of your script:
Recommended: Use aliases to avoid ambiguous references. You can name them whatever you like but in this case because these fields are named the same as the native UnityEditor.EditorGUI and UnityEditor.EditorGUILayout namespaces you can organize them better by building off the last part of the namespace. This way intelli-sense will order them next to the native versions they are based on. For example, try adding:
using EditorGUICV = Dabblesoft.Unity.Editor.CustomVectors.EditorGUI;
using EditorGUILayoutCV = Dabblesoft.Unity.Editor.CustomVectors.EditorGUILayout;- Create a Custom Vectors Editor GUI field. For example, to create a layout Vector2 field enter:
EditorGUILayoutCV.Vector2Field("MyCustomVector2Name", myV2.vector2Value);- Pass in any arguements you would like to use to customize this Vector. For example, to pass in custom labels for the prefix label and sub-labels enter:
EditorGUILayoutCV.Vector2Field("MyCustomVector2Name", myV2.vector2Value, "MyCustomXLabel", "MyCustomYLabel");Tip: If you only want to pass in specific arguements then define it with the parameter name first. For example, to change only the X sub-label and display expanded fields you would enter:
EditorGUILayoutCV.Vector2Field("MyCustomVector2Name", myV2.vector2Value, xLabel: "MyCustomXLabel", expandWidth: true);This version of Custom Vectors is compatible with the following versions of the Unity:
- 2019.1 and later (recommended)


