A deep learning framework written from scratch using NumPy.
This is a vanilla deep learning framework which is implemented from scrach using pure NumPy library. The main purpose isn't, of course, to put together yet another powerful auto-grad library (with cpu-only NumPy, seriously?), but instead to document and summarize the math behind the most commonly seen deep learning building blocks when I recently reviewed them.
All the forward pass, backward pass, initialization, update, etc., are implemented with numpy matrix operations; no magic wrappers behind whatsoever. It's a good reference for practitioners in this field (might just be me) to review the basics, and also for people who just started to see how the black box (or more precisely, boxes) works under the scene.
Simply out of personal preference, Pytorch is chosen to be the "ground truth" reference to verify the implementation. Also, the interfaces have a similar style with Pytorch.
Dependency:
- NumPy >= 1.18.0
- scikit-learn >= 0.20.0
Clone the repository and set up python search path:
git clone https://github.com/DianCh/numpy-deep-learning.git
export PYTHONPATH=<your-chosen-location>/numpy-deep-learning:$PYTHONPATHSo far, this framework contains implementation of several core layers and a complete suite of tools needed to train & evaluate a network. Specifically, the ndl package contains:
- layers (
Linear,Conv2D,ReLU,Pool2D, etc.) - loss funtions (
CrossEntropyLoss, etc.) - optimizers (
SGDwith momentum, etc.) - schedulers (
StepLR,MultiStepLR, etc.) - trainers (
MultiClassTrainer, etc.) - models (
Sequential,MultiLayerPerceptron,SimpleConvNet, etc.) - utils for tensor manipulation & data loading, etc.
With down-to-earth, easy-to-read implementation, these components can serve as a referece revealing the core pipeline & mechanism of major deep learning frameworks on the market. What's even cooler, is that these components actually allow you to put together a complete experiment to test out your own ideas! Checkout the Experiment section below!
There will be more components to come (I have a list of TODOs). Stay tuned!
The deep learning components are packaged into ndl, while scripts of different experiments are grouped under experiments. Before running the experiments, please run the following the script to get MNIST and CIFAR10 datasets ready on your local machine:
python prepare_data.pyThen by default you should have the follow folders for your data inside this repo:
├── data
│   ├── cifar-10-batches-py
│   └── mnist-784
If you prefer to put data elsewhere, you can also achieve that by setting NDL_DATA_ROOT environment variable. If you are playing with other datasets, you might also want to include the preparing steps here.
(Note: currently this vanilla framework doesn't support accumulating gradients of multiple forward passes; only the last forward pass will count.)
In this experiment, we are going to train a Multi-Layer Perceptron classifier to classify hand-written digits from the MNIST dataset. Run the following script with data root pointing to where you put MNIST dataset (if you didn't specify a custom location with , then it's simply data/mnist-784):
python experiments/mnist_mlp.py <your-data-root>/mnist-784To save the complexity from creating config files or making argument parsers, configurations & hyperparameters (number of epochs, batch size, learning rate, etc., see __main__ block) can be directly modified inside experiments/mnist_mlp.py.
The script will:
- build an MLP classifier
- train the classifier on MNIST train split
- evaluate the classifier on MNIST test split
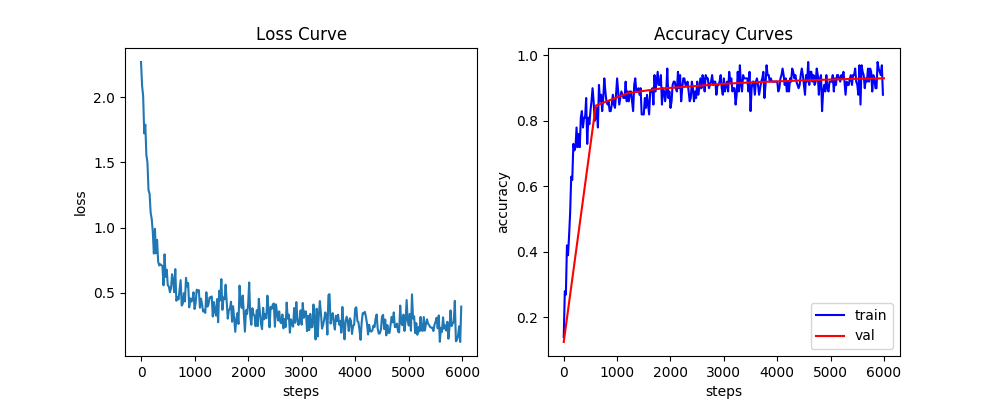
During the experiment, you should see metrics being printed along the way. You can also set show_curve=True in the __main__ to draw the loss & accuracy curves which will be saved as metrics.png. As an example, with the default settings in the script, you can get something similar to this plot, with accuracy converged to approx. 0.94:
If you are interested in seeing how the model performs on classifying each digit, you can get a result breakdown the looks like:
Test accuracy after 10 epochs: 0.938
Accuracy of digit 0: 0.978
Accuracy of digit 1: 0.981
Accuracy of digit 2: 0.904
Accuracy of digit 3: 0.927
Accuracy of digit 4: 0.925
Accuracy of digit 5: 0.899
Accuracy of digit 6: 0.936
Accuracy of digit 7: 0.927
Accuracy of digit 8: 0.884
Accuracy of digit 9: 0.915
As a reference, the experiment with the default settings finishes within approx. 10 seconds on my i7 macbook pro.
In this experiment, we are going to train a classifier to recognize objects on the CIFAR10 dataset, but this time with a Convolutional Neural Network. Similarly to the MLP experiment, run the following script with your data root provided, which now should point to the CIFAR10 dataset (by default data/cifar-10-batches-py):
python experiments/cifar10_cnn.py <your-data-root>/cifar-10-batches-pySimilarly, don't forget to play around with configurations & hyperparameters in the __main__ block of the script.
The default model provided has several convolutional layers which are followed by several fully connected layers. Feel free to experiment with your own architecture with building blocks from ndl.layers (but maybe don't go too wild since the computation might become really slow if you throw in too many layers, well, if you want to finish the training).
The script will:
- build a classifier using convolutional layers & fully connected layers
- train the classifier on CIFAR10 train split
- evaluate the classifier on CIFAR10 test split
In this experiment, you will probably notice that the training is much slower than our last MLP experiment. This is mainly because the number of operations (#multiplication, #addition) involved with the layers boosted (try to verify this yourself with a pen on a piece of paper!). Also since the NumPy operations aren't quite optimized (both my implementation and Numpy itself) as well as Pytorch in terms of manipulating tensors,the slow-down becomes noticeable.
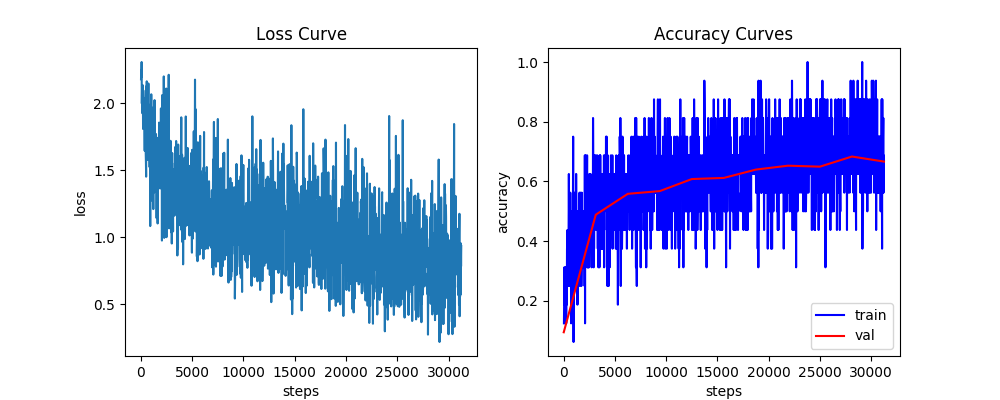
With the provided default settings, you can get a plot similar to this (accuracy converged to approx. 0.67):
The breakdown accuracies for each class looks like something to:
Test accuracy after 10 epochs: 0.667
Accuracy of plane: 0.755
Accuracy of car: 0.836
Accuracy of bird: 0.583
Accuracy of cat: 0.459
Accuracy of deer: 0.425
Accuracy of dog: 0.582
Accuracy of frog: 0.825
Accuracy of horse: 0.711
Accuracy of ship: 0.825
Accuracy of truck: 0.665
As a reference, the experiment with the default settings finishes within approx. 15 minutes on my i7 macbook pro.
This experiment is for testing out the running speed of some NumPy-implemented layers. Specifically, for Conv2D and Pool2D, I've used 3 levels of vectorization to implement their forward pass and backward pass, which included 2-layer, 3-layer and 4-layer for-loops (if you don't know what I'm talking about you may go check ndl.layers.conv2d and ndl.layers.pool2d).
For 2D convolutional layers, Conv2D, Conv2DTwoFold, Conv2DThreeFold and Conv2DFourFold are benchmarked. They are ordered descendingly in terms of level of optimization/vectorization, but feel free to start reading reversely with minimum vectorization if you want to understand the math, and gradually add the juice back. The same is true for Pool2D, Pool2DThreeFold and Pool2DFourFold; both max pooling and average pooling are considered.
Simply run:
python experiments/layers_benchmark.pyAgain, as a reference, the output on my macbook looks like:
Benchmarking Conv2D...
All variants' forward are consistent.
All variants' backward are consistent.
Conv2D with im2col used 0.025 seconds for 3 forward passes, 0.045 seconds for 3 backward passes.
Conv2DTwoFold used 0.239 seconds for 3 forward passes, 0.496 seconds for 3 backward passes.
Conv2DThreeFold used 1.281 seconds for 3 forward passes, 3.802 seconds for 3 backward passes.
Conv2DFourFold used 6.135 seconds for 3 forward passes, 9.988 seconds for 3 backward passes.
------
Benchmarking Max Pool2D...
All variants' forward are consistent.
All variants' backward are consistent.
Pool2D used 0.042 seconds for 3 forward passes, 0.107 seconds for 3 backward passes.
Pool2DThreeFold used 0.322 seconds for 3 forward passes, 1.014 seconds for 3 backward passes.
Pool2DFourFold used 1.914 seconds for 3 forward passes, 5.590 seconds for 3 backward passes.
------
Benchmarking Avg Pool2D...
All variants' forward are consistent.
All variants' backward are consistent.
Pool2D used 0.053 seconds for 3 forward passes, 0.068 seconds for 3 backward passes.
Pool2DThreeFold used 0.526 seconds for 3 forward passes, 0.777 seconds for 3 backward passes.
Pool2DFourFold used 3.091 seconds for 3 forward passes, 3.661 seconds for 3 backward passes.This repo uses MIT license.

