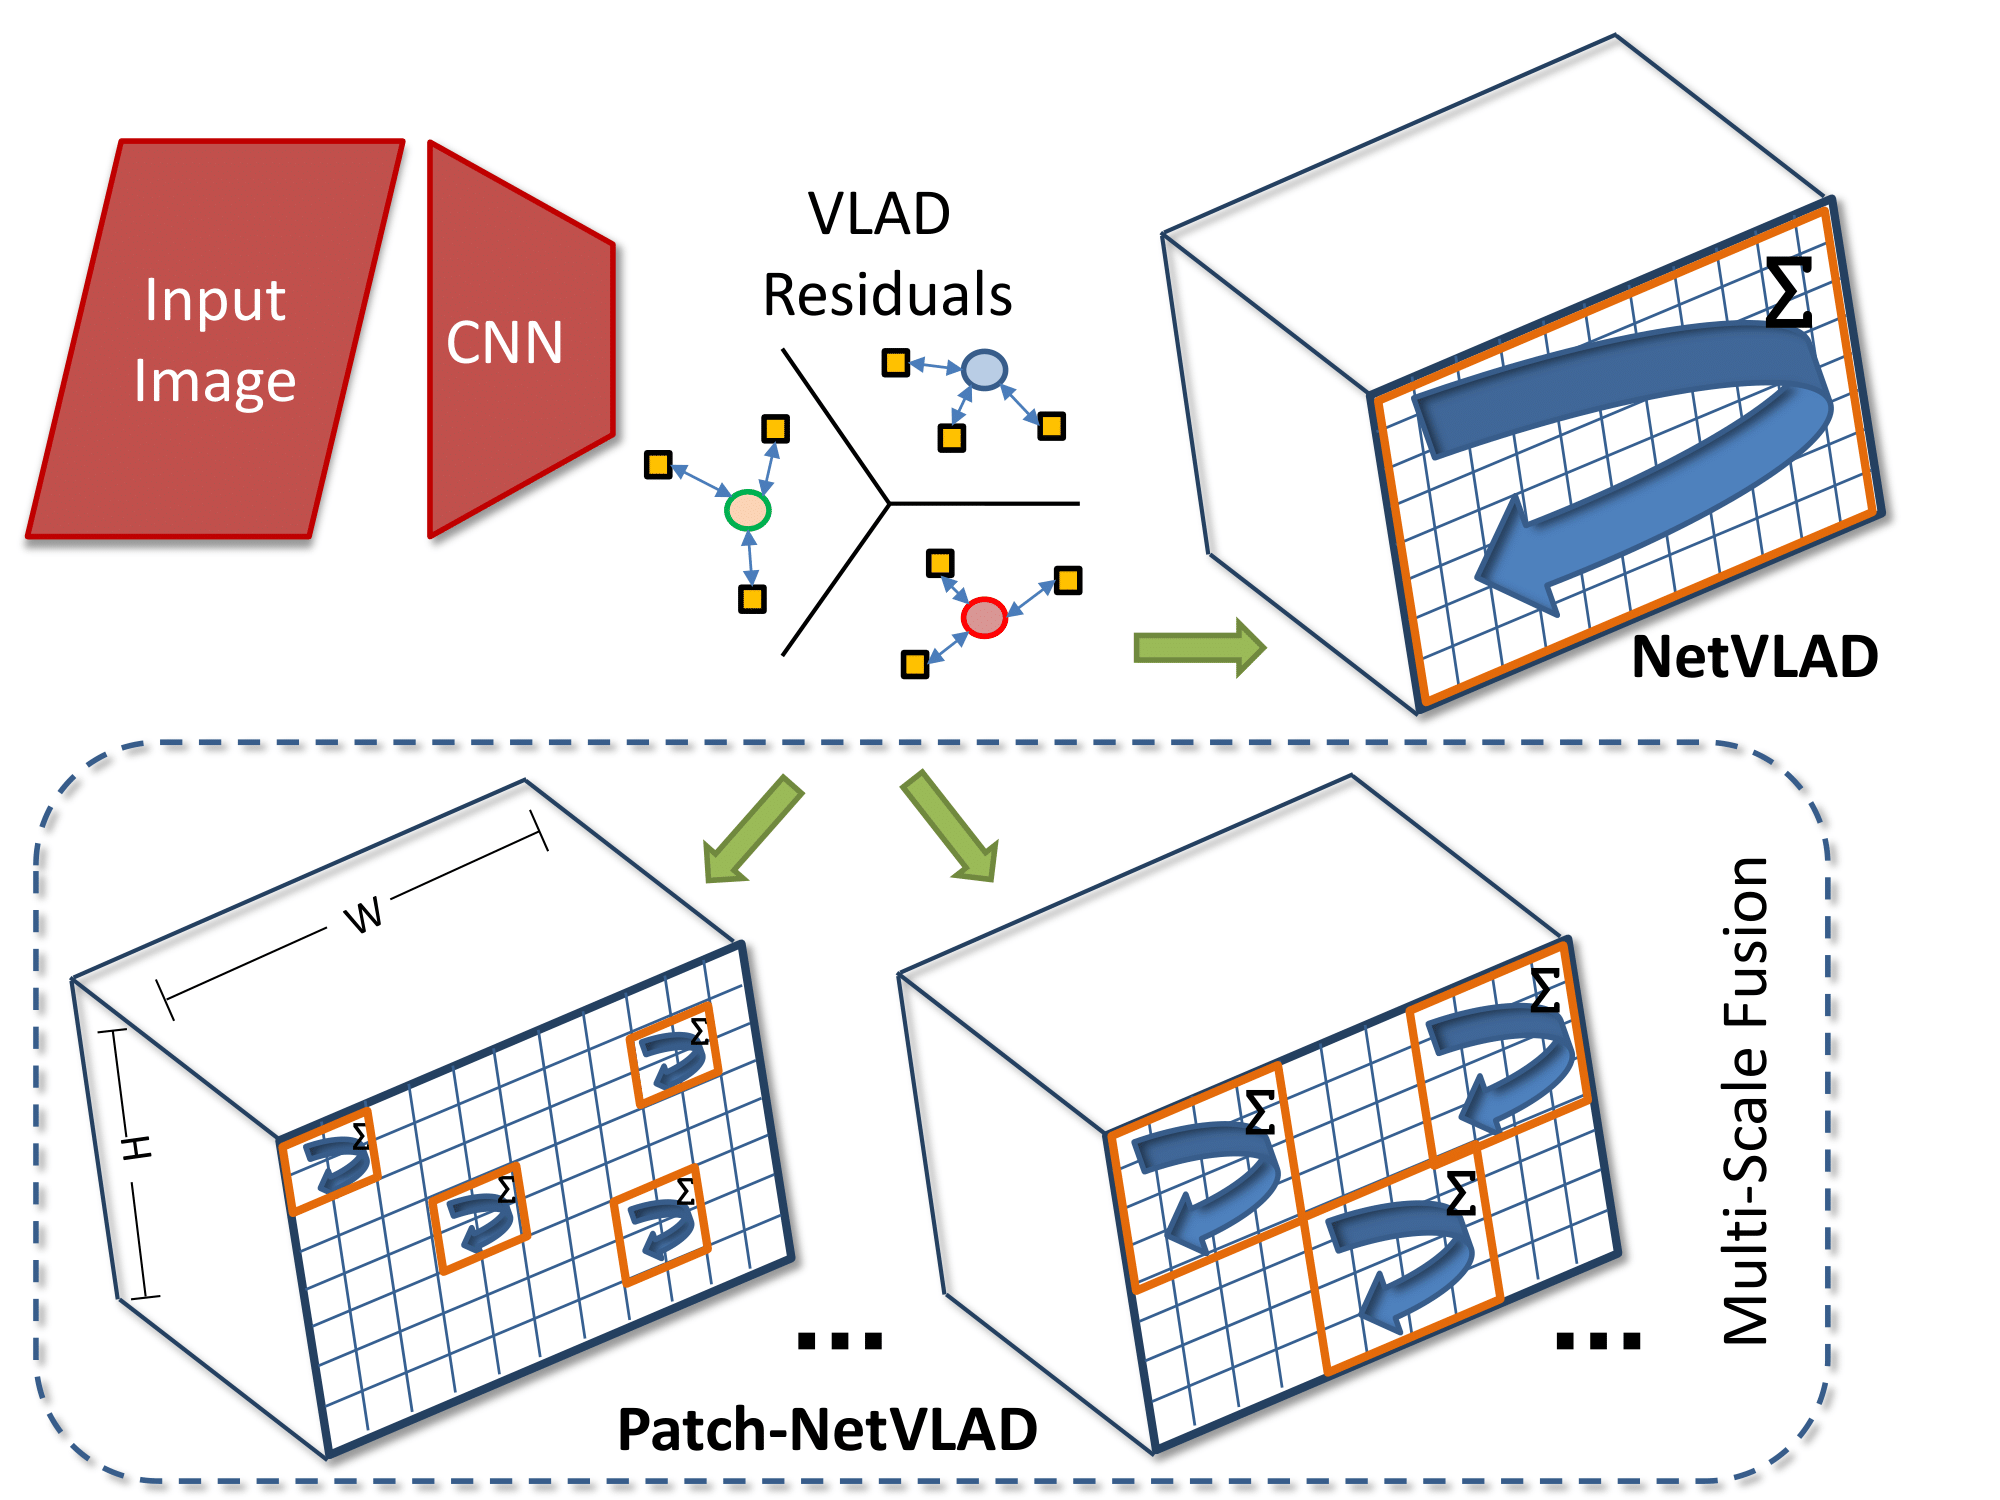
This repository contains code for the CVPR2021 paper "Patch-NetVLAD: Multi-Scale Fusion of Locally-Global Descriptors for Place Recognition"
The article can be found on arXiv and the official proceedings.
When using code within this repository, please refer the following paper in your publications:
@inproceedings{hausler2021patchnetvlad,
  title={Patch-NetVLAD: Multi-Scale Fusion of Locally-Global Descriptors for Place Recognition},
  author={Hausler, Stephen and Garg, Sourav and Xu, Ming and Milford, Michael and Fischer, Tobias},
  booktitle={Proceedings of the IEEE/CVF Conference on Computer Vision and Pattern Recognition},
  pages={14141--14152},
  year={2021}
}
The code is licensed under the MIT License.
We recommend using conda (or better: mamba) to install all dependencies. If you have not yet installed conda/mamba, please download and install mambaforge. Note that issues with recent NumPy versions have been reported - please use numpy=1.21 which we know works.
# On Linux:
conda create -n patchnetvlad python numpy=1.21 pytorch-gpu torchvision natsort tqdm opencv pillow scikit-learn faiss matplotlib-base -c conda-forge
# On MacOS (x86 Intel processor):
conda create -n patchnetvlad python numpy=1.21 pytorch torchvision natsort tqdm opencv pillow scikit-learn faiss matplotlib-base -c conda-forge
# On MacOS (ARM M1/M2 processor):
conda create -n patchnetvlad python numpy=1.21 pytorch torchvision natsort tqdm opencv pillow scikit-learn faiss matplotlib-base -c conda-forge -c tobiasrobotics
# On Windows:
conda create -n patchnetvlad python numpy=1.21 natsort tqdm opencv pillow scikit-learn faiss matplotlib-base -c conda-forge
conda activate patchnetvlad
conda install pytorch torchvision torchaudio pytorch-cuda=11.7 -c pytorch -c nvidia

conda activate patchnetvlad
We provide several pre-trained models and configuration files. The pre-trained models will be downloaded automatically into the pretrained_models the first time feature extraction is performed.
Alternatively, you can manually download the pre-trained models into a folder of your choice; click to expand if you want to do so.
We recommend downloading the models into the pretrained_models folder (which is setup in the config files within the configs directory):
# Note: the pre-trained models will be downloaded automatically the first time feature extraction is performed
# the steps below are optional!

# You can use the download script which automatically downloads the models:
python ./download_models.py

# Manual download:
cd pretrained_models
wget -O mapillary_WPCA128.pth.tar https://huggingface.co/TobiasRobotics/Patch-NetVLAD/resolve/main/mapillary_WPCA128.pth.tar?download=true
wget -O mapillary_WPCA512.pth.tar https://huggingface.co/TobiasRobotics/Patch-NetVLAD/resolve/main/mapillary_WPCA512.pth.tar?download=true
wget -O mapillary_WPCA4096.pth.tar https://huggingface.co/TobiasRobotics/Patch-NetVLAD/resolve/main/mapillary_WPCA4096.pth.tar?download=true
wget -O pittsburgh_WPCA128.pth.tar https://huggingface.co/TobiasRobotics/Patch-NetVLAD/resolve/main/pitts_WPCA128.pth.tar?download=true
wget -O pittsburgh_WPCA512.pth.tar https://huggingface.co/TobiasRobotics/Patch-NetVLAD/resolve/main/pitts_WPCA512.pth.tar?download=true
wget -O pittsburgh_WPCA4096.pth.tar https://huggingface.co/TobiasRobotics/Patch-NetVLAD/resolve/main/pitts_WPCA4096.pth.tar?download=true
wget -O landmarks_WPCA4096.pth.tar https://huggingface.co/TobiasRobotics/Patch-NetVLAD/resolve/main/landmarks_WPCA4096.pth.tar?download=true
If you want to use the shortcuts patchnetvlad-match-two, patchnetvlad-feature-match and patchnetvlad-feature-extract, you also need to run (which also lets you use Patch-NetVLAD in a modular way):
pip3 install --no-deps -e .Replace performance.ini with speed.ini or storage.ini if you want, and adapt the dataset paths - examples are given for the Pittsburgh30k dataset (simply replace pitts30k with tokyo247 or nordland for these datasets).
python feature_extract.py \
  --config_path patchnetvlad/configs/performance.ini \
  --dataset_file_path=pitts30k_imageNames_index.txt \
  --dataset_root_dir=/path/to/your/pitts/dataset \
  --output_features_dir patchnetvlad/output_features/pitts30k_index
Repeat for the query images by replacing _index with _query. Note that you have to adapt dataset_root_dir.
python feature_match.py \
  --config_path patchnetvlad/configs/performance.ini \
  --dataset_root_dir=/path/to/your/pitts/dataset \
  --query_file_path=pitts30k_imageNames_query.txt \
  --index_file_path=pitts30k_imageNames_index.txt \
  --query_input_features_dir patchnetvlad/output_features/pitts30k_query \
  --index_input_features_dir patchnetvlad/output_features/pitts30k_index \
  --ground_truth_path patchnetvlad/dataset_gt_files/pitts30k_test.npz \
  --result_save_folder patchnetvlad/results/pitts30k
Note that providing ground_truth_path is optional.
This will create three output files in the folder specified by result_save_folder:
recalls.txtwith a plain text output (only ifground_truth_pathis specified)NetVLAD_predictions.txtwith top 100 reference images for each query images obtained using "vanilla" NetVLAD in Kapture formatPatchNetVLAD_predictions.txtwith top 100 reference images from above re-ranked by Patch-NetVLAD, again in Kapture format
python match_two.py \
--config_path patchnetvlad/configs/performance.ini \
--first_im_path=patchnetvlad/example_images/tokyo_query.jpg \
--second_im_path=patchnetvlad/example_images/tokyo_db.png
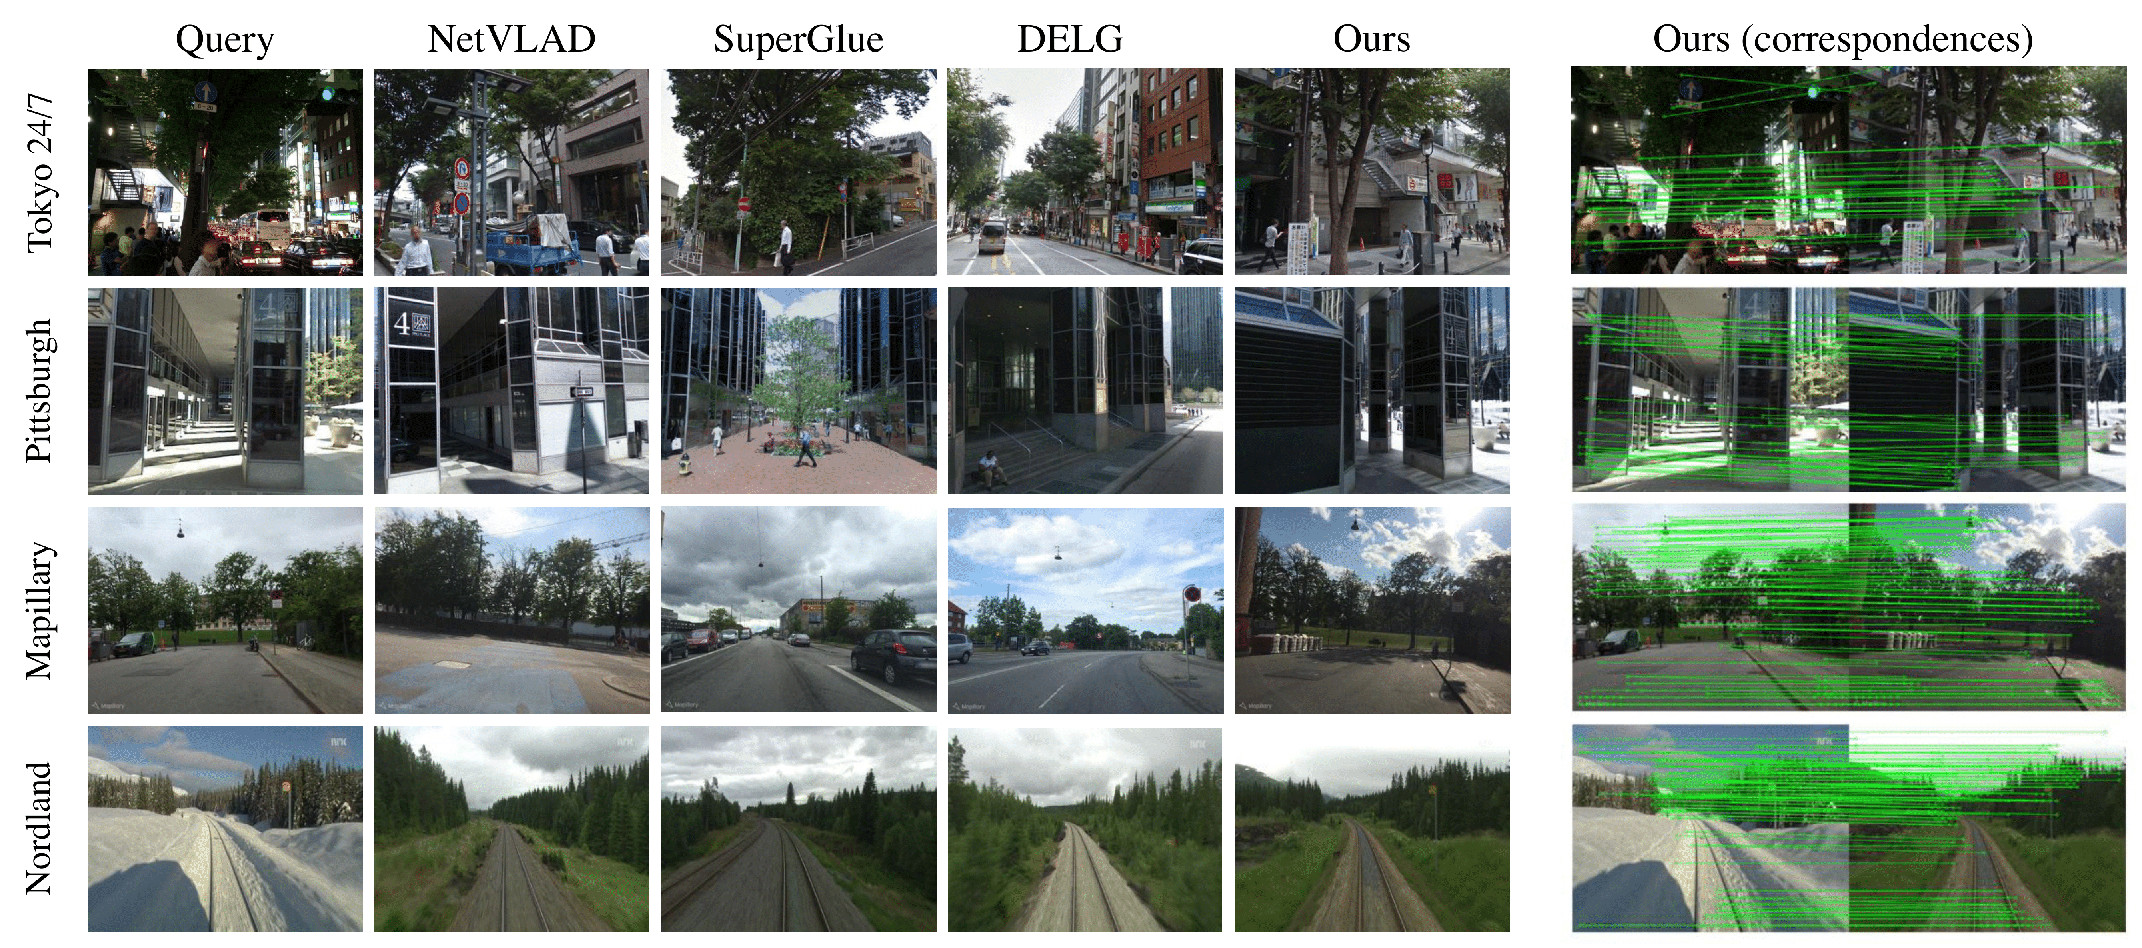
We provide the match_two.py script which computes the Patch-NetVLAD features for two given images and then determines the local feature matching between these images. While we provide example images, any image pair can be used.
The script will print a score value as an output, where a larger score indicates more similar images and a lower score means dissimilar images. The function also outputs a matching figure, showing the patch correspondances (after RANSAC) between the two images. The figure is saved as results/patchMatchings.png.
python train.py \
--config_path patchnetvlad/configs/train.ini \
--cache_path=/path/to/your/desired/cache/folder \
--save_path=/path/to/your/desired/checkpoint/save/folder \
--dataset_root_dir=/path/to/your/mapillary/dataset
To begin, request, download and unzip the Mapillary Street-level Sequences dataset (https://github.com/mapillary/mapillary_sls). The provided script will train a new network from scratch, to resume training add --resume_path and set to a full path, filename and extension to an existing checkpoint file. Note to resume our provided models, first remove the WPCA layers.
After training a model, PCA can be added using add_pca.py.
python add_pca.py \
--config_path patchnetvlad/configs/train.ini \
--resume_path=full/path/with/extension/to/your/saved/checkpoint \
--dataset_root_dir=/path/to/your/mapillary/dataset
This will add an additional checkpoint file to the same folder as resume_path, except including a WPCA layer.
We provide three ready-to-go ground truth files in the dataset_gt_files folder, however, for evaluation on other datasets you will need to create your own .npz ground truth data files.
Each .npz stores three variables: utmQ (a numpy array of floats), utmDb (a numpy array of floats) and posDistThr (a scalar numpy float).
Each successive element within utmQ and utmDb needs to correspond to the corresponding row of the image list file. posDistThr is the ground truth tolerance value (typically in meters).
The following mock example details the steps required to create a new ground truth file:
- Collect GPS data for your query and database traverses and convert to utm format. Ensure the data is sampled at the same rate as your images.
- Select your own choice of posDistThr value.
- Save these variables using Numpy, such as this line of code:
np.savez('dataset_gt_files/my_dataset.npz', utmQ=my_utmQ, utmDb=my_utmDb, posDistThr=my_posDistThr)
We would like to thank Gustavo Carneiro, Niko Suenderhauf and Mark Zolotas for their valuable comments in preparing this paper. This work received funding from the Australian Government, via grant AUSMURIB000001 associated with ONR MURI grant N00014-19-1-2571. The authors acknowledge continued support from the Queensland University of Technology (QUT) through the Centre for Robotics.
Please check out this collection of related works on place recognition.


