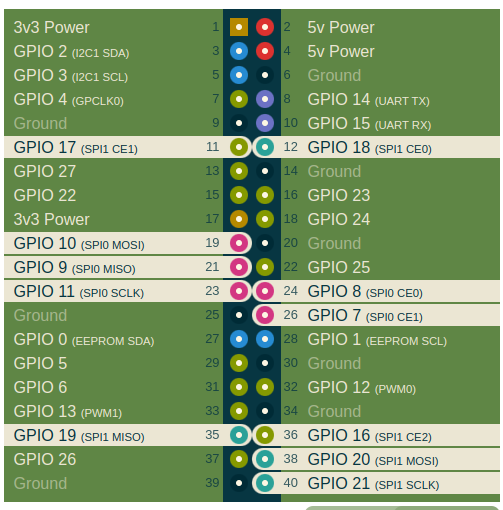
This is a documention repo on how can you make your Raspberry Pi a medium for debugging and communicating to dronecan nodes through CAN and SWD
via MCP2515
| RP4 HEADR | RP4 GPIO | SIGNAL | MCP2515 TJA1050 MODULE |
|---|---|---|---|
| #01 | Power | 3,3V | VCC |
| #02 | Power | 5V | Extra wire to TJA1050 VCC |
| #06 | Power | GND | GND |
| #09 | Power | GND | GND to CAN BUS (there is no GND terminal on CAN MODULE) |
| #19 | GPIO 10 | MOSI | SI |
| #21 | GPIO 9 | MISO | SO |
| #23 | GPIO 11 | SCLK | SCK/CLK |
| #24 | GPIO 8 | SPI0.CE0 | CS |
| #32 | GPIO 12 | INT | INT |
-
Inteface Configuration
- update your packages
sudo apt update && sudo apt upgrade; - append the following lines to your configration file located in
/boot/config.txt:[all] dtparam=spi=on #dtoverlay=mcp2515-can0,oscillator=<oscillator-frequency-in-hertz>,interrupt=<gpio-for-interrupt-pin> # in our case dtoverlay=mcp2515-can0,oscillator=16000000,interrupt=12 - install can-utils
sudo apt install can-utils - evaluate if the can0 is on your SPI bus
ls /sys/bus/spi/devices/spi0.0/net/(it should show 'can0') - set up yor can interface
sudo ip link set can0 up type can bitrate 1000000the bitrate for our case is 1000000, you may change it to your preffered bitrate
- check if can0 is interface
sudo ifconfigmbed@ahuratus:~ $ ifconfig can0: flags=193<UP,RUNNING,NOARP> mtu 16 unspec 00-00-00-00-00-00-00-00-00-00-00-00-00-00-00-00 txqueuelen 10 (UNSPEC) RX packets 396 bytes 3168 (3.0 KiB) RX errors 0 dropped 0 overruns 0 frame 0 TX packets 0 bytes 0 (0.0 B) TX errors 0 dropped 0 overruns 0 carrier 0 collisions 0 - Finally now you can send or receive something overthe bus using
candumpandcansendmbed@ahuratus:~ $ candump can0 can0 1801555C [8] 1A 00 00 00 00 02 00 D4 can0 1801555C [8] 1B 00 00 00 00 02 00 D5 can0 1801555C [8] 1B 00 00 00 00 02 00 D6
- update your packages
via BCM2835 and Open On-Chip Debugger
- Signal Connection
| RP4 HEADR | RP4 GPIO | SIGNAL |
|---|---|---|
| #17 | Power | 3,3V |
| #20 | Power | GND |
| #18 | GPIO 24 | SWCLK |
| #22 | GPIO 25 | SWIO |
-
Build and Install openocd
- Install building utils
sudo apt-get install git autoconf libtool make pkg-config libusb-1.0-0 libusb-1.0-0-dev - Clone openocd repository
git clone http://openocd.zylin.com/openocd cd openocd;chmod +x ./bootstrap; chmod +x ./configure;./bootstrap- configure bcm2835
./configure --enable-sysfsgpio --enable-bcm2835gpio make- Install openocd
sudo make install
- Install building utils
-
configre swd via openocd on raspberry pi 4
- create an openocd interface in directory
<openocd_directory>/scripts/interface/raspberrypi4-native.cfgusing the following command
sudo echo "# # Config for using Raspberry Pi's expansion header # # This is best used with a fast enough buffer but also # is suitable for direct connection if the target voltage # matches RPi's 3.3V and the cable is short enough. adapter driver bcm2835gpio bcm2835gpio peripheral_base 0x3F000000 # Transition delay calculation: SPEED_COEFF/khz - SPEED_OFFSET # These depend on system clock, calibrated for stock 700MHz # bcm2835gpio speed SPEED_COEFF SPEED_OFFSET bcm2835gpio speed_coeffs 146203 36 # Each of the SWD lines need a gpio number set: swclk swdio # swd gpio pins swclk swio adapter gpio swclk 24 adapter gpio swdio 25 adapter speed 100 transport select swd " > /usr/local/share/openocd/scripts/interface/raspberrypi4-native.cfg- Now create your gdb configuration
echo " source [find interface/raspberrypi4-native.cfg] # for STM32F1xx mcus set CHIPNAME stm32f1 source [find target/stm32f1x.cfg] # did not yet manage to make a working setup using srst #reset_config srst_only reset_config srst_nogate init targets reset halt ">openocd.cfg - start debugging
sudo openocdmbed@ahuratus:~ $ openocd Open On-Chip Debugger 0.12.0-rc2+dev-00019-g9d925776b (2022-11-23-13:01) Licensed under GNU GPL v2 For bug reports, read http://openocd.org/doc/doxygen/bugs.html Info : BCM2835 GPIO JTAG/SWD bitbang driver Info : clock speed 1001 kHz Info : SWD DPIDR 0x1ba01477 Info : [stm32f1.cpu] Cortex-M3 r1p1 processor detected Info : [stm32f1.cpu] target has 6 breakpoints, 4 watchpoints Info : starting gdb server for stm32f1.cpu on 3333 Info : Listening on port 3333 for gdb connections [stm32f1.cpu] halted due to debug-request, current mode: Thread xPSR: 0x01000000 pc: 0x080015b8 msp: 0x20005000 Info : Listening on port 6666 for tcl connections Info : Listening on port 4444 for telnet connections
- create an openocd interface in directory

