Turtlebot arm ROS project
The class project is about implementing a scenario where multiple robots will work together to perform a cetain task. We have a turtlebot and two arms sitting on two seperate tables, one is in the load area and the other is in the drop area. The turtlebot needs to navivate its way to the load area, then, the arm will pick a cube from the table and places it on top of the turtlebot, this happens once it receives a message from the turtlebot that it has reached the load area. Once the placing is done, the turtlebot needs to navigate its way to the drop area. After this comes our part of the task. Once the turtlebot reaches the drop area, the arm will receive a message from the robot indicating that it is positioned in the right place. After this, we need to detect the cube, then the arm should pick it and place it on top of the table and the task is done! The setup looks like this :

This repository contains all the code necessary to allow the turtlebot arm PhantomX Pincher to perform a specific task along with the Kinect v1. The task is as follows : we will use the kinect to detect a green cube on top of a turtlebot, the arm then will pick that cube and place it on top of the table -more on the setup can be found in the setup section.
In this readMe file you will find explanations regarding the following sections :
- A summary of the code files used.
- Steps taken by our team to ensure the task is working properly including :
- Our contribution to the pre-existing repository (that could be found here), specifically regarding :
- How to? A tutorial-like section on how to :
- Results obtained.
- Problems encountred.
- Suggested improvements.
- Conclusion.
- References.
The code included in the repository is in a nutshell doing the following tasks :
- turtlebot_arm_block_manipulation : this folder includes the code necessary to run if you want to start testing immediatly, it contains a lunch file in the demo folder named block_manip_complete.launch. If you run this launch file, you will be able to see first hand how the process work without having to intervene in anything, just run it and you're good to go!
- turtlebot_arm_bringup : this folder includes some necessary configuration files to make the turtlebot arm work (you don't need to worry about this code nor do you need to modify it).
- turtlebot_arm_description : this folder includes the files that ensure we have a virtual model of our robot (urdf files).
- turtlebot_arm_kinect_calibration : this folder includes the code necessary to calibrate the Kinect with turtlebot arm.
- turtlebot_arm_moveit_config : this folder includes the code necessary for the turtlebot arm to move (kinematics).
- turtlebot_arm_moveit_demos : this folder contains a demo that you can run if you would like to test how the arm moves.
In this section we will describe what we have done to ensure things work smoothly.
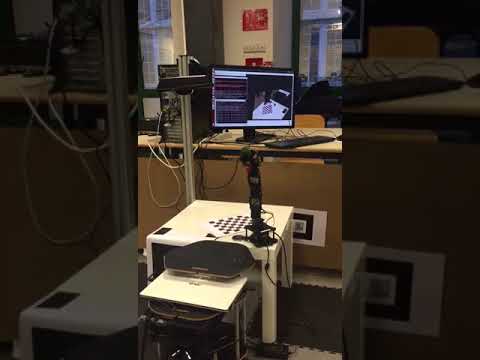
For the setup, we have two main components, the turtlebot arm and the Kinect. There is also a turtlebot shown in the figure below to show the stage where the turtlebot reaches the drop area :

The calibration is needed because we have to make the turtlebot arm work with the Kinect, so when the Kinect detects an object and the arm needs to pick it up, the arm should know where that object is, since the arm has no sensors attached to it, this means we have to use the Kinect as a sensor working closely with the arm, so the calibration is for exactly this task. The calibration process is described below in the how to section.
The detection part is done using the Kinect, we have developped our own method to detect the cube, it will be described in the Our contribution section. In the detection, the arm needs to be able to "know" where the cube is using some operations done on the point cloud acquired by the kinect.
Once we finished the steps above, we needed to work on making the process autonomous. To do this the arm had to wait for a message from the turtlebot, the message is vsdone of type std_msgs/String from the topic /delay/robot_status2. Once this message is received the detection part starts and when the cube is detected, the arm will pick the cube and place it on top of the table, all of this is done without our interference, that is, we run the launch file turtlebot_arm_block_manipulation/demo/block_manip_complete.launch and that's it! The code developed will do the rest.
In this section, we will describe our contribution to the pre-existing project, specifically in the detection and autonomy parts.
For the detection, we implemented a method for detecting the cube on top of the turtlebot. The way we did this, is by detecting planes in the point cloud acquired by the Kinect, after this we remove the planes and go through the rest of the chunks or clusters of the point cloud and check whether that cluster is a green cube or not. We added the color feature to the detection process because it helped a lot in detecting the cube and in a very short amount of time as well! The drawback of course, is that now we can only detect green cubes. This process is implemented in Turtlebot_arm/turtlebot_arm_block_manipulation/src/block_detection_action_server.cpp. Here are some bits of code responsible for doing this.
How to create a cluster and customize it to look for a cube :
    std::vector<pcl::PointIndices> cluster_indices;
    pcl::EuclideanClusterExtraction<pcl::PointXYZRGB> ec;

    ec.setClusterTolerance(0.003); /* The spatial cluster tolerance as a measure in the L2 Euclidean space. */
    ec.setMinClusterSize(100);
    ec.setMaxClusterSize(2000);

    ec.setSearchMethod(tree);
    ec.setInputCloud(cloud_filtered);
    ec.extract(cluster_indices);
Adding a virtual block (cube) on top of the detected block :
    if (greenSum > blueSum && greenSum > redSum)  // a green cube is used in this project
         addBlock(xmin , ymin , zmax , angle, (unsigned long) blueSum/pixelCount);
In fact, we removed two planes before we started searching for the cube, the first plane is of the table and the second one is of the turtlebot top. The point cloud before filtering anything looked like this :


After filtering the table plane, it looked like this :


And after fitering the robot top, it looked like this :


We can notice now that there are only some chunks of point clouds left and it will take less time in the search process to find the cube. The method worked very nicely and we were able to detect the cube in a very short amount of time.
To make the process autonomous (as we described above), we needed to change some parts of the code in turtlebot_arm_block_manipulation/src/interactive_manipulation_action_server.cpp. The method is simple, we wait for a message from the turtlebot, this message tells the arm that the turtlebot is well positioned infront of it and that the arm can reach and pick the cube now.
Here are some code snippets for achieving this task :
void moveCB(const std_msgs::String::ConstPtr& msg) // callback function
  {
      if (std::strcmp(msg->data.c_str(), "vsdone") == 0 && armMode != "d")
      {
          detectBlocks(); armMode="d";
      }
  }
And :
    starting_pose = pose; // the pose where the cube was detected
    ending_pose.position.x = target_X; // target_X is predefined
    ending_pose.position.y = target_Y; // target_Y is predefined
    ending_pose.position.z = starting_pose.position.z;
    ending_pose.orientation = starting_pose.orientation;

moveBlock(starting_pose, ending_pose); // moving the cube from where it was detected to a predefined position on the tableTo run the project from this repository you need Ubuntu 14.04 version and ROS Indigo igloo distribution. If you do not have an active ROS workspace, you can create one by:
$ mkdir -p ~/catkin_ws/src
$ cd ~/catkin_ws/
$ catkin_make
Now that you have a workspace, clone or download this repository into the (source) src directory of your workspace:
$ cd ~/catkin_ws/src
$ git clone https://github.com/sniper0110/Turtlebot_arm.git
Build the project:
$ cd ~/catkin_ws
$ catkin_make
Type the following in a terminal to run the demo code :
$ roscd turtlebot_arm_block_manipulation/demo
$ roslaunch block_manip_complete.launch.
Once all these items are confirmed, rviz window will be opened with the workspace. you can see the complete action, detection of cube and Manipulation trajectory performed sucessfully.
To calibrate your camera extrinsic parameters Here we have a kinect off-board setup, which gives a guaranteed good view of the workspace. This extrinsic calibration procedure works by using a calibration pattern. The kinect can localize the calibration very precisely, and by moving the arm to certain positions on the pattern, we can calculate the transform between the kinect and any frame on the robot. It is very important to mention the following remarks :
- The setup we worked with is when the 2 servo-motors (the one for the wrist and the one for the shoulder spin) are on the same side.
- With the previously mentioned remark, we used the left side of the gripper for calibrating the setup, that is, we put the bottom corner of the left gripper on each of the 4 points on the pattern. If you choose a different setup, then you should take this into consideration. The following images shows how this exact setup looks like :

Another view :

The setup for the calibration involves Kinect camera that can see the workspace, and a workspace that the arm can reach. Next, you need to print out this check_7x6_27mm.pdf calibration pattern on A4 paper and attach it to the workspace, making sure that the arm can reach every point on the pattern.The final setup for calibration can be seen in below figure :

Type the following commands in a terminal :
roslaunch turtlebot_arm_bringup arm.launch
roslaunch turtlebot_arm_kinect_calibration calibrate.launch
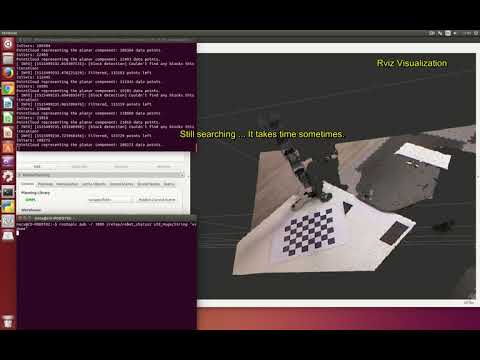
This should detect the checkerboard and pop-up the image shown in the figure below, with the calibration pattern edges overlaid and four points marked on the image.

The next step is to move the edge of the gripper to the four specified points in the order shown in the below figure. Again, note that there is one specific edge you are trying to move, make sure that your setup matches the one pictured below.

Once the calibration process is finished, a set of parameters will be shown on the terminal. If you're just testing your calibration, you can open up a new terminal window, and run the static transform output by the script on the terminal, an example would be :
rosrun tf static_transform_publisher -0.26683 -0.122903 -0.537733 0.5 -0.499602 0.5 0.500398 /arm_base_link /openni_camera 100
As long as this command runs, the static_transform_publisher will publish the transform between a frame on the turtlebot and the kinect frame. If you move the physical camera or the arm's base, you will need to recalibrate again.
Once you are sure that your setup is correctly calibrated, you should add the parameters in the launch file found in turtlebot_arm_block_manipulation/demo/block_manip_complete.launch, the last lines of the file show where to add the parameters. An example would be :
<node pkg="tf" type="static_transform_publisher" name="static_transform_publisher" args="0.552972 0.0311763 1.01794 -0.485351 0.0823443 0.864462 0.101775 /base_link /camera_link 100"/>
If you would like to test the code with only the arm and the Kinect without having a turtlebot to send you a message, you can simply :
- Launch the launch file from a terminal.
- On a second terminal, send the message
vsdoneto the topic/relay/robot_status2, which means you are simulating the process of receiving a message from the turtlebot. The command that you will be using on this new terminal is :rostopic pub -r 1000 /relay/robot_status2 std_msgs/String "vsdone".
The complete tutorial can be found here :
We obtained some very nice results that can be seen in the below video :
We can see clearly how the robotic arm was able to pick the cube after it was detected using the Kinect and it placed it on top of the table.
During the course of this project, we encountred many problems :
- The calibration was perfect in the beginning, but after a few weeks and when we decided to change the setup and move the kinect to allow a better view of the workspace, the calibration started becoming harder and it became difficult to align the virtual robot with the real one. To overcome this problem, we changed the setup a few times by changing how the arm was positioned on the table and also by moving the Kinect, in the end we were able to make it work.
- The detection (before we changed it) was meant to work on the table only. For our case, we needed to detect the cube on top of the turtlebot, the top of the robot was a little higher than the table, so the pre-existing detection code did not work; that's why we modified the code to work with our setup and it performed very nicely.
There are many improvements that could be made to this project such as :
- Detecting a cube of any color : Our code only works with green cubes, so it would be a good improvement if the program could detect cubes of any color.
- The camera calibration could also be improved. Currently, variations in surrounding lightings affect the object detection. Using an additional lighting source will minimize the lighting issue that come from shadows which will consequently make the detection part easier.
In this project, we were able to implement a working version of a scenario where the turtlebot arm will wait for a message coming from a turtlebot then a process of detection will be launched where the Kinect will detect the presence of a green cube, after this the robotic arm will pick the cube and place it on top of the table in a position that is hardcoded. We faced some difficulties throughout the duration of the project, but we were able to successfully overcome them.