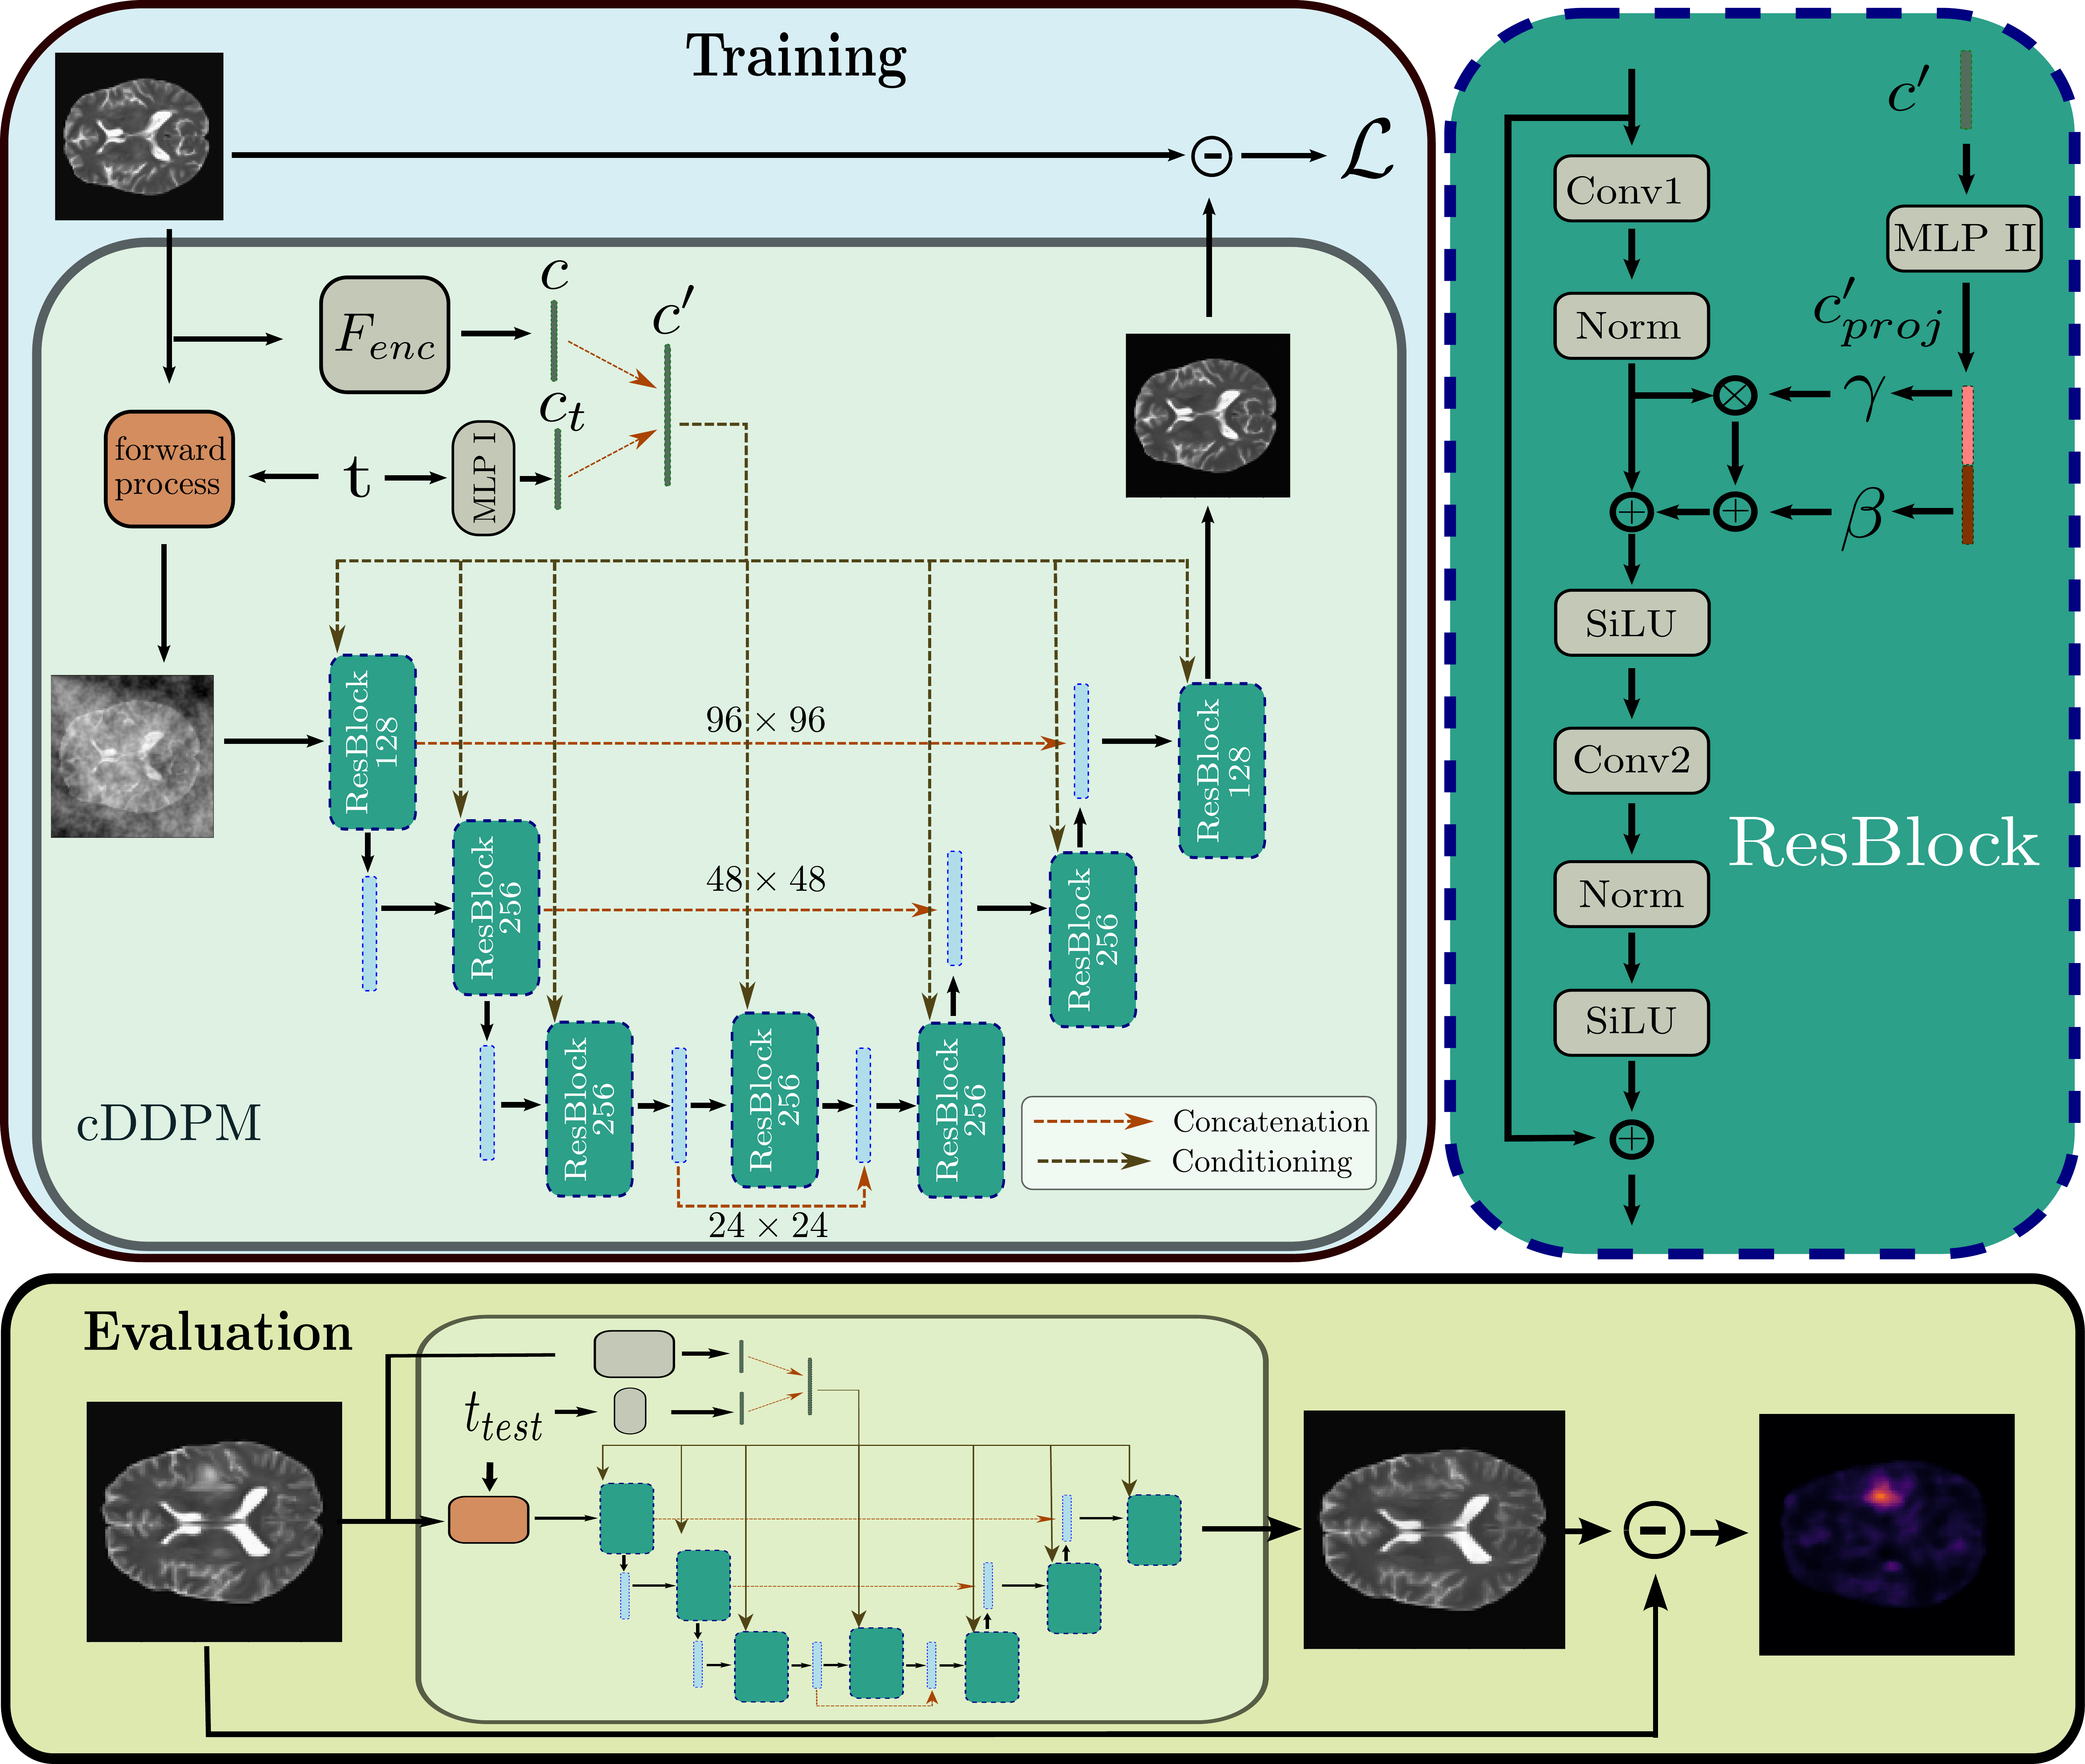
Codebase for the paper Guided Reconstruction with Conditioned Diffusion Models for Unsupervised Anomaly Detection in Brain MRIs.
Abstract: Unsupervised anomaly detection in Brain MRIs aims to identify abnormalities as outliers from a healthy training distribution. Reconstruction-based approaches that use generative models to learn to reconstruct healthy brain anatomy are commonly used for this task. Diffusion models are an emerging class of deep generative models that show great potential regarding reconstruction fidelity. However, they face challenges in preserving intensity characteristics in the reconstructed images, limiting their performance in anomaly detection. To address this challenge, we propose to condition the denoising mechanism of diffusion models with additional information about the image to reconstruct coming from a latent representation of the noise-free input image. This conditioning enables high-fidelity reconstruction of healthy brain structures while aligning local intensity characteristics of input-reconstruction pairs. We evaluate our method's reconstruction quality, domain adaptation features and finally segmentation performance on publicly available data sets with various pathologies. Using our proposed conditioning mechanism we can reduce the false-positive predictions and enable a more precise delineation of anomalies which significantly enhances the anomaly detection performance compared to established state-of-the-art approaches to unsupervised anomaly detection in brain MRI. Furthermore, our approach shows promise in domain adaptation across different MRI acquisitions and simulated contrasts, a crucial property of general anomaly detection methods.
We use the IXI data set, the BraTS21 data set and the MSLUB data set for our experiments. You can download/request the data sets here:
- IXI: https://brain-development.org/ixi-dataset/
- BraTS21: http://braintumorsegmentation.org/
- MSLUB: https://lit.fe.uni-lj.si/en/research/resources/3D-MR-MS/
Before processing, you need to extract the downloaded zip files and organize them as follows:
├── IXI
│   ├── t2
│   │   ├── IXI1.nii.gz
│   │   ├── IXI2.nii.gz
│   │   └── ...
│   └── ...
├── MSLUB
│   ├── t2
│   │   ├── MSLUB1.nii.gz
│   │   ├── MSLUB2.nii.gz
│   │   └── ...
│   ├── seg
│   │   ├── MSLUB1_seg.nii.gz
│   │   ├── MSLUB2_seg.nii.gz
│   │   └── ...
│   └── ...
├── Brats21
│   ├── t2
│   │   ├── Brats1.nii.gz
│   │   ├── Brats2.nii.gz
│   │   └── ...
│   ├── seg
│   │   ├── Brats1_seg.nii.gz
│   │   ├── Brats2_seg.nii.gz
│   │   └── ...
│   └── ...
└── ...
We apply several preprocessing steps to the data, including resampling to 1.0 mm, skull-stripping with HD-BET, registration to the SRI Atlas, cutting black boarders and N4 Bias correction. To run the preprocessing, you need to clone and setup the HD-BET tool for skull-stripping. For each data set there is an individual bash script that performs the preprocessing in the preprocessing directory. To preprocess the data, go to the preprocessing directory:
cd preprocessing
execute the bash script:
bash prepare_IXI.sh <input_dir> <output_dir>
the <input_dir> refers to the directory where the downloaded, raw data is stored.
Note, that you need to provide absolute paths and this script will use a GPU for skull-stripping.
Example for the IXI data set:
bash prepare_IXI.sh /raw_data/IXI/ $(pwd)
This will create 4 different folders with the results of the intermediate preprocessing steps. The final scans are located in /processed_data/v4correctedN4_non_iso_cut
After preprocessing, place the data (the folder v4correctedN4_non_iso_cut) in your DATA_DIR.
cp -r <output_dir>/IXI <DATA_DIR>/Train/ixi
cp -r <output_dir>/MSLUB <DATA_DIR>/Test/MSLUB
cp -r <output_dir>/Brats21 <DATA_DIR>/Test/Brats21
The directory structure of <DATA_DIR> should look like this:
<DATA_DIR>
├── Train
│   ├── ixi
│   │   ├── mask
│   │   ├── t2
├── Test
│   ├── Brats21
│   │   ├── mask
│   │   ├── t2
│   │   ├── seg
│   ├── MSLUB
│   │   ├── mask
│   │   ├── t2
│   │   ├── seg
├── splits
│   ├──  Brats21_test.csv
│   ├──  Brats21_val.csv
│   ├──  MSLUB_val.csv
│   ├──  MSLUB_test.csv
│   ├──  IXI_train_fold0.csv
│   ├──  IXI_train_fold1.csv
│   └── ...
└── ...
You should then specify the location of <DATA_DIR> in the pc_environment.env file. Additionally, specify the <LOG_DIR>, where runs will be saved.
To download the code type
git clone git@github.com:FinnBehrendt/conditioned-Diffusion-Models-UAD.git
In your linux terminal and switch directories via
cd conditioned-Diffusion-Models-UAD
To setup the environment with all required packages and libraries, you need to install anaconda first.
Then, run
conda env create -f environment.yml -n cddpm-uad
and subsequently run
conda activate cddpm-uad
pip install -r requirements.txt
to install all required packages.
To run the training and evaluation of the cDDPM without pretraining, you can simply run
python run.py experiment=cDDPM/DDPM_cond_spark_2D model.cfg.pretrained_encoder=False
For better performance, you can pretrain the encoder via masked pretraining (Spark)
python run.py experiment=cDDPM/Spark_2D_pretrain
Having pretrained the encoder, you can now run
python run.py experiment=cDDPM/DDPM_cond_spark_2D encoder_path=<path_to_pretrained_encoder>
The <path_to_pretrained_encoder> will be placed in the <LOG_DIR>. Alternatively, you will find the best checkpoint path printed in the terminal.
If you make use of our work, you can cite it via
@article{Behrendt.2023,
  title={Guided Reconstruction with Conditioned Diffusion Models for Unsupervised Anomaly Detection in Brain MRIs},
  author={Behrendt, Finn and Bhattacharya, Debayan and Mieling, Robin and Maack, Lennart and Kr{\"u}ger, Julia and Opfer, Roland and Schlaefer, Alexander},
  journal={arXiv preprint arXiv:2312.04215},
  year={2023}
  }
