A snakemake pipeline for the analysis of SE and PE ChIP-seq data using singularity and docker.
Snakemake pipeline made for reproducible analysis of paired-end Illumina ChIP-seq data. The desired output of this pipeline are:
- fastqc zip and html files
- bigWig files (including bamCompare rule)
- bed files
This paragraph should get the Snakemake workflow to work in few minutes:
-
download the pipeline:
git clone https://github.com/JihedC/ChIP_seq_singularity.git -
change directory to the newly downloaded pipeline:
cd ChIP_seq_singularity/ -
To run the workflow requires conda to be installed. First check if conda is installed in your session
-
if conda is not installed:
- download miniconda3:
wget https://repo.anaconda.com/miniconda/Miniconda3-latest-Linux-x86_64.sh - install miniconda in your folder with:
sh Miniconda3-latest-Linux-x86_64.sh. - Follow the instruction by pressing
ENTERto go through the disclaimers and informations. You will be offered the choice to accept or not the licence terms. - Type
yesto continue the installation. - You will be then offered to define the location of installation of miniconda3. (For a usage on Shark, due to space limit in the /home folder, you need to make sur to install the miniconda in your /exports/humgen/{username}/miniconda3/ folder by typing the absolute path in the prompt)
- Once the installation is finished, conda will offer to initialize Miniconda3, type
yesand pressENTER - After the installation you will need to restart your terminal and reconnect to the HPC. On shark just disconnect from your session and connect as you usually do.
- At the restart,
(base)should appear on the left side of the prompt which means that you are in the base environment and that Miniconda installation was successful.
- download miniconda3:
-
install Mamba:
conda install -n base -c conda-forge mambathis might take a while, but it's worth it because it will make conda much faster. Accept all the install. This can be done in any folder. -
activate the base environment:
conda activate base -
install snakemake with mamba:
mamba create -c conda-forge -c bioconda -n snakemake snakemake=7.18.1Accept the insllation with "Y" -
activate the snakemake environment:
conda activate snakemake -
control that you are in the folder containing the workflow/pipeline:
pwdotherwise go back to the folder with{absolute_path_to_pipeline}/ChIP_seq_singularity/ -
Use the dry run option to check that the download pipeline should work:
snakemake -npif nothing appears in red, the pipeline should work.
snakemake -np will use the dummy samples available when you download the pipeline to test if all the rules/job of the workflow are properly set.
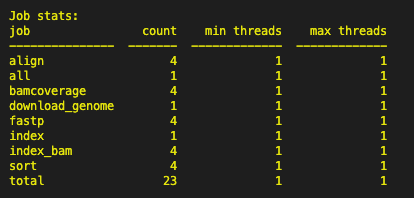
A list of Job and command line should appear in the terminal. At the bottom you should see the following image:
A successful run should have a total of 27 jobs.
If error are raised, please read the error message. You may not be in the right folder or forgot to activate the snakemake environment.
To run your own files adapt the units.tsv file, if you wishe only to test the workflow ** DO NOT** modify the units.tsv
-
Adapt the
units.tsvfile to your sample name and their path on the HPC using your favorite text editor. For example withnano units.tsv. Make sure that the columns are tab seaparated values. -
Use the dry run option to check that the pipeline will run now that the units.tsv is adapted:
snakemake -npif nothing appears in red, the pipeline should work. -
Before running the pipeline on shark/slurm make sure that
slurm-cluster-status.pyhave the following permissions set :"-rwxr-xr-x". If not the job scheduler will not be able to know whether a job is finished or not. To set the proper permission, use:chmod 755 slurm-cluster-status.py -
Start the pipeline:
sbatch slurm_snakemake.sh -
Check if the pipeline is working with `squeue -u {username}
-
The test run should take approximately 1h30min.
-
Once it finished you can use the function
snakemake --reportto create a html report file that summarize the analysis. An example of the report can be found here.
Snakemake makes uses of singularity to pull images of Dockers containers. Dockers containers contains the softwares required for the rules set up in the Snakemake workflow.
Singularity is a must and will most likely be the source of error
For now I have hard coded the module loaded by Shark: module load container/singularity/3.10.0/gcc.8.5.0. If in the future, this module is removed from Shark or modified, it might prevent the pipeline from working because it will not be able to pull containers. This line of code would then need to be modified in the file slurm_snakemake.sh.
This line would need to be replaced by the line obtained after running module spider singularity on Shark.
-
Snakefile containing the targeted output and the rules to generate them from the input files.
-
config/ , folder containing the configuration files making the Snakefile adaptable to any input files, genome and parameter for the rules. Adapt the config file and its reference in the Snakefile. Please also pay attention to the parameters selected for deeptools, for convenience and faster test the bins have been defined at
1000bp, do not forget to adapt it to your analysis. -
Fastq/, folder containing subsetted paired-end fastq files used to test locally the pipeline. Generated using Seqtk:
seqtk sample -s100 read1.fq 5000 > sub1.fqseqtk sample -s100 read2.fq 5000 > sub2.fq. RAW fastq or fastq.gz files should be placed here before running the pipeline. -
units.tsv, is a tab separated value files containing information about the experiment name, the condition of the experiment (control or treatment) and the path to the fastq files relative to the Snakefile. Change this file according to your samples.
-
rules/, folder containing the rules called by the snakefile to run the pipeline, this improves the clarity of the Snakefile and might help modifying the file in the future.
The only conda environment required to run this workflow is the (snakemake) environment. Details on how to install this environment can be found in the TLDR section of this documentation.
I strongly advise to take your time to install mamba since it is much faster than conda. Mamba replaces conda in almost all the usual conda commands. For example:
Instead of using conda install -c bioconda macs2 one can use mamba install -c bioconda macs2.
The versions of the softwares are hard-coded in the rules. If one desires to use a particular version of a software, they would need to find a docker hub containing the desired version and to change it in every rules that uses the software.
The config.yaml file specifies the sample list, the genomic reference fasta file to use, the directories to use, etc. This file is then used to build parameters in the main Snakefile.
The Snakemake pipeline/workflow management system reads a master file (often called Snakefile) to list the steps to be executed and defining their order.
It has many rich features. Read more here.
Samples are listed in the units.tsv file and will be used by the Snakefile automatically. Change the name, the conditions accordingly.
The supplied template of the units.tsv file combines single-end and paired-end experiment. In the case of single-end experiment the column fq2 is left empty. Instead of writing a path in that column, simply press TAB to jump to the next column condition.
If you have paired-end reads, fill the column fq2 with the path to the R2 file.
sample  fq1 fq2 condition
100K  fastq/100K_R1.fq  fastq/100K_R2.fq  treatment
50K fastq/50K_R1.fq fastq/50K_R2.fq treatment
ChIP1 fastq/SRX091645_T1.fq   treatment
ChIP2 fastq/SRX091646_T1.fq   control
In the example above, the samples 100K and 50K are paired-end data while ChIP1 and ChIP2 are single-end data.
You can edit the units.tsv file using nano units.tsv.
Use the command snakemake -np to perform a dry run that prints out the rules and commands.
If the dry run is successful (no red lines on the screen), the workflow can be started with sbatch slurm_snakemake.sh
The main output are :
-
fastp : Provide informations about the quality of the sequences provided and generate a html file to visualize it. More information to be found here.Fastp provides 1 files per sample. MultiQC gather all samples together in an html file.
-
bed : Provide information generated by the MACS2 algorithm for the locations and significance of peaks. These files can be used for direct visualization of the peaks location using IGV or as an input for further analysis using the bedtools
-
bigwig files : Provides files allowing fast displays of read coverages track on any type of genome browsers. The default normalization is RPKM and can be modified in the
config.yamlfile. -
peak calling files: Peak calling will be performed on the samples. For now it compares all samples annotated as
treatmentagains all samples annotated ascontrol. In other words, the pipeline will generate more files than necessary and you will need to check the filenames to know which one you want to use. -
MultiQC output: A summary of the statitics measured during the analysis. An example of the MultiQC output file obtained after a run with the test sample: here.
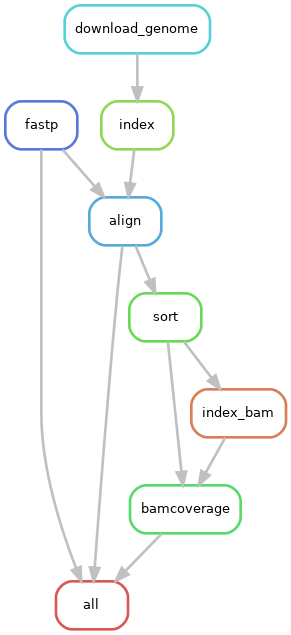
Below is an overview of the jobs run for each sample through the pipeline:
If for any reason, the Snakemake folder gets locked during the analysis. You can unlock it by running the command:
snakemake --unlock --cores 2
and then run the dry-run and pipeline as usually with sbatch slurm_snakemake.sh.


