This guide provides step-by-step instructions to set up the Blog Site using Firebase project on your local machine. Follow these steps carefully to ensure a smooth setup process.
Before you begin, make sure you have the following installed on your machine:
- Node.js (version 14.x or higher)
- npm (Node Package Manager)
- Git (for cloning the repository)
First, clone the repository to your local machine using Git.
git clone https://github.com/KaSaNaa/Blog-Site-using-Firebase.git
cd <CLONED_FOLDER>Navigate to the project directory and install the required dependencies using npm.
npm installCreate a [.env] file in the root directory of the project and add the necessary environment variables. You can use the .env.example file as a reference.
cp .env.example .envEdit the [.env] file to include your Firebase configuration and other necessary environment variables.
VITE_SEND_WELCOME_EMAIL=<your-send-welcome-email-endpoint>
VITE_YOUTUBE_API_KEY=<your-youtube-api-key>Ensure that your Firebase project is set up correctly. You need to configure Firebase functions and hosting.
-
Navigate to the [
functions] directory:cd functions -
Install Firebase functions dependencies:
npm install
-
Set up Firebase environment variables:
Create a [
.env] file in the [functions] directory and add your Firebase configuration.cp .env.example .env
Edit the [
.env] file to include your Firebase configuration.VITE_FIREBASE_API_KEY VITE_FIREBASE_AUTH_DOMAIN VITE_FIREBASE_PROJECT_ID VITE_FIREBASE_STORAGE_BUCKET VITE_FIREBASE_MESSAGING_SENDER_ID VITE_FIREBASE_APP_ID VITE_YOUTUBE_API_KEY VITE_GET_USER_DISPLAY_NAME VITE_SEND_WELCOME_EMAIL VITE_STRIPE_PUBLISHABLE_KEY
Navigate back to the root directory and start the development server.
cd ..
npm run dev
This will start the Vite development server and open the application in your default web browser.
If you need to deploy Firebase functions, follow these steps:
-
Login to Firebase:
firebase login
-
Deploy Firebase functions:
firebase deploy --only functions
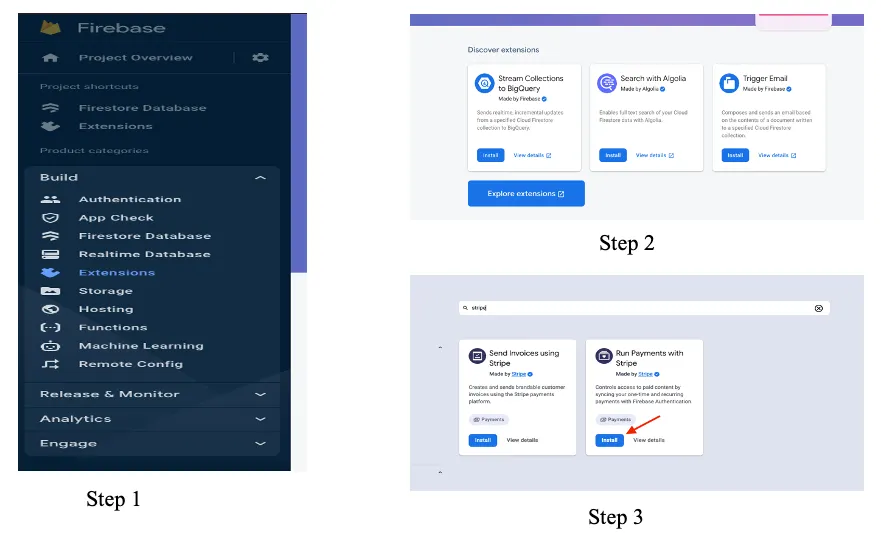
- Install Stripe by Invertase Extension in Firebase and configure API keys and Webhook endpoints (You need to sign up in Stripe and enable the Test Mode for Developers.)
- Click on Build -> Extensions as in the above image step 1.
- Click on Explore extensions as in the above step 2.
- Click on Install as marked in the above step 3.
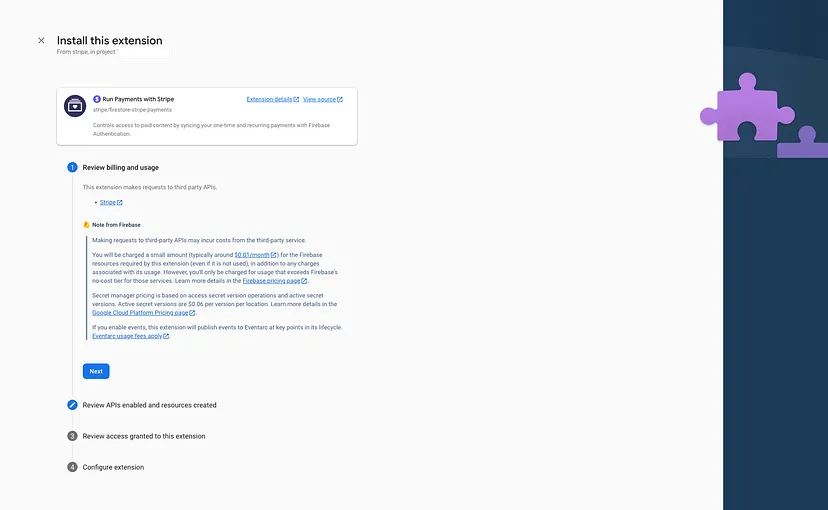
- Once you clicked on that you’ll be navigated again to your home screen of the console.firebase.google.com. In there, click again your relevant project and you’ll be continue with the rest of the extension installation process.
- Click next on first step as there’s nothing to setup any configs there. But feel free to go through those information.
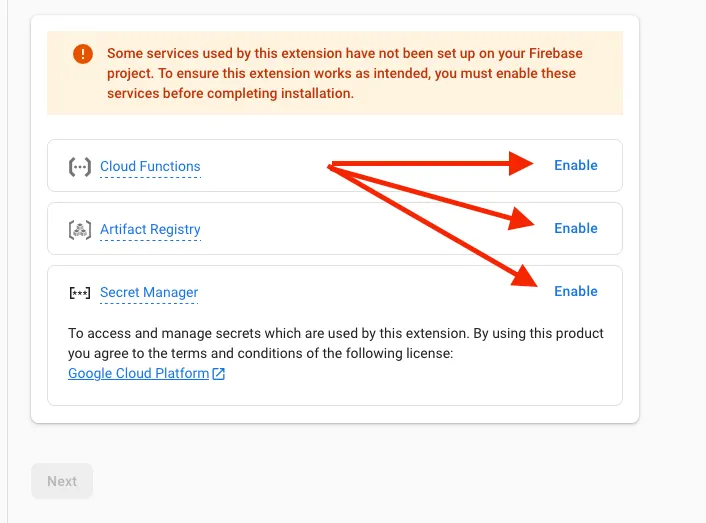
- In the second step you need to enable below services in order to continue.
- Once you done with that the Next button will be enabled and click on that.
- Just as the first step there’s nothing to setup any configs on the third step, just click on next.
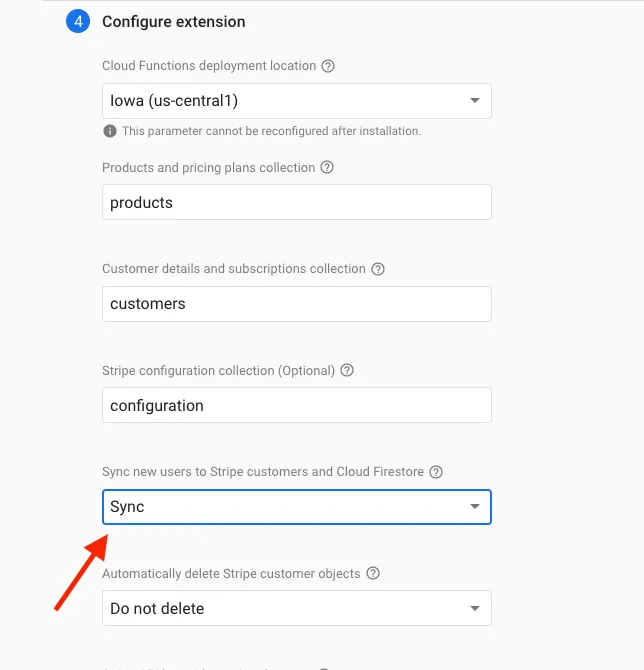
- On the 4th step make sure to set the sync new users to stripe customers and firestore.
- Add the stripe secret API key to below field which you copied from stripe dashboard.
Refer this Medium Article on setting up the rest of the Stripe related functinalities such as webhook,
Here is an overview of the project structure:
.env
.firebaserc
.gitignore
.prettierignore
.prettierrc
.vscode/
 settings.json
eslint.config.js
firebase.json
functions/
 .env
 .eslintrc.js
 .gitignore
 index.js
 package.json
index.html
LICENSE
package.json
public/
 _redirects
README.md
src/
 App.jsx
 assets/
 components/
  auth/
  home/
  misc/
  posts/
 configs/
  firebaseConfigs.js
 contexts/
  AuthContext.jsx
  LoadingContext.jsx
  ThemeContext.jsx
 GlobalLayout.jsx
 hooks/
  ...
 main.jsx
 services/
  ...
 theme/
 utils/
vite.config.js
-
src/: Contains the main source code for the application.App.jsx: The main application component.main.jsx: The entry point for the React application.components/: Contains React components organized by feature.contexts/: Contains context providers for global state management.configs/: Contains configuration files.services/: Contains service files for API calls and other utilities.theme/: Contains theme configuration files.utils/: Contains utility functions.
-
functions/: Contains Firebase functions.index.js: The main entry point for Firebase functions.
-
public/: Contains static assets and the_redirectsfile for Netlify. -
.env: Environment variables for the project. -
vite.config.js: Configuration file for Vite. -
eslint.config.js: Configuration file for ESLint.
To run tests, use the following command:
npm run testTo lint the code, use the following command:
npm run lintTo format the code, use the following command:
npm run formatTo build the project for production, use the following command:
npm run buildThis will create a dist directory with the production build of the application.
To deploy the application, you can use any static site hosting service like Netlify, Vercel, or Firebase Hosting. Follow the respective documentation for deployment instructions.


