Side note: leaving Secure Boot on is fine, as long as you select "Enroll MOK" after rebooting, following the install.
Upgrade the bios by downloading the latest image from Dell.com. (Alternatively, you can try to download the image from this website and install it through "Software" (simply open the file).) Then:
sudo cp Downloads/Latitude_7x80_1.4.6.exe /boot/efi # Not mv because of permissions
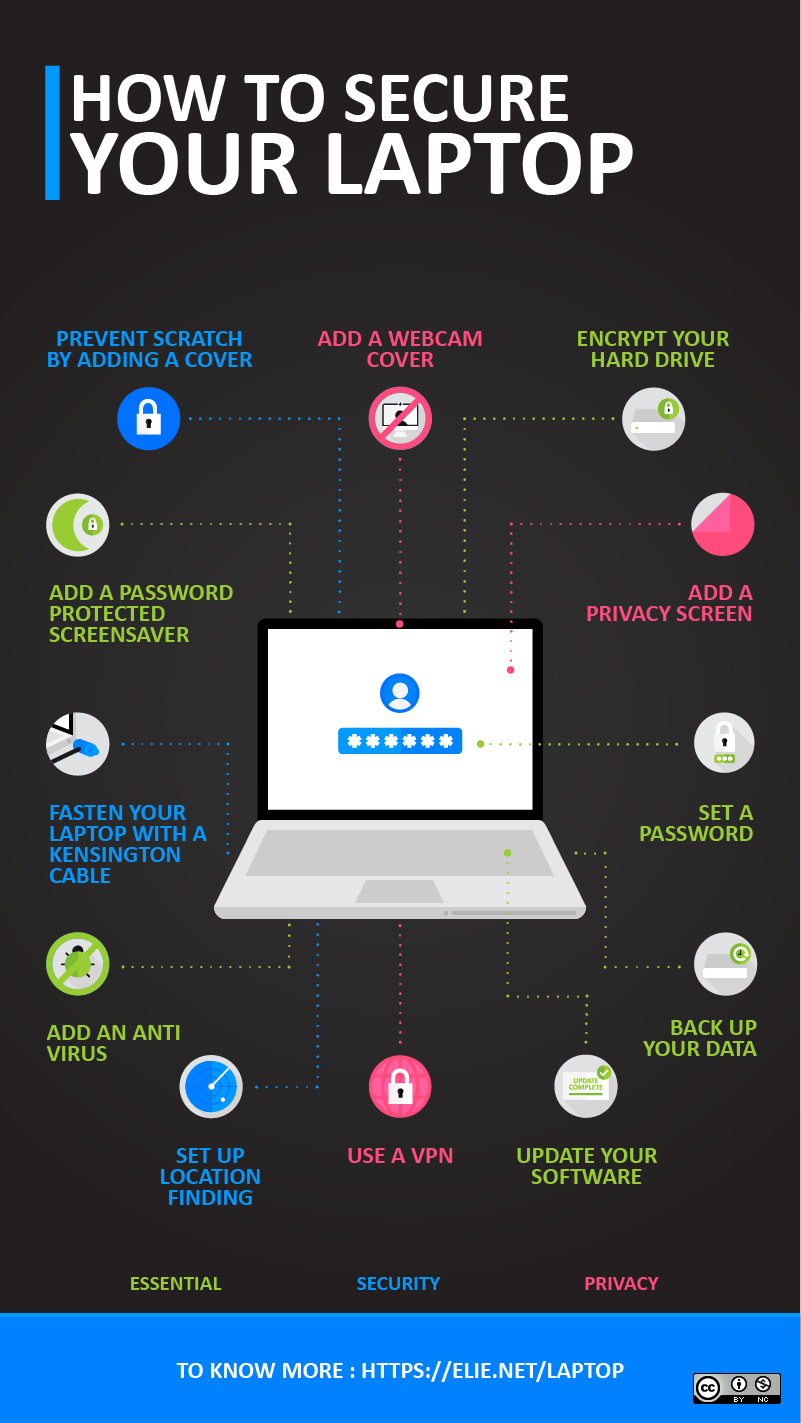
rm Downloads/Latitude_7x80_1.4.6.exeReboot, hit F12 to initiate the update. Once done, reboot and press F2 to enter BIOS setup. Set a password for the BIOS and the hard drive. Don't forget to remove the file from /boot/efi.
Then:
sudoedit /etc/default/grub
GRUB_TIMEOUT=0
sudo update-grub# https://github.com/guard/listen/wiki/Increasing-the-amount-of-inotify-watchers
echo fs.inotify.max_user_watches=524288 | sudo tee -a /etc/sysctl.conf && sudo sysctl -p
sudo apt update
sudo apt upgrade
sudo apt install gnupg2 \
htop \
ncdu \
silversearcher-ag \
jq \
xclip \
autojump \
ctags \
tree \
ntp \
imagemagick \
optipng \
inotify-tools \
vlc \
gksu \
gigolo \
i3lock \
xss-lock \
p7zip-full \
build-essential \
gimp \
curl \
ffmpeg \
vim-gtk \
python3 \
zsh \
libreoffice \
libreoffice-l10n-fr \
libreoffice-l10n-en-gb \
libreoffice-help-en-gb \
libreoffice-help-fr \
libreoffice-pdfimport \
hyphen-fr \
hyphen-en-gb \
hunspell-en-gb \
unattended-upgrades \
redshift-gtk \
gtk-recordmydesktop \
youtube-dl
# Rofi is an app launcher
# An alternative to autojump is z: https://github.com/rupa/z
# xss-lock is for auto locking session after 2 minutes of inactivity
# vim-gtk for clipboard support
# ctags is for vim tag jumping (see .vimrc)
# libreoffice-pdfimport is for PDF signing
# redshift-gtk is an alternative to xflux
# For automatic security updates, run `sudo dpkg-reconfigure unattended-upgrades`sudo apt install texlive-full \
texlive-bibtex-extra \
biber \
arandr \
gcolor2 \
mpd mpv \
rofi \
exiftool \
jhead \
filezilla
zenity \
icoutils \
zathura \
wireshark
synaptic \
pdf-presenter-console \
openvpn \
network-manager-openvpn-gnome \
network-manager-vpnc \
codeblocks
# Install biber from apt first and try to compile a PDF document.
# If there is any compatibility issue, install it from http://biblatex-biber.sourceforge.net/ (sudo cp biber /usr/local/bin)
# See https://bugs.launchpad.net/ubuntu/+source/biber/+bug/1565842
# MPD is a music player for terminal, MPV is a video player compatible with Youtube and co.
# exiftool and jhead are for EXIF data
# zenity is a simple interactive dialog
# icoutils to create Microsoft Windows(R) icon and cursor files
# zathura is a PDF viewer
# synaptic see http://askubuntu.com/questions/76/whats-the-difference-between-package-managers
# After installing network-manager-openvpn-gnome do `sudo service network-manager restart`sudo apt install oathtool # For OTPs
git clone https://git.zx2c4.com/password-store
git clone git@github.com:tadfisher/pass-otp.git
cd password-store
sudo make install
cd ../pass-otp
sudo make installssh-keygen -t rsa -b 4096 -C "<me@domain>" -f .ssh/id_rsa
cat .ssh/id_rsa.pub | xclip -i -selection clip-boardPaste what you just copied at https://github.com/settings/keys
Only if you don't have one already. For Github to verify your commits, mostly. Also useful for pass.
gpg2 --full-gen-key # Accept RSA and RSA, size 4096
gpg2 --list-secret-keys --keyid-format LONG # Copy the value after `sec rsa4096/`
gpg2 --edit-key <copied value>

# Now we'll create a signing subkey
addKey
4
4096
5y
y
y
save

gpg2 --gen-revoke <copied value> > revoke.asc
gpg2 -c revoke.asc
gpg2 --armor --export <copied value> | xclip -i -selection clip-board
sudo git config --system user.signingkey <copied value>
We store the signing key in the system settings instead of the user's settings to avoid having to commit every new key in this repo.
Paste what you just copied at https://github.com/settings/keys. More details.
It's also very important to make backups of your private and public keys:
gpg2 --export-secret-keys --armor "Romain" > secret.key
gpg2 --export --armor "Romain" > public.key
gpg2 --export-secret-subkeys --armor <copied value> > subkeys.key
gpg2 --export-ownertrust --armor > romain-ownertrust-gpg.txt
gpg2 -c secret.key # Encrypt your private key before saving it somewhere
To restore it:
gpg2 -d secret.key.gpg # Decrypt private key
gpg2 --import secret.key
gpg2 --import public.key # Is this needed?
gpg2 --import-ownertrust romain-ownertrust-gpg.txt
# Or, if you don't have the ownertrust file
gpg2 --edit-key "Romain"
trust
5
save
If you have made backups and created a signing subkey, it's reasonably safe to remove the master key from your machine. You only need the master key to sign other people's key or edit your subkeys.
gpg2 --delete-secret-key <copied value>
gpg2 --import subkeys.key
shred -u subkeys # for security purposes
To temporarily re-import it, do:
mkdir ~/gpgtmp
gpg2 --homedir ~/gpgtmp --import secret.txt
# Do what you need to with `gpg2 --homedir ~/gpgtmp command`
gpg-connect-agent --homedir ~/gpgtmp KILLAGENT /bye
rm -rf ~/gpgtmp
If, for some reason, you want to erase all your secret and public keys, run:
gpg2 --delete-secret-and-public-key <copied value>
Finally, configure Pass:
pass init <copied value>Set a cronjob to periodically make a backup:
0 20 9 * * tar czfh "$HOME/$(date -u +"%Y-%m-%dT%H-%M-%SZ")-password-store.tar.gz" -C "$HOME" .password-storeDownload Chrome .deb file and then:
sudo dpgk -i google-chrome-stable.deb
sudo apt install -f # To fix dependencies problems
sudo dpgk -i google-chrome-stable.deb
rm -f google-chrome-stable.debDownload VS code .deb file and then:
sudo dpgk -i code_1.27_amd64.deb
sudo apt install -f # To fix dependencies problems
sudo dpgk -i code_1.27_amd64.deb
rm -f code_1.27_amd64.deb
code --install-extension "esbenp.prettier-vscode"
code --install-extension "dbaeumer.vscode-eslint"
code --install-extension "eamodio.gitlens"-
In about:config, do:
- Disable the HTTP referer: set
network.http.sendRefererHeaderto0. - Set
security.tls.version.minto3(more info) - Set
view_source.wrap_long_linestotrue. - Set
browser.tabs.warnOnClosetofalse. - Set
browser.tabs.closeWindowWithLastTabtofalse. - Set
network.prefetch-nexttofalse. - Set
network.dns.disablePrefetchtofalse. - Set
datareporting.healthreport.uploadEnabledtofalse. - Set
general.useragent.overridetoMozilla/5.0 (X11; Linux x86_64) AppleWebKit/537.36 (KHTML, like Gecko) Ubuntu Chromium/47.0.2526.73 Chrome/47.0.2526.73 Safari/537.36 - Set
privacy.resistFingerprintingtotrue(this voids the effect ofgeneral.useragent.override). - Set
gfx.webrender.enabledtotrue. - Set
geo.enabledtofalse. - Set
browser.safebrowsing.malware.enabledtofalse. - Set
browser.safebrowsing.phishing.enabledtofalse - Set
browser.send_pingstofalse - Set
dom.battery.enabledtofalse - Set
media.navigator.enabledtofalse - Set
network.trr.modeto2(https://blog.nightly.mozilla.org/2018/06/01/improving-dns-privacy-in-firefox/ + DNS-over-HTTPS functionality in Firefox). - Set
network.trr.uritohttps://mozilla.cloudflare-dns.com/dns-query.
- Disable the HTTP referer: set
-
In about:preferences#general, check
Restore previous session. -
In ](about:preferences#search), add the search bar next to the url bar and uncheck
Show search suggestions ahead of browsing history in address bar results -
In about:preferences#privacy, uncheck everything under
Firefox Data Collection and Use. Also, block cookies for the following domains:- https://s.ytimg.com
- https://www.youtube.com
- https://r5---sn-25glenes.googlevideo.com
- https://i.ytimg.com
Also, disable third-party cookies and enable
Tracking ProtectionandDo Not Trackat all times. -
Add these extensions:
sudo apt-add-repository ppa:git-core/ppa
sudo apt update
sudo apt install git git-extrasDownload Thunderbird 60 .deb file. Then extract it and:
sudo mv thunderbird/ /opt
sudo ln -s /opt/thunderbird/thunderbird /usr/bin/
sudo su
bash
cat > /usr/share/applications/thunderbird.desktop << "EOF"
[Desktop Entry]
Name=Thunderbird Mail
Comment=Send and receive mail with Thunderbird
GenericName=Mail Client
Exec=thunderbird %u
Terminal=false
Type=Application
Icon=thunderbird
Categories=Network;Email;
MimeType=application/xhtml+xml;text/xml;application/xhtml+xml;application/xml;application/rss+xml;x-scheme-handler/mailto;
StartupNotify=true
EOF
ln -s /opt/thunderbird/chrome/icons/default/default256.png /usr/share/pixmaps/thunderbird.png
To restore all email accounts, preferences and emails, you can import the directory ~/.thunderbird from another computer. In Preferences > Advanced > General > Config Editor, set rss.show.content-base to 1 so that RSS feeds opened in a new tab will always show summaries instead of loading the full web page.
sudo apt install libevent-dev libncurses-dev pkg-config automake autoconf
git clone https://github.com/tmux/tmux.git
cd tmux
sh autogen.sh
./configure && make
sudo make installzsh
# Press the 'q' key
git clone --recursive https://github.com/sorin-ionescu/prezto.git "${ZDOTDIR:-$HOME}/.zprezto"
setopt EXTENDED_GLOB
for rcfile in "${ZDOTDIR:-$HOME}"/.zprezto/runcoms/^README.md(.N); do
ln -s "$rcfile" "${ZDOTDIR:-$HOME}/.${rcfile:t}"
done
chsh -s /bin/zsh # Might need rebooting to take effectcurl -o- https://raw.githubusercontent.com/creationix/nvm/v0.33.11/install.sh | bash
# Make sure ~/.zshrc does not contain code added by nvm install script,
# since it is already present in dotfiles/.rc
nvm install node
# Or install Nodejs directly
# curl -sL https://deb.nodesource.com/setup_9.x | sudo -E bash -
# sudo apt install nodejs # And read https://docs.npmjs.com/getting-started/fixing-npm-permissions
# Install some useful packages
npm i -g tldr peerflix castnow # castnow plays media files on Chromecast (subtitles supported)13. Battery saver (https://doc.ubuntu-fr.org/tlp)
sudo apt install tlp
sudo systemctl enable tlp
sudo systemctl enable tlp-sleepcd dotfiles # cd to this git repo
sudo cp -i scripts/firewall.sh /etc/init.d/
sudo chmod 700 /etc/init.d/firewall.sh
sudo chown root:root /etc/init.d/firewall.sh
sudo update-rc.d firewall.sh defaultscd dotfiles # cd to this git repo
REPO_DIR=`pwd`
# Custom settings
ln -sf $REPO_DIR/.vimrc $HOME/
mkdir -p $HOME/.vim
for file in .vim/**/*.*; do
ln -sf $REPO_DIR/`dirname $file` $HOME/.vim
done
echo "source $REPO_DIR/.rc" >> $HOME/.zshrc
echo "source $REPO_DIR/.aliases" >> $HOME/.zshrc
ln -sf $REPO_DIR/.tmux.conf $HOME/
cp -i "$REPO_DIR/Pictures/pause.png" $HOME/Pictures/pause.png
mkdir -p $HOME/.config/autostart
cp $REPO_DIR/.config/autostart/* "$HOME/.config/autostart"
cp "$REPO_DIR/.config/redshift.conf" $HOME/.config/
mkdir -p $HOME/.config/Code/User/
ln -s $REPO_DIR/.config/Code/User/* $HOME/.config/Code/User/
ln -sf "$REPO_DIR/.gitconfig" $HOME/ # Edit your email address
ln -sf "$REPO_DIR/.git-templates" $HOME/
ln -sf "$REPO_DIR/.gitignore_global" $HOME/
ln -sf $REPO_DIR/.curlrc $HOME/
ln -sf $REPO_DIR/.less $HOME/
ln -sf $REPO_DIR/.lesskey $HOME/
ln -s $REPO_DIR/.ycm_extra_conf.py $HOME/
ln -s $REPO_DIR/.tern-project $HOME/
ln -s $REPO_DIR/.eslintrc.js $HOME/
ln -s $REPO_DIR/.config/compton.conf $HOME/.config/
mkdir -p $HOME/.gnupg
ln -s $REPO_DIR/.gpupg/gpg.conf $HOME/.gpupg
source "$REPO_DIR/.rc"
git diff $HOME/.zprezto/runcoms/zpreztorc $REPO_DIR/.zpreztorc
ln -s "$REPO_DIR/.zpreztorc" $HOME/
zsh-newuser-install- In
General, unlimited scrollback - In
Appearance, uncheck menu bar and borders around new windows - In
Colors, use theXubuntu darktheme, checkCursor colorand edit colors as you like.
# Set up Vim
## Vundle (Vim package manager)
git clone https://github.com/VundleVim/Vundle.vim.git ~/.vim/bundle/Vundle.vim
### Then go to https://github.com/VundleVim/Vundle.vim
### Deactivate your firewall (just in case), launch Vim and run:
:PluginInstall
## Install YouCompleteMe by reading
## https://github.com/Valloric/YouCompleteMe/blob/master/README.md#ubuntu-linux-x64
## (no need to read the "Full Installation Guide" section; if you alreadt have Clang
## on your system, your might use the option `--system-libclang`)curl https://sh.rustup.rs -sSf | shNow install exa:
sudo apt install zlib1g-dev
cargo install exaOpen the settings manager and do:
-
Click Additional Drivers to make sure all devices are being used.
-
Set the keyboard layout to US international with dead keys.
-
Set up the xfce panel (top bar): show the battery indicator (if on a laptop), set the date, time and timezone (clock format:
%a %d %b %T %p), sync the time with the Internet. Add network, RAM and CPU monitor. -
In
Window Manager>Keyboard, set the keyboard shortcuts (Tile window to the x, Show desktop). -
In
Keyboard>Application Shortcuts, set:- Shift Alt 4:
xfce4-screenshooter -r - Ctrl Shift Alt 4:
xfce4-screenshooter -c -r - Email client to
Super + M - Browser to
Super + W - File explorer to
Super + F - Terminal to
Super + T - Slack to
Super + S /home/romain/git/dotfiles/scripts/lock-screen.shtoCtrl+Alt+Delete.
- Shift Alt 4:
-
In
Power manager, make sure nothing happens when you close the lid (in both plugged mode or battery mode): no sleep mode, no turning off. -
In
Removable Drives and Media, uncheck the 3 options about auto-mount and auto-broswe.
Install the ownCloud client. UPDATE: install NextCloud instead of ownCloud.
If you experience V-sync issues when watching this video, you might want to install compton, unless you run xfwm4 4.13+.
sudo sh -c 'printf "[SeatDefaults]\nallow-guest=false\n" > /etc/lightdm/lightdm.conf.d/50-no-guest.conf'Disable blueman applet from application autostart cause it turns bluetooth on when starting. Then run sudo systemctl disable bluetooth. To check status, run one of the following commands:
- `hcitool dev`
- `rfkill list`
- `bluetooth`
git clone --depth 1 https://github.com/junegunn/fzf.git ~/.fzf
~/.fzf/install # Select Yes Yes NoChange the DNS servers to those from FDN (http://blog.fdn.fr/?post/2014/12/07/Filtrer-The-Pirate-Bay-Ubu-roi-des-Internets).
Set up your /etc/hosts: https://github.com/rpellerin/safe-hosts.
You might want to protect your privacy even further (read the section "Further Reading"). Also read this.
Check this out if you own a laptop equiped with an Intel CPU and ATM (Active Management Technology).
File explorer with image preview support:
sudo apt install ranger
mkdir -p ~/.config/ranger
echo 'set preview_images true' >> ~/.config/ranger/rc.conf
ranger --copy-config=scopePay attention while installing the Android SDK, it requires extra Debian packages, as stated on the download page. You'll also need to install lib32stdc++6 and lib32z1.
Then:
mkdir -p $HOME/.gradle
cp $REPO_DIR/.gradle/gradle.properties $HOME/.gradle/

sudo ln -s /home/romain/android-studio/bin/studio.sh /usr/local/bin/studio
sudo ln -s /home/romain/Android/Sdk/tools/android /usr/local/bin/androidIf you download Python3 using your package manager (as seen above), you'll likely get a quite old version. If you want the latest one, here's how to do it:
-
Download it from https://www.python.org/downloads/
-
Extract the tar ball and
cdto the directory. -
Then:
sudo apt install libssl-dev openssl libsqlite3-dev
./configure --enable-loadable-sqlite-extensions --with-ensurepip=install
make profile-opt
make test
sudo make install
You might also consider using Pipenv to manage several versions of Python and virtual environments.
git clone https://github.com/pyenv/pyenv.git ~/.pyenv
git clone https://github.com/pyenv/pyenv-virtualenv.git ~/.pyenv/plugins/pyenv-virtualenvInstallable with pip install <package>. Don't run them as sudo.
eguseful examples of common commandsgitpythonan API for GitHub
wget http://download.teamviewer.com/download/teamviewer_linux.deb -O /tmp/teamviewer.deb
sudo dpkg -i /tmp/teamviewer.deb
# You might need to run dpkg --add-architecture i386 before the previous command
sudo apt update # Required to solve dependencies involving i386 packages
sudo apt install -f
rm /tmp/teamviewer.deb -fsudo apt install haskell-platform
# http://pandoc.org/installing.html
cabal update
cabal install pandoc --enable-tests
cabal install pandoc-citeproc