A non-official Meshy generative ai RESTful client for the Unity Game Engine.
All copyrights, trademarks, logos, and assets are the property of their respective owners.
This repository is available to transfer to the Meshy organization if they so choose to accept it.
Requires Unity 2021.3 LTS or higher.
The recommended installation method is though the unity package manager and OpenUPM.
- Open your Unity project settings
- Select the
Package Manager
- Add the OpenUPM package registry:
- Name:
OpenUPM - URL:
https://package.openupm.com - Scope(s):
com.rest.meshy
- Name:
- Open the Unity Package Manager window
- Change the Registry from Unity to
My Registries - Add the
Meshypackage
- Open your Unity Package Manager
- Add package from git url:
https://github.com/RageAgainstThePixel/com.rest.meshy.git#upmNote: this repo has dependencies on other repositories! You are responsible for adding these on your own.
There are 4 ways to provide your API keys, in order of precedence:
- Pass keys directly with constructor
⚠️ - Unity Scriptable Object
⚠️ - Load key from configuration file
- Use System Environment Variables
You use the MeshyAuthentication when you initialize the API as shown:
var api = new MeshyClient("msy_apikey123");Or create a MeshyAuthentication object manually
var api = new MeshyClient(new MeshyAuthentication("msy_apikey123"));You can save the key directly into a scriptable object that is located in the Assets/Resources folder.
You can create a new one by using the context menu of the project pane and creating a new MeshyConfiguration scriptable object.
Attempts to load api keys from a configuration file, by default .meshy in the current directory, optionally traversing up the directory tree or in the user's home directory.
To create a configuration file, create a new text file named .meshy and containing the line:
Organization entry is optional.
{
  "apiKey": "msy_apikey123"
}
You can also load the configuration file directly with known path by calling static methods in MeshyAuthentication:
- Loads the default
.meshyconfig in the specified directory:
var api = new MeshyClient(new MeshyAuthentication().LoadFromDirectory("path/to/your/directory"));- Loads the configuration file from a specific path. File does not need to be named
.meshyas long as it conforms to the json format:
var api = new MeshyClient(new MeshyAuthentication().LoadFromPath("path/to/your/file.json"));Use your system's environment variables specify an api key and organization to use.
- Use
MESHY_API_KEYfor your api key.
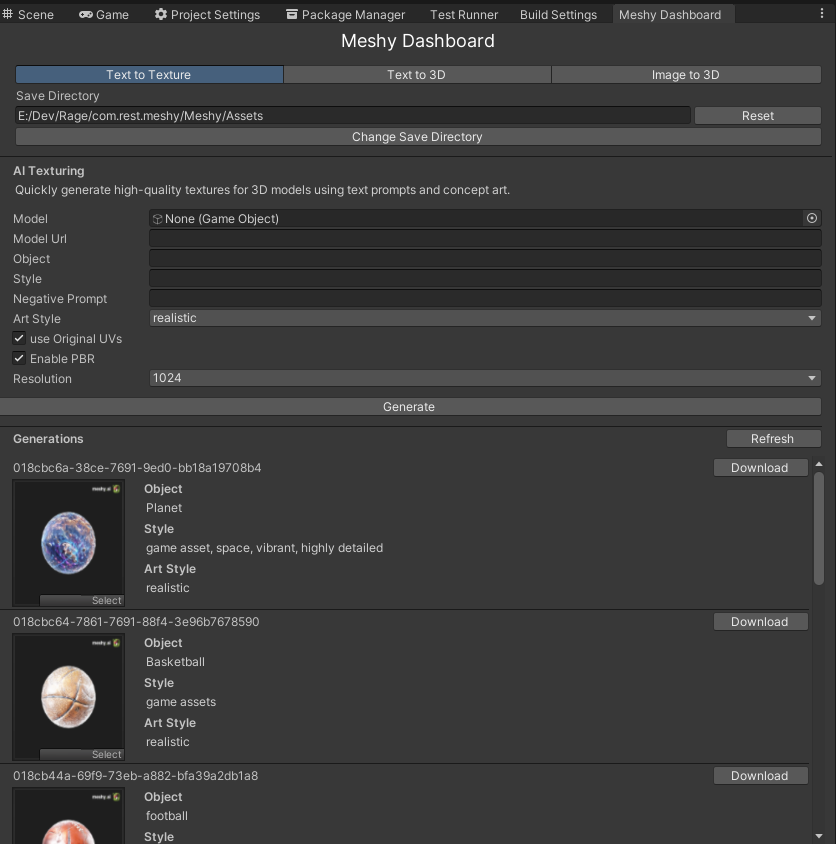
var api = new MeshyClient(new MeshyAuthentication().LoadFromEnvironment());You can perform the same tasks in the dashboard as you would in the webapp.
pro-tip: You can also use the context window to quickly access in editor options for prefabs and scene objects!
Access the dashboard via Window/Dashboards/Meshy
- Generate textures for an existing 3D model.

- Generate a 3D model from a text prompt.

- Generate a 3d model from an image.

Quickly generate high-quality textures for your existing 3D models using text prompts and concept art.
var api = new MeshyClient();
var textToTextureTasks = await api.TextToTextureEndpoint.ListTasksAsync(1, 12, SortOrder.Descending);

foreach (var meshyTask in textToTextureTasks)
{
    Debug.Log($"{meshyTask.Id} | created_at: {meshyTask.CreatedAt}");
}Creates a new text to texture task, and reports progress until the task is completed.
Pass in a prefab or scene GameObject to be re-textured:
var api = new MeshyClient();
var sphere = GameObject.CreatePrimitive(PrimitiveType.Sphere);
var request = new TextToTextureRequest(sphere, "Basketball", "game assets", enableOriginalUV: false, resolution: Resolutions.X1024, artStyle: ArtStyles.Realistic);
var taskResult = await MeshyClient.TextToTextureEndpoint.CreateTextToTextureTaskAsync(request, new Progress<TaskProgress>(progress => Debug.Log($"[{progress.Id}] {progress.Status}: {progress.PrecedingTasks ?? progress.Progress}")));
Assert.IsNotNull(taskResult);
Debug.Log($"{taskResult.Id} | created_at: {taskResult.FinishedAt} | expires_at: {taskResult.ExpiresAt}");
If you need more control over the glb export process you can also pass in your own GLTFast.Export.GameObjectExport object:
var api = new MeshyClient();
var sphere = GameObject.CreatePrimitive(PrimitiveType.Sphere);
var exportSettings = new ExportSettings
{
    Format = GltfFormat.Binary,
    FileConflictResolution = FileConflictResolution.Overwrite,
    ComponentMask = ~(ComponentType.Camera | ComponentType.Animation | ComponentType.Light),
};
var gameObjectExportSettings = new GameObjectExportSettings
{
    OnlyActiveInHierarchy = false,
    DisabledComponents = true,
};
var glbExport = new GameObjectExport(exportSettings, gameObjectExportSettings);
glbExport.AddScene(new[] { sphere });
var request = new TextToTextureRequest(glbExport, "Planet", "game asset, space, vibrant, highly detailed", enableOriginalUV: false, resolution: Resolutions.X1024, artStyle: ArtStyles.Realistic);
var taskResult = await MeshyClient.TextToTextureEndpoint.CreateTextToTextureTaskAsync(request, new Progress<TaskProgress>(progress => Debug.Log($"[{progress.Id}] {progress.Status}: {progress.PrecedingTasks ?? progress.Progress}")));
Assert.IsNotNull(taskResult);
Debug.Log($"{taskResult.Id} | created_at: {taskResult.FinishedAt} | expires_at: {taskResult.ExpiresAt}");
You can also use a public url:
var api = new MeshyClient();
var modelUrl = "https://github.com/KhronosGroup/UnityGLTF/raw/master/UnityGLTF/Assets/StreamingAssets/Lantern/glTF-Binary/Lantern.glb"
var request = new TextToTextureRequest(modelUrl, "Lantern", "game assets", resolution: Resolutions.X1024, artStyle: ArtStyles.Realistic);
var taskResult = await api.TextToTextureEndpoint.CreateTextToTextureTaskAsync(request, new Progress<TaskProgress>(progress => Debug.Log($"[{progress.Id}] {progress.Status}: {progress.PrecedingTasks ?? progress.Progress}")));
Debug.Log($"{taskResult.Id} | created_at: {taskResult.FinishedAt} | expires_at: {taskResult.ExpiresAt}");Quickly generate impressive 3D models using text prompts.
var api = new MeshyClient();
var textTo3DTasks = await MeshyClient.TextTo3DEndpoint.ListTasksAsync(1, 12, SortOrder.Descending);

foreach (var meshyTask in textTo3DTasks)
{
    Debug.Log($"{meshyTask.Id} | created_at: {meshyTask.CreatedAt}");
}var request = new TextTo3DRequest("a treasure chest", "realistic, wooden, carved, highest quality", resolution: Resolutions.X1024, artStyle: ArtStyles.Realistic);
var taskResult = await MeshyClient.TextTo3DEndpoint.CreateTextTo3DTaskAsync(request, new Progress<TaskProgress>(progress => Debug.Log($"[{progress.Id}] {progress.Status}: {progress.PrecedingTasks ?? progress.Progress}")));
Debug.Log($"{taskResult.Id} | created_at: {taskResult.FinishedAt} | expires_at: {taskResult.ExpiresAt}");Quickly transform your 2D images into stunning 3D models and bring your visuals to life.
var api = new MeshyClient();
var imageTo3dTasks = await api.ImageTo3DEndpoint.ListTasksAsync(1, 12, SortOrder.Descending);

foreach (var meshyTask in imageTo3dTasks)
{
    Debug.Log($"{meshyTask.Id} | created_at: {meshyTask.CreatedAt}");
}var api = new MeshyClient();
var imageUrl = "https://raw.githubusercontent.com/KhronosGroup/glTF-Sample-Assets/main/Models/Fox/screenshot/screenshot-x150.jpg";
var request = new ImageTo3DRequest(imageUrl);
var taskResult = await api.ImageTo3DEndpoint.CreateImageTo3DTaskAsync(request, new Progress<TaskProgress>(progress => Debug.Log($"[{progress.Id}] {progress.Status}: {progress.PrecedingTasks ?? progress.Progress}")));
Assert.IsNotNull(taskResult);
Debug.Log($"{taskResult.Id} | created_at: {taskResult.FinishedAt} | expires_at: {taskResult.ExpiresAt}");

