Team Members: Pranjal Srivastava (ps3392), Rishabh Srivastava (rs4489)
Diffusion models, particularly in image generation and representation learning, have demonstrated remarkable capabilities in capturing complex data distributions. However, since these models use an iterative refinement process and have multiple components, they need a lot of resources during inference.
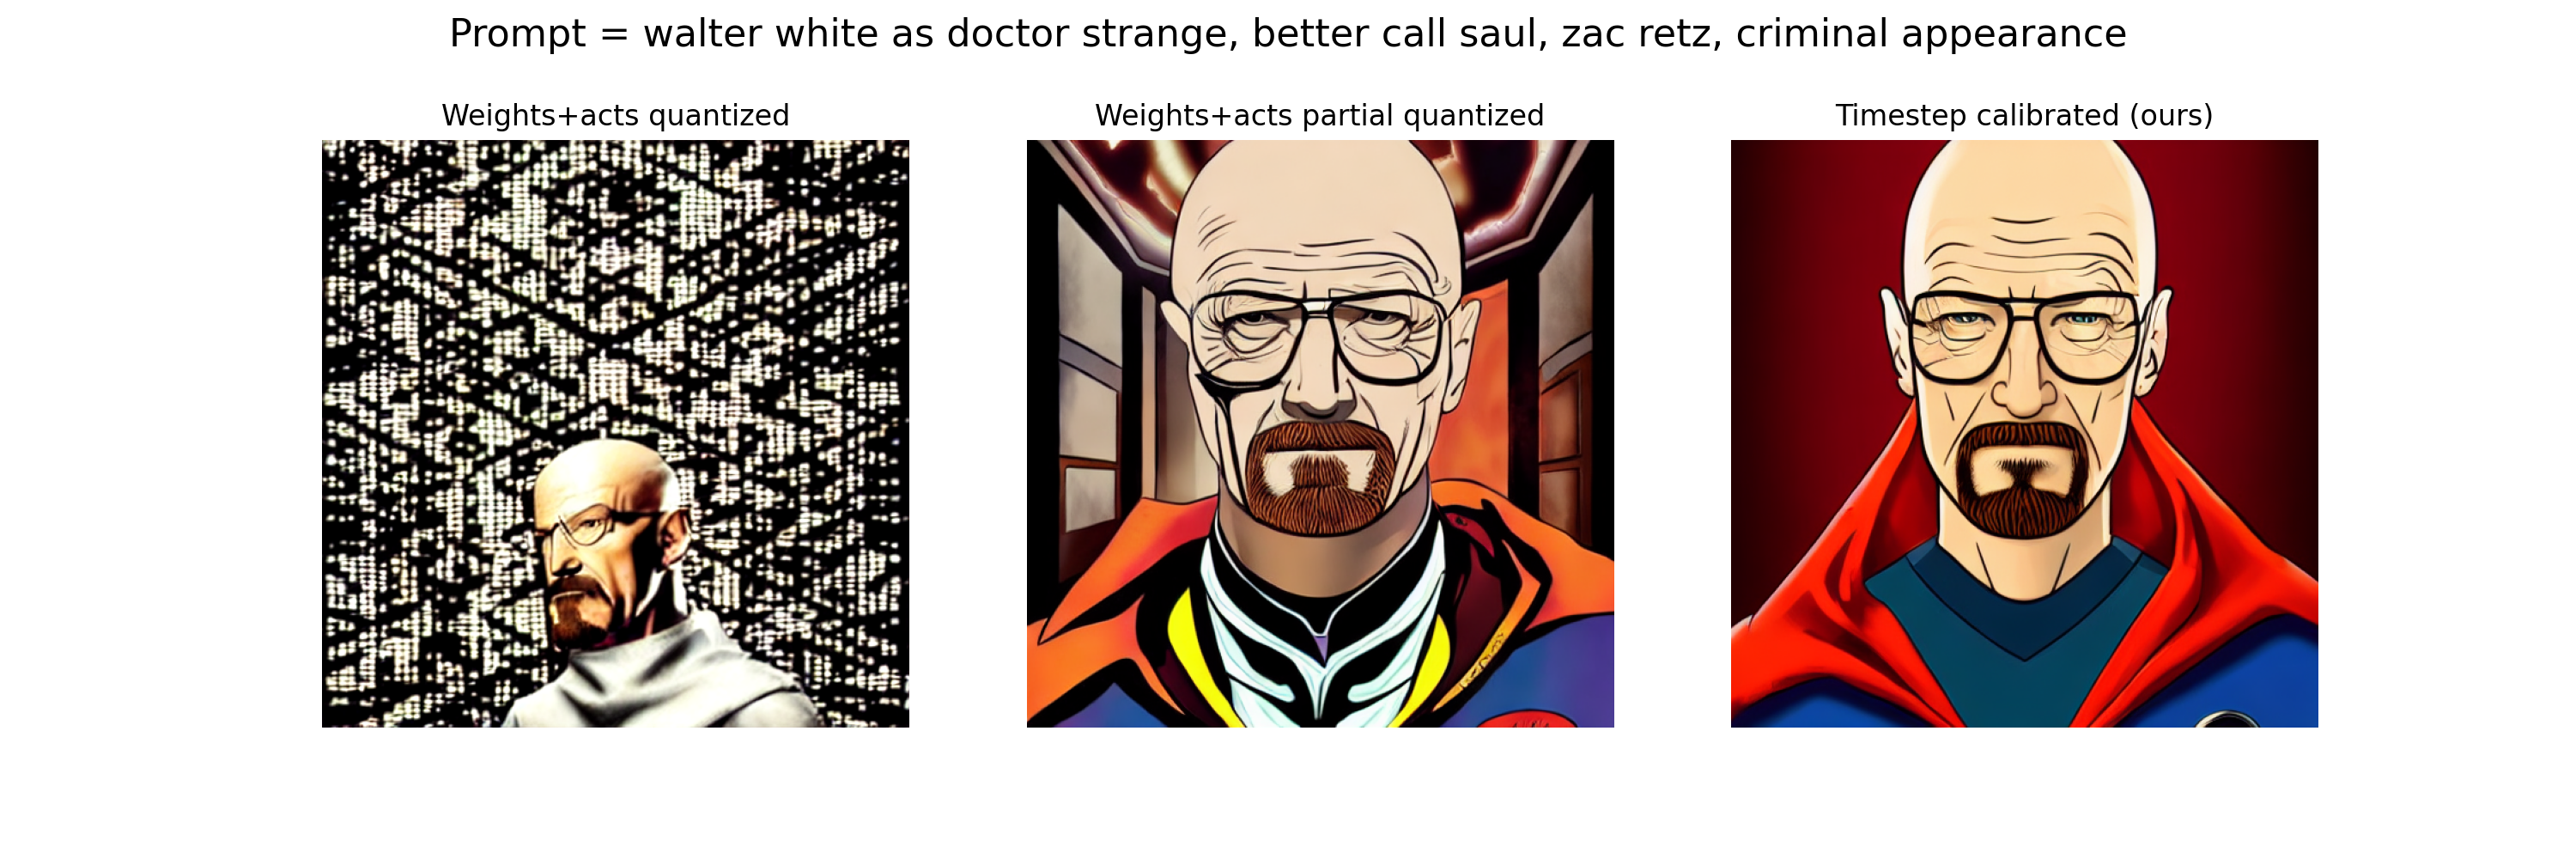
This project studies quantisation and pruning of Stable-diffusion. We also implement Time-step calibrated Quantisation, a new approach to account for timesteps in stable diffusion which significantly improves image generation quality after quantisation and is extremely light-weight and quick to calibrate.
Image generation quality examplesRefer to the Wandb pages for more examples and experiments:
README.md
code
├── config_presets
├── data
├── quantisation
├── stable_diffusion
├── config.yaml
├── download_weights.sh
├── main.py
├── pruning_experiment.py
├── prune_quantize_model.py
├── pruning_profile_exp.py
├── quant_experiment_script.py
├── utility.py
├── prompts_train.txt
├── prompts_train.txt
The data folder contains the CLIP tokenizer vocabulary files, weights of the pre-trained Stable Diffusion model, and sample images used to calculate the FID score.
The stable_diffusion folder contains all the necessary code to create the Stable Diffusion model from the pre-trained model's weights.
The quantisation folder contains the modules for quantisation, including Time-step aware quantisation.
The utility.py file has some helper functions, and the pruning_experiment.py file has the code for the pruning experiments. The main.py file runs the pruning experiments and logs the results in Weights & Biases.
The quant_experiment_script.py is responsible for conducting experiments with quantisation, which are configured by config.yaml. config_presets is a folder that contains some pre-defined configs to run experiments for 8-bit quantisation.
- PyTorch
- PyTorch Lightning
- Numpy
- Matplotlib
- tqdm
- Transformers
- Wandb
- Torchmetrics
- Dotenv
To download the pre-trained model's weights, run the provided bash script:
cd code
bash download_weights.sh
To run the quantization experiments, execute the command below:
python quant_experiment_script.py config.yamlIt creates a quantized model as specified in the config.yaml, runs calibration if required, and saves model output and test numbers to wandb. Many preset configs are provided in the config_presets folder to test different calibration and quantisation schemes.
To run the pruning experiments, execute the command below:
python main.pyBy default, the pruning experiments prune the model unstructurally. You can provide the argument to run_pruning_exp() as True in main.py file to run the experiments for pruning the model structurally.
You can also run profiling experiments for pruning via the main.py script.
To run the combination of pruning and quantization experiments, execute the command below:
python prune_quantize_model.py config.yamlWe provide modules to test different quantisation configurations.
The quantization module simulates quantization based on parameters specified by the config.yaml.
We implement different strategies for quantization, which can be accessed via different parameters.
The quantisation module implements two models that serve as wrappers for a base diffusion model. They are:
- QuantModel: Supports n-bits symmetric quantization with possible scale strategies of
mseandmax - TimeStepCalibratedQuantModel: Implements time-step aware quantization for activations, supports possible scale strategies of
mseandmax. Parametrised by number of timesteps and k, a constant denoting the number of intervals in the timesteps.
We also implement a custom Calibrator, which calibrates the quantisation modules as per the following policies:
- ACT_SCALE_POLICY: How to scale the activations for quantization. Possible values are
maxfor absolute max andmsefor Lp-norm-based scaling. - ACT_UPDATE_POLICY: How to update the step parameter of the quantizer. Possible values are
maximum, for maximum of values through the run, andmomentumfor a weighted exponential average of the scales.
To have a quantize stable-diffusion model based on a specific configuration, we can do the following:
- First, load the stable-diffusion modules and their weights from pre-trained weights
# load the modules of stable-diffusion and their pre-trained weights
from stable_diffusion import *
from stable_diffusion.model_loader import load_from_standard_weights
from transformers import CLIPTokenizer

tokenizer = CLIPTokenizer("<path_to_vocab_file>",
                          merges_file="<path_to_merges_file>")
clip = CLIP()
encoder = VAE_Encoder()
decoder = VAE_Decoder()
diff = Diffusion()

state_dict = load_from_standard_weights('<path_to_weights>')
clip.load_state_dict(state_dict['clip'], strict = True)
encoder.load_state_dict(state_dict['encoder'], strict = True)
decoder.load_state_dict(state_dict['decoder'], strict = True)
diff.load_state_dict(state_dict['diffusion'], strict = True)-
Import quantisation modules and add them to the model.
-
For QuantModel, specify the bitwidths for activations and weights quantisation. By default, weights are quantised per channel, and activations are quantised on per tensor basis.
from quantisation.quant_modules import QuantModel quantised_diff = QuantModel(diff, weight_quant_params={'n_bits': 8}, act_quant_params={'n_bits': 8}) -
For Time-step calibrated quant model, we also specify the timesteps and the parameter k, whcih is the number of different scales through timesteps.
from quantisation.quant_modules import TimeStepCalibratedQuantModel

quantised_diff = TimeStepCalibratedQuantModel(diff, timesteps = 40, k = 5, weight_quant_params={'n_bits': 8}, act_quant_params={'n_bits': 8}, quant_filters = filters)
-
For calibration, we define a config dictionary as following:
    config = {}
    # If you want to send the intermediate images to weights and biases, set to true
    config['LOG_TO_WANDB'] = True

    # Parameters that control th image generation process
    config['GENERATION_PARAMS'] = {}

    config['GENERATION_PARAMS']['UNCOND_PROMPT'] = ""
    # If we want to do classifier-free guidance
    config['GENERATION_PARAMS']['DO_CFG'] = True
    # scale for classifier free guidance
    config['GENERATION_PARAMS']['CFG_SCALE'] = 8
    # Strength of the sampler
    config['GENERATION_PARAMS']['STRENGTH'] = 0.9
    config['GENERATION_PARAMS']['NUM_INFERENCE_STEPS'] = 42
    config['SEED']
    config['GENERATION_PARAMS']['SAMPLER_NAME'] = 'ddpm'
We use this to perform calibration:
from quantisation.quant_modules import Calibrator
models = {
    "clip": clip,
    "encoder": encoder,
    "decoder": decoder,
    "diffusion": quantised_diff #QuantModel or TimeStepCalibratedQuantModel,
}

calibrator = Calibrator(models,
                          tokenizer,
                          act_scale_policy='mse',
                          act_update_policy='momomentum')

calibrator.calibrate(prompts, config)
Calibrator can perform both TimeStepCalibratedQuantisation as well Simple Quantisation.
Refer to the wandb page for detailed results (here) Different methods for quantization were studied along with their generated images.
We present a new method for quantization called Timestep aware quantization.
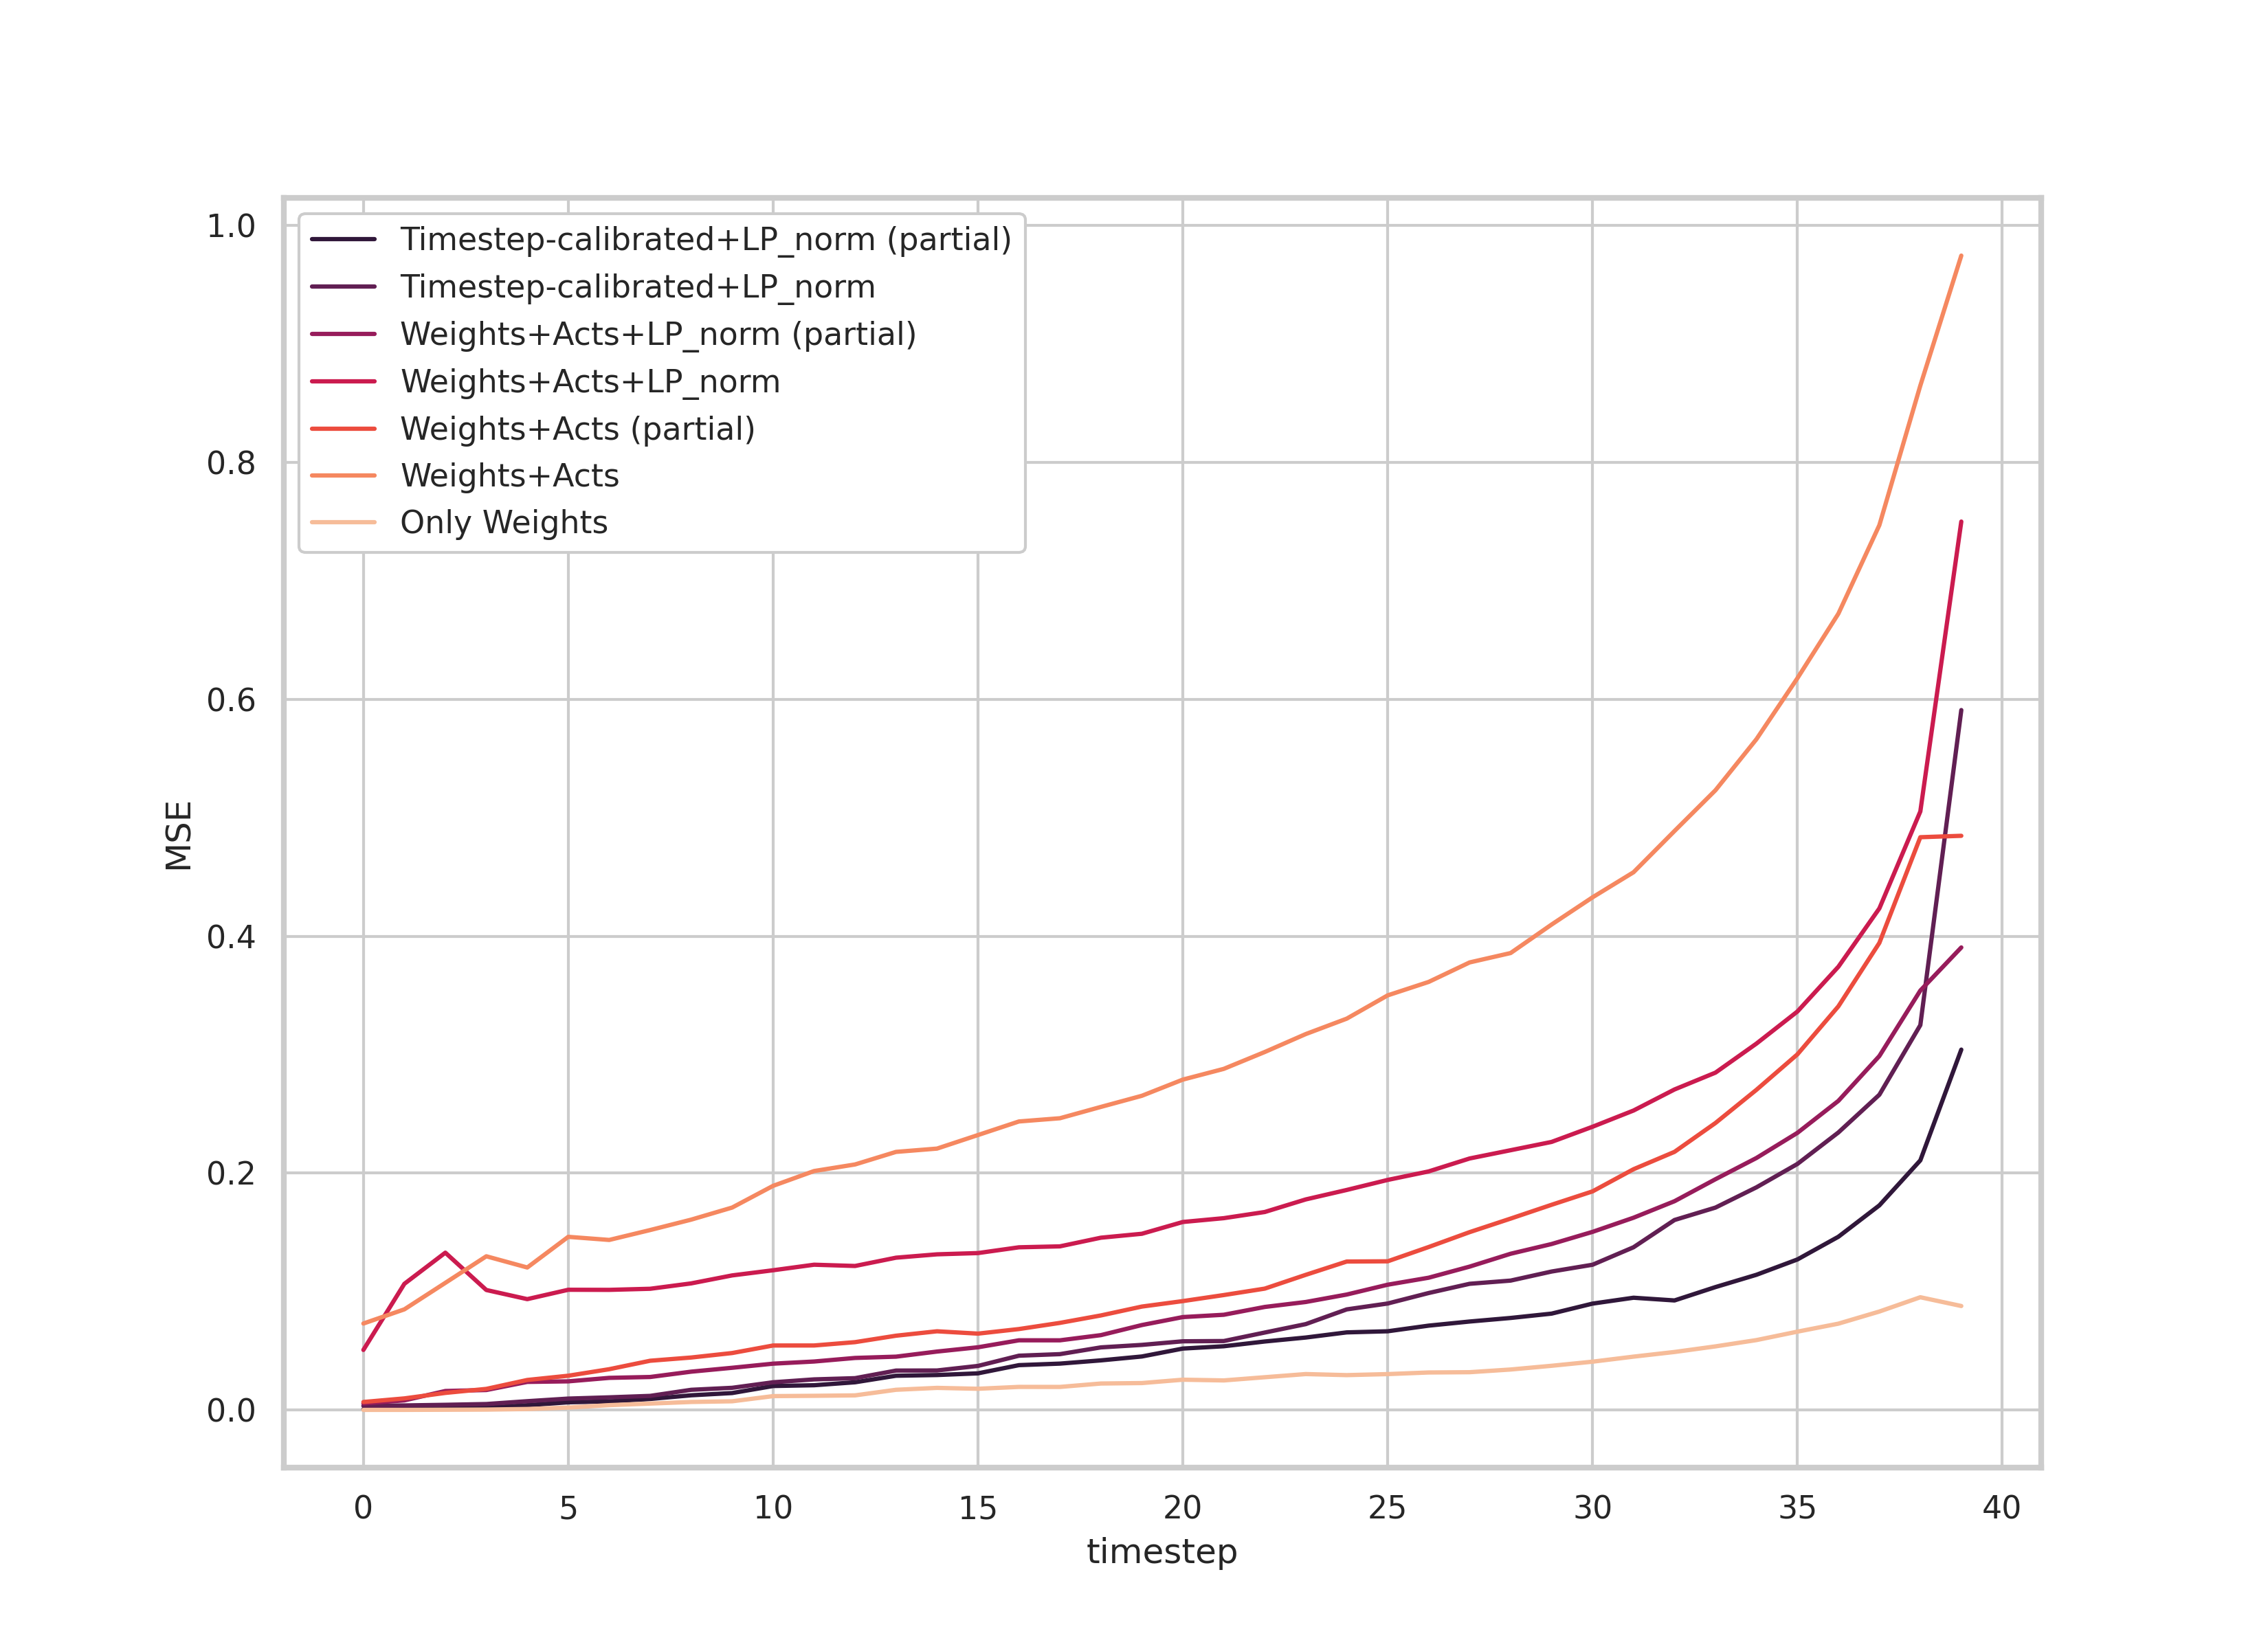
Following is the trace of the MSE loss between outputs of different quantisation methods and unquantised models:
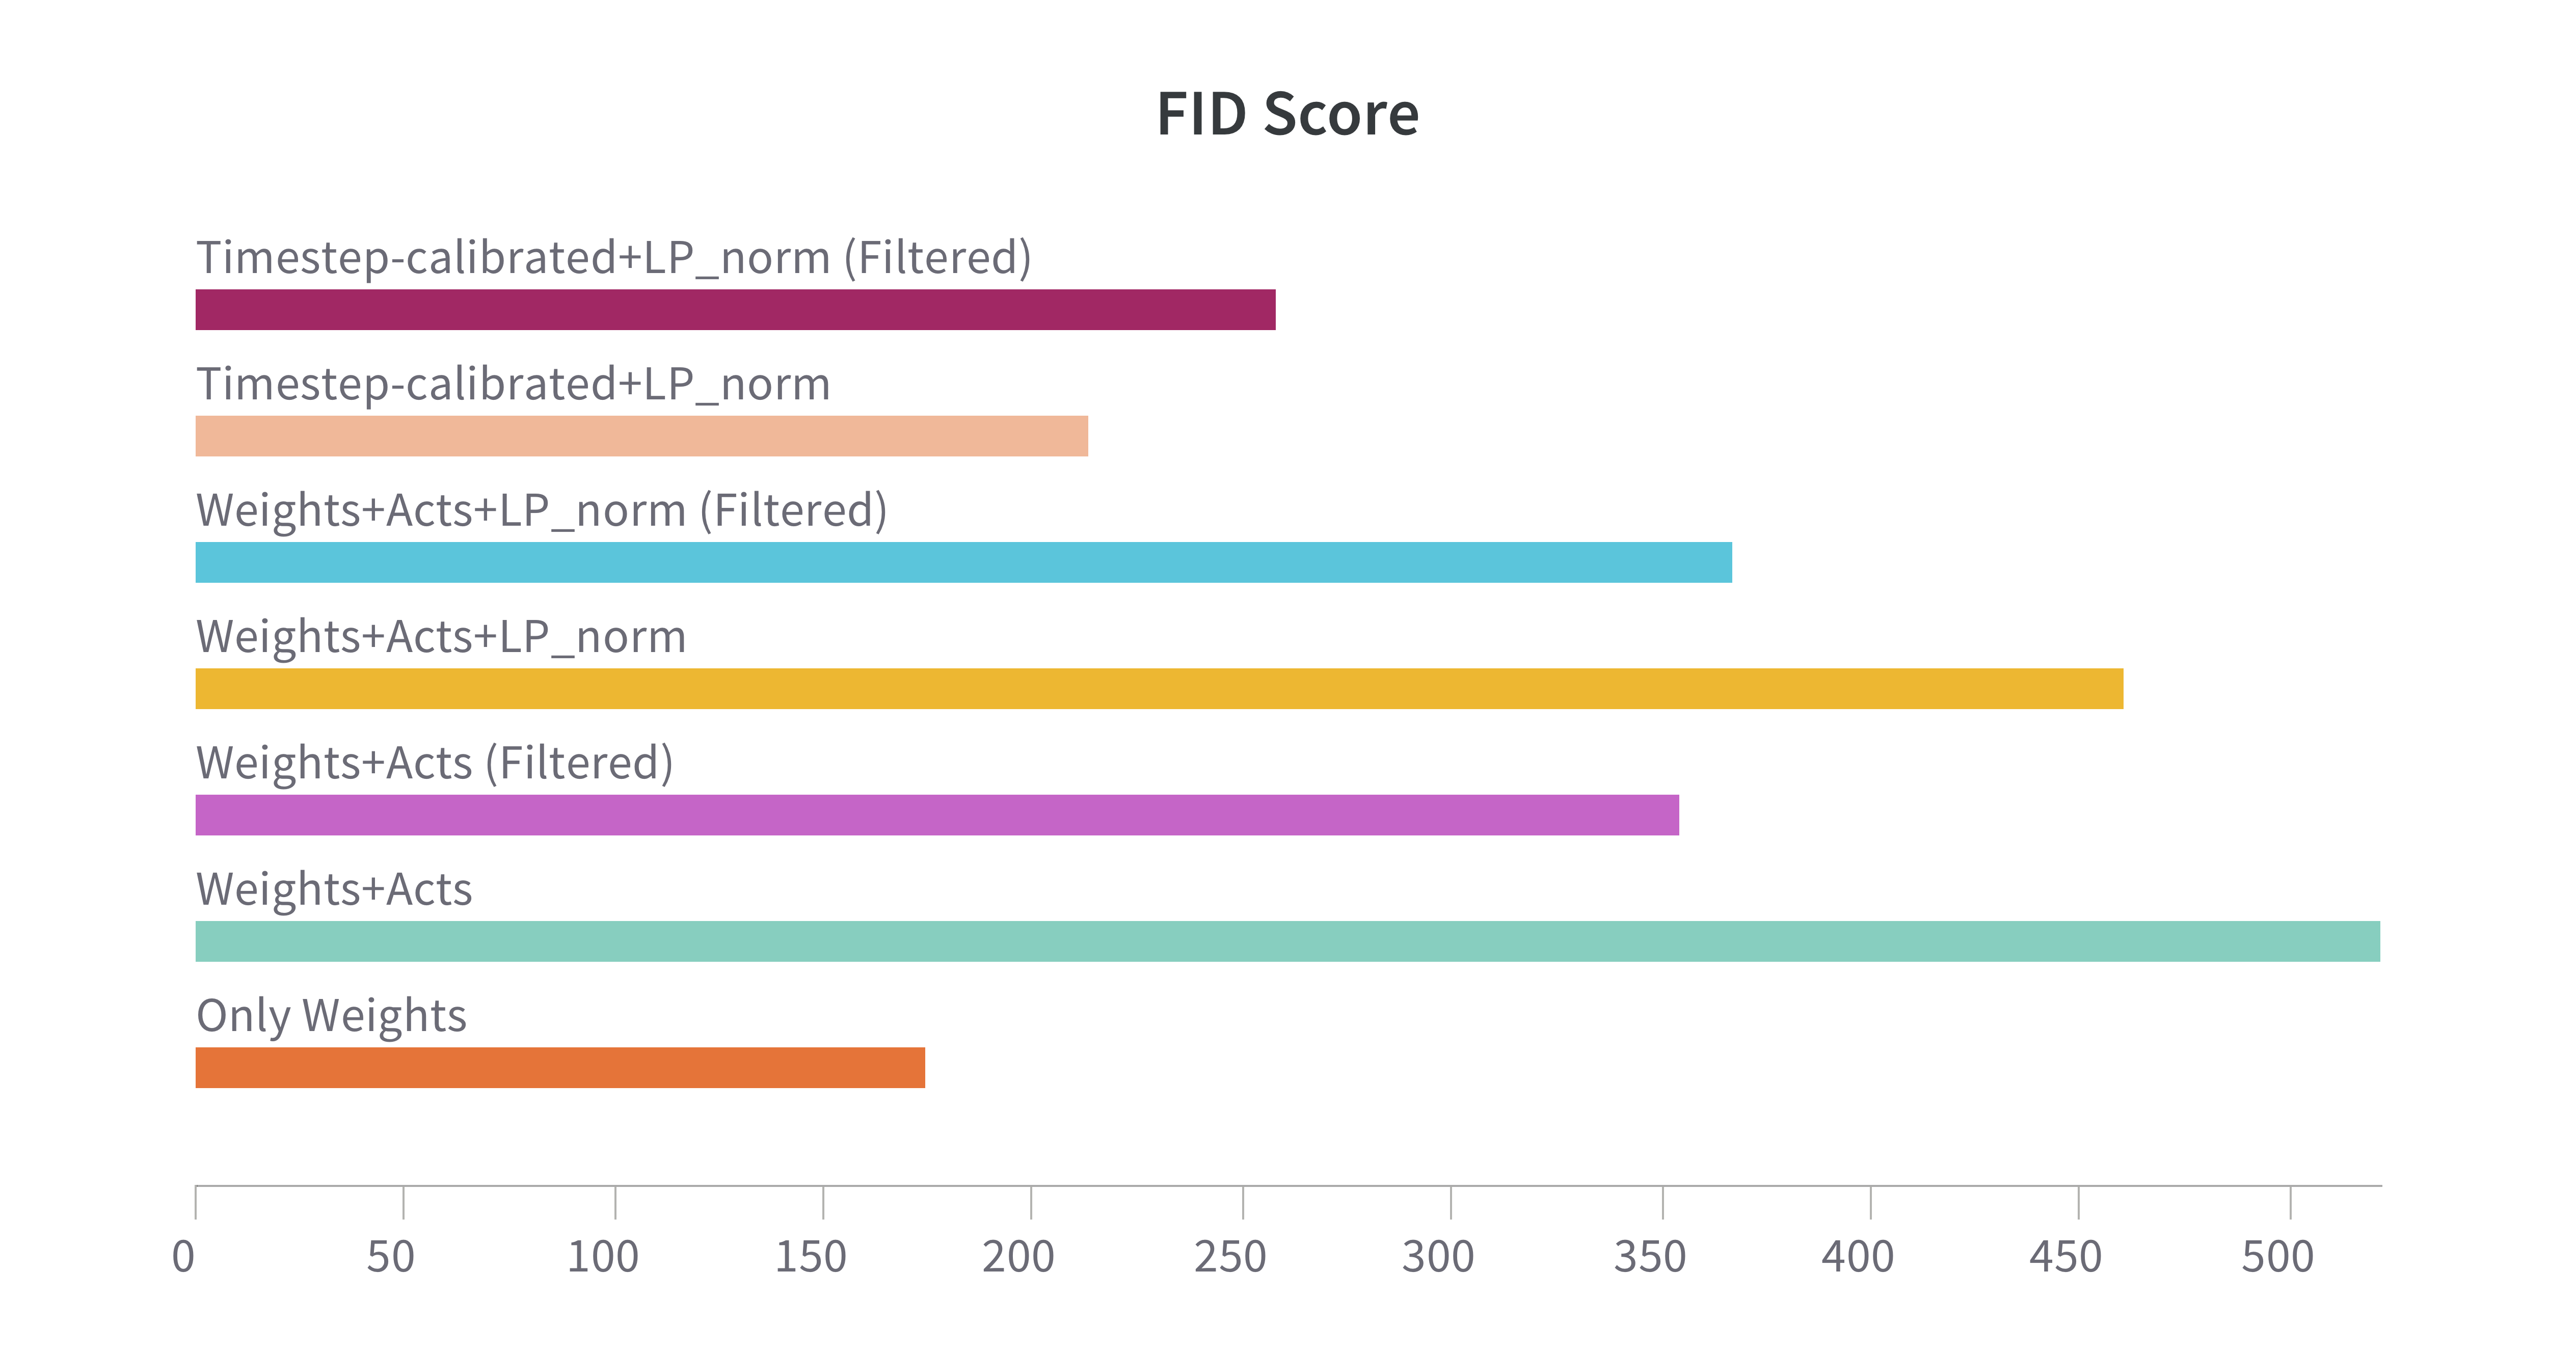
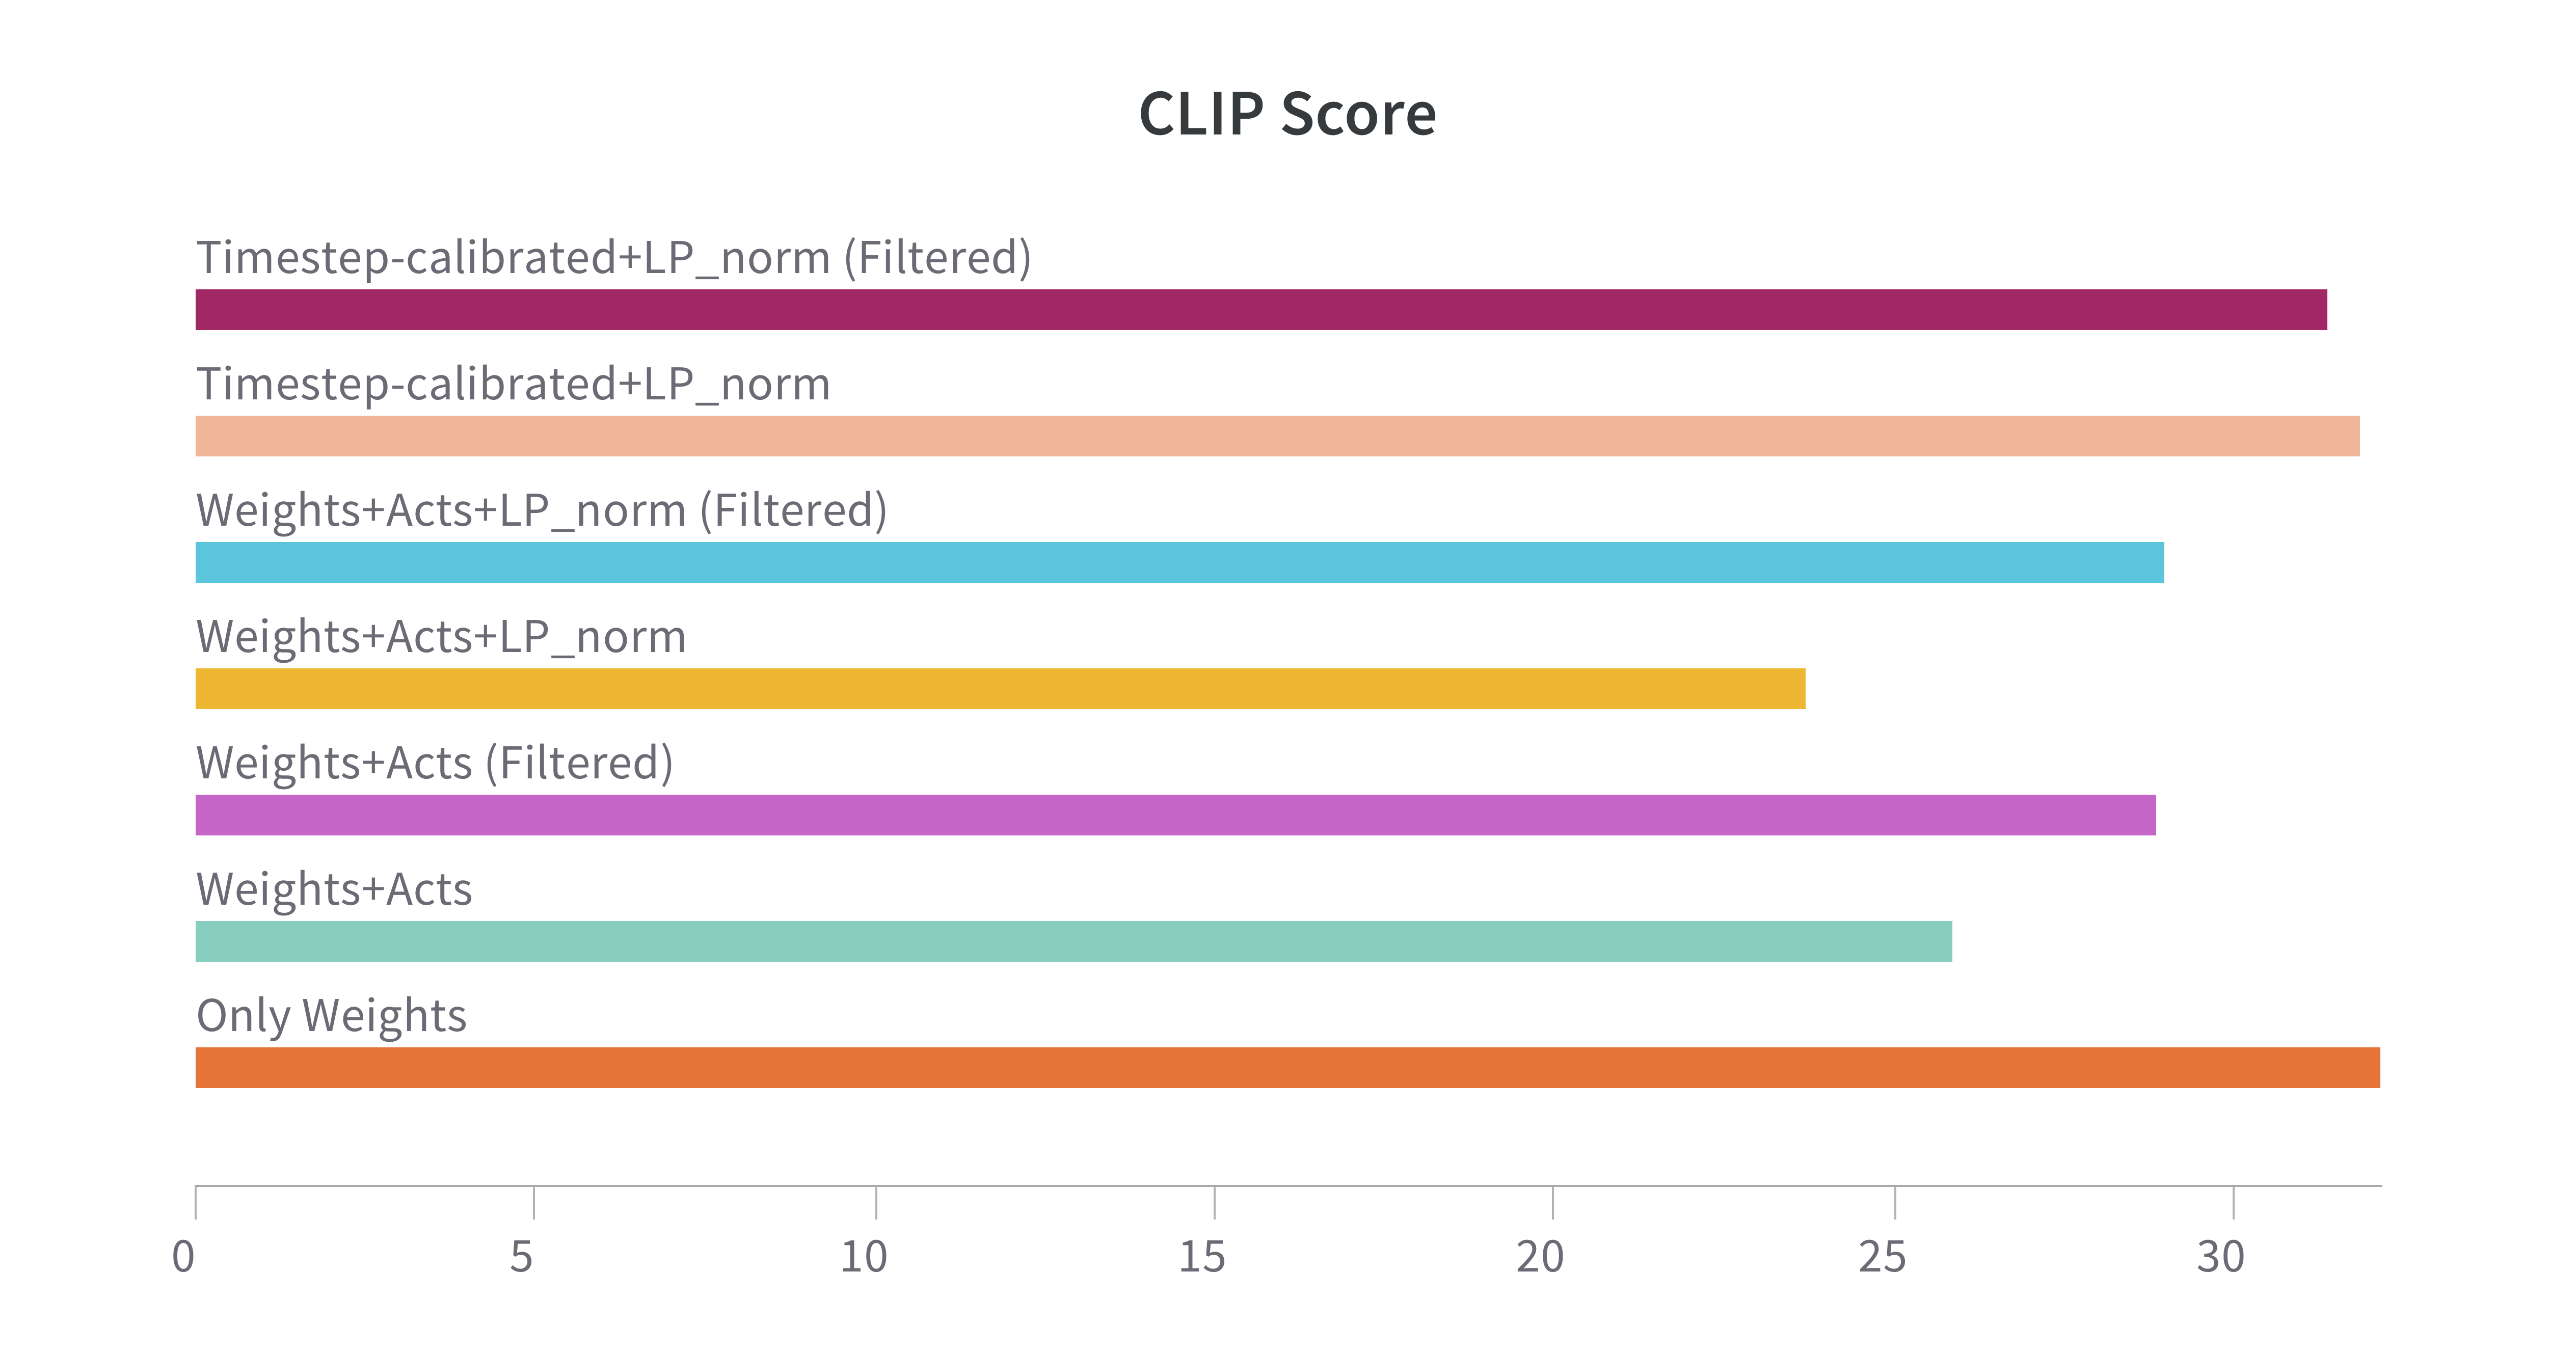
MSE losses in output (Quantized vs Unquantised)We also evaluated the FID scores and CLIP scores for different models. Following were the results:
Interesting takeaways:
-
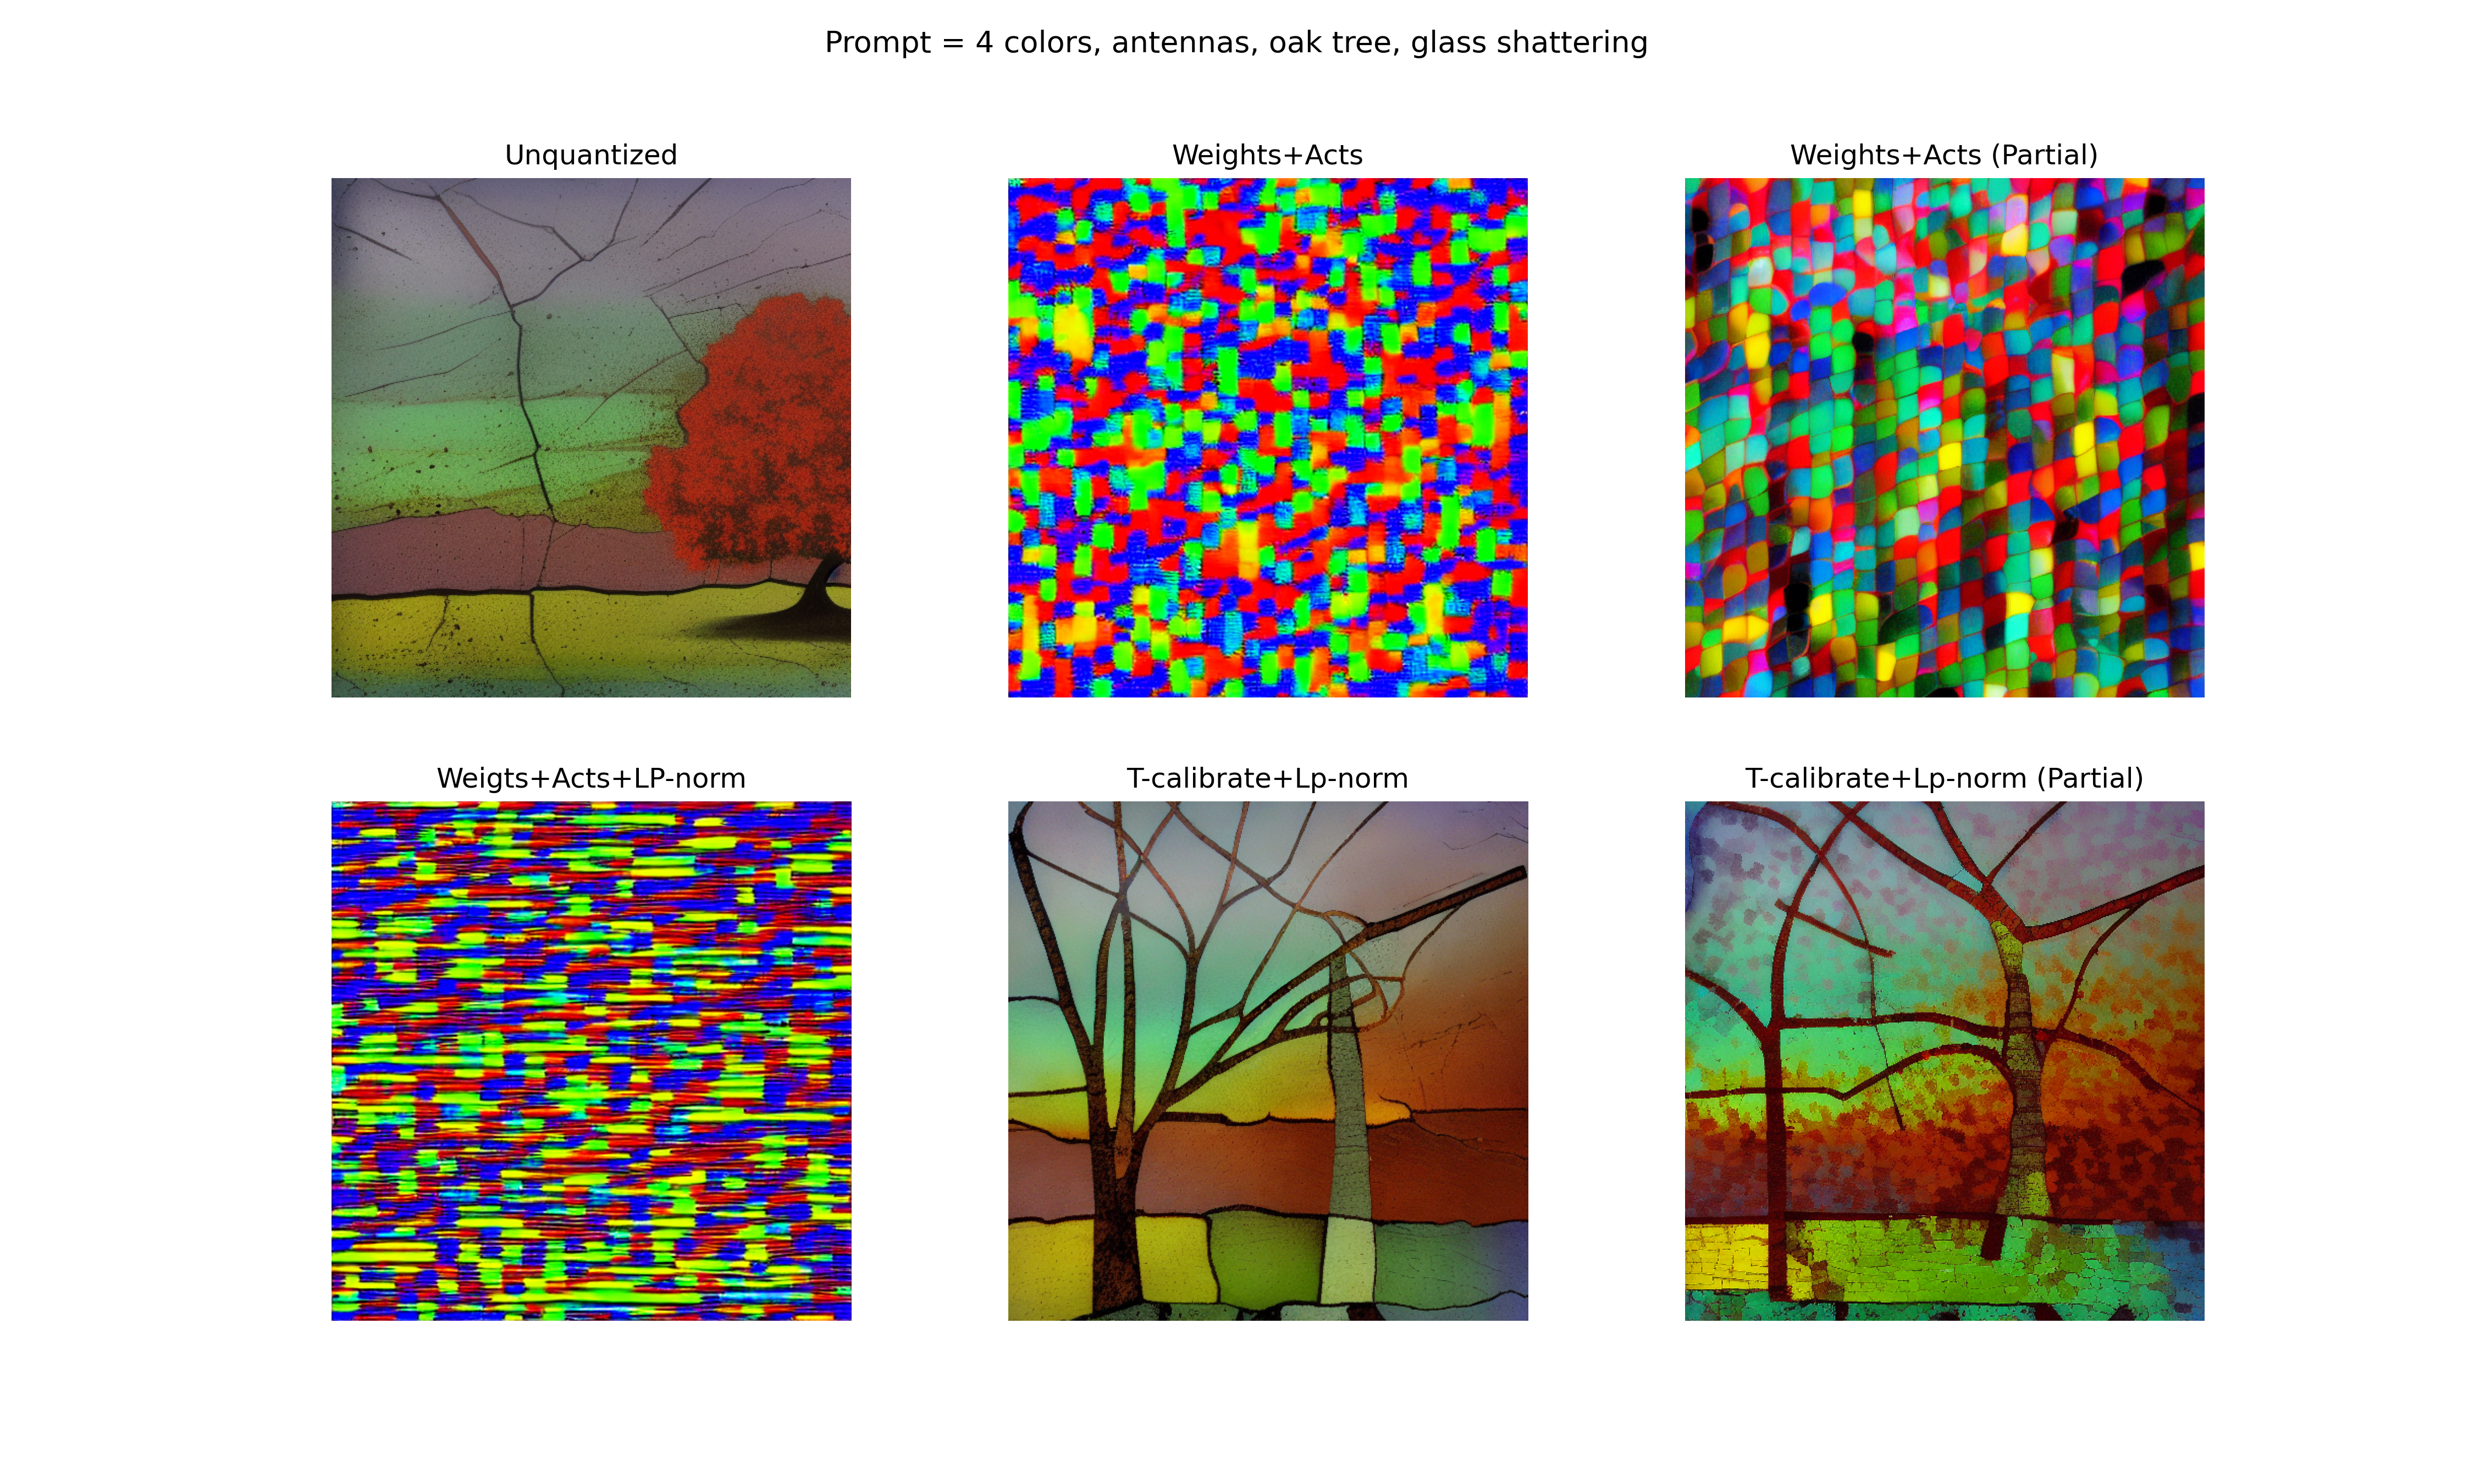
Our proposed approach, Time step calibrated quantization outperforms other methods in scores as well as image generation quality. It achieved the lowest FID score and highest CLIP score as well.
-
If we just quantize the weights, we can quantize the entire network without loss of much capabilities.
-
Quantizing activations is harder, even if we skip the first and the last layer during quantizing activations as well as weights.
-
Scaling based on LP-norm works better than scaling based on MAX value.
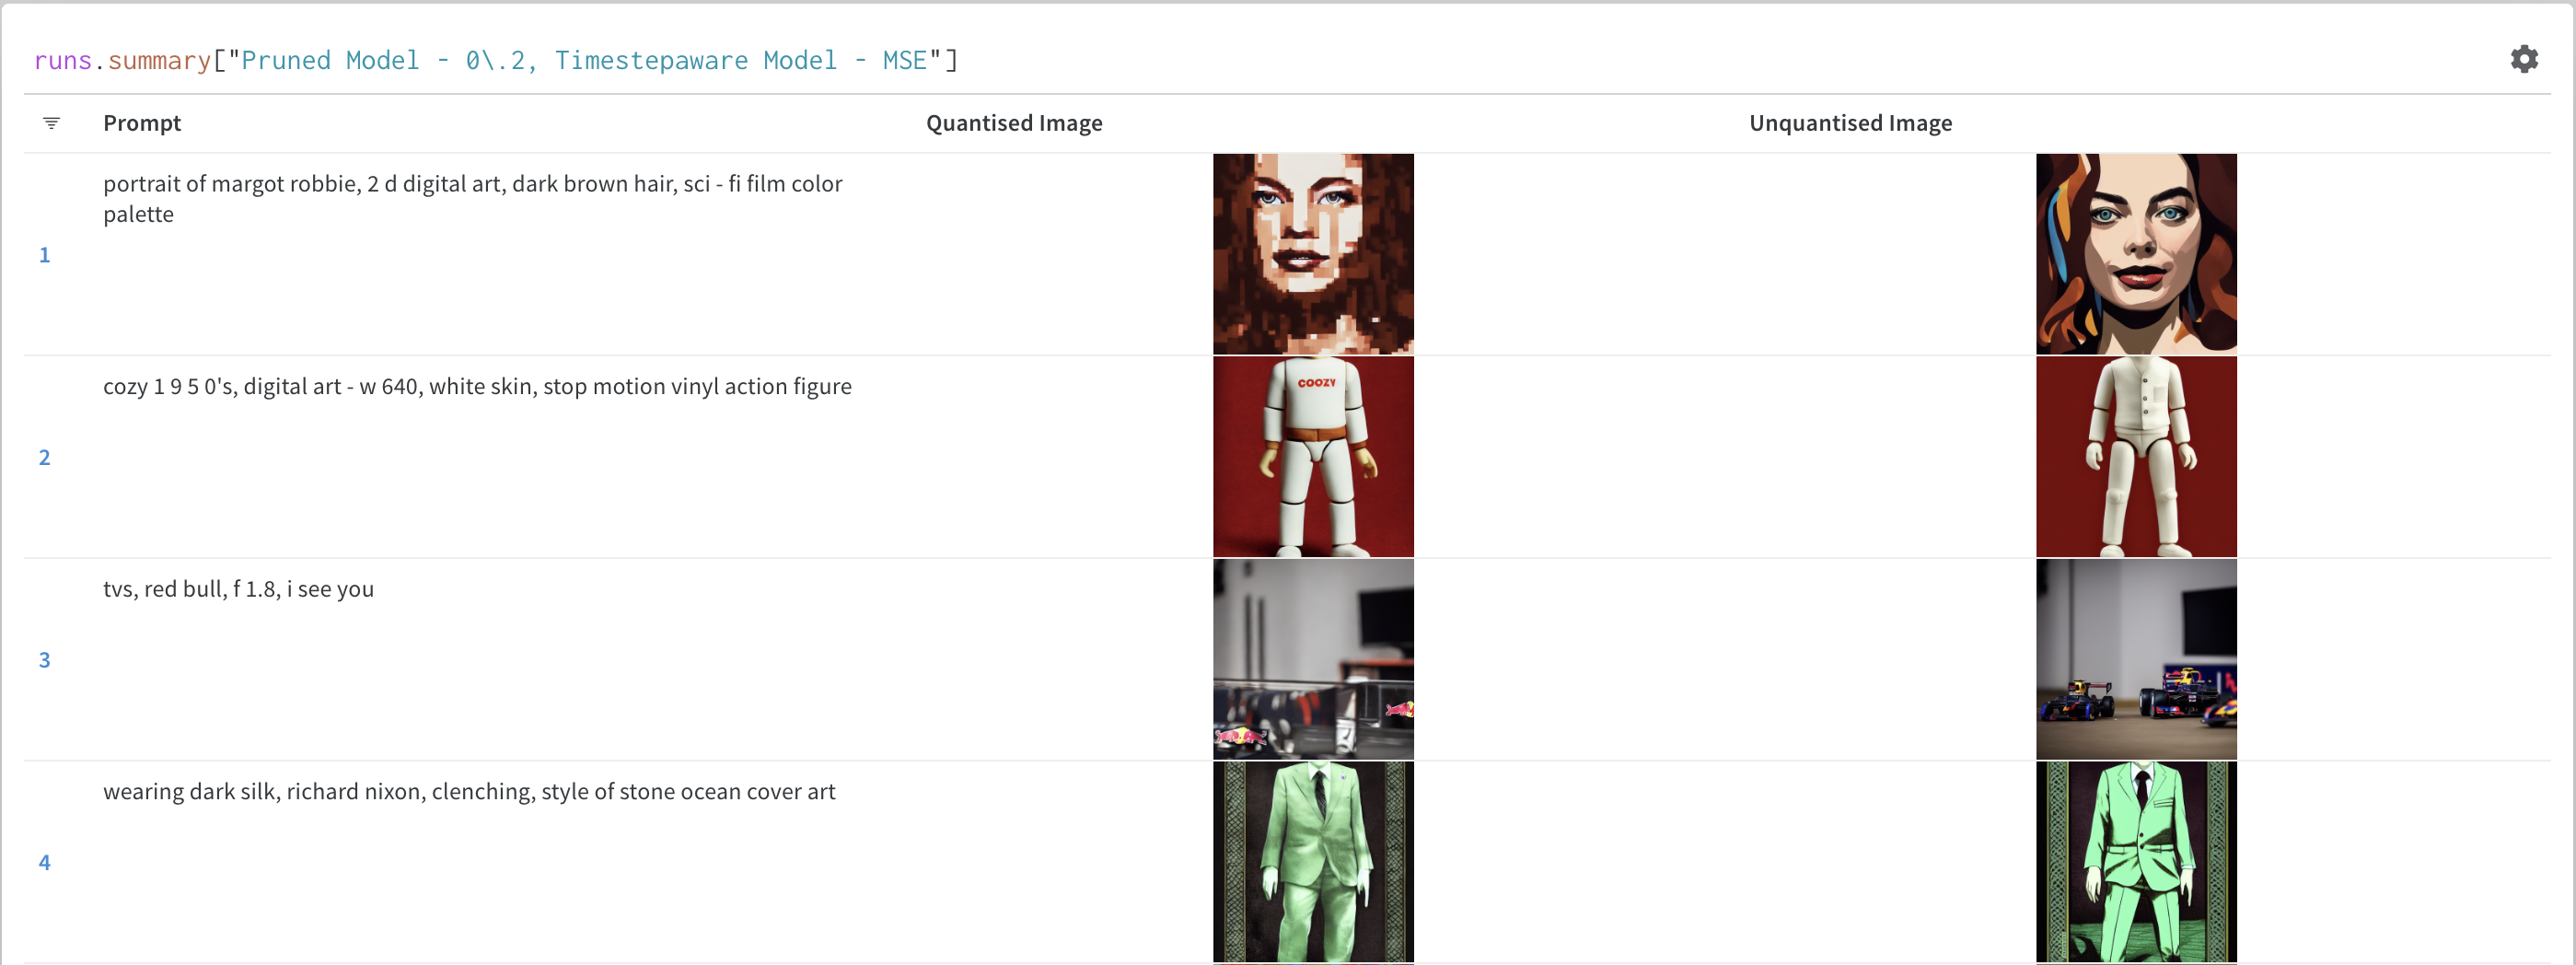
Timestep calibration also achieved significant improvement in the generated image quality. Following are some representative samples:
Image generated by different quantisation methodsPlease refer to the wandb page for more examples and results.
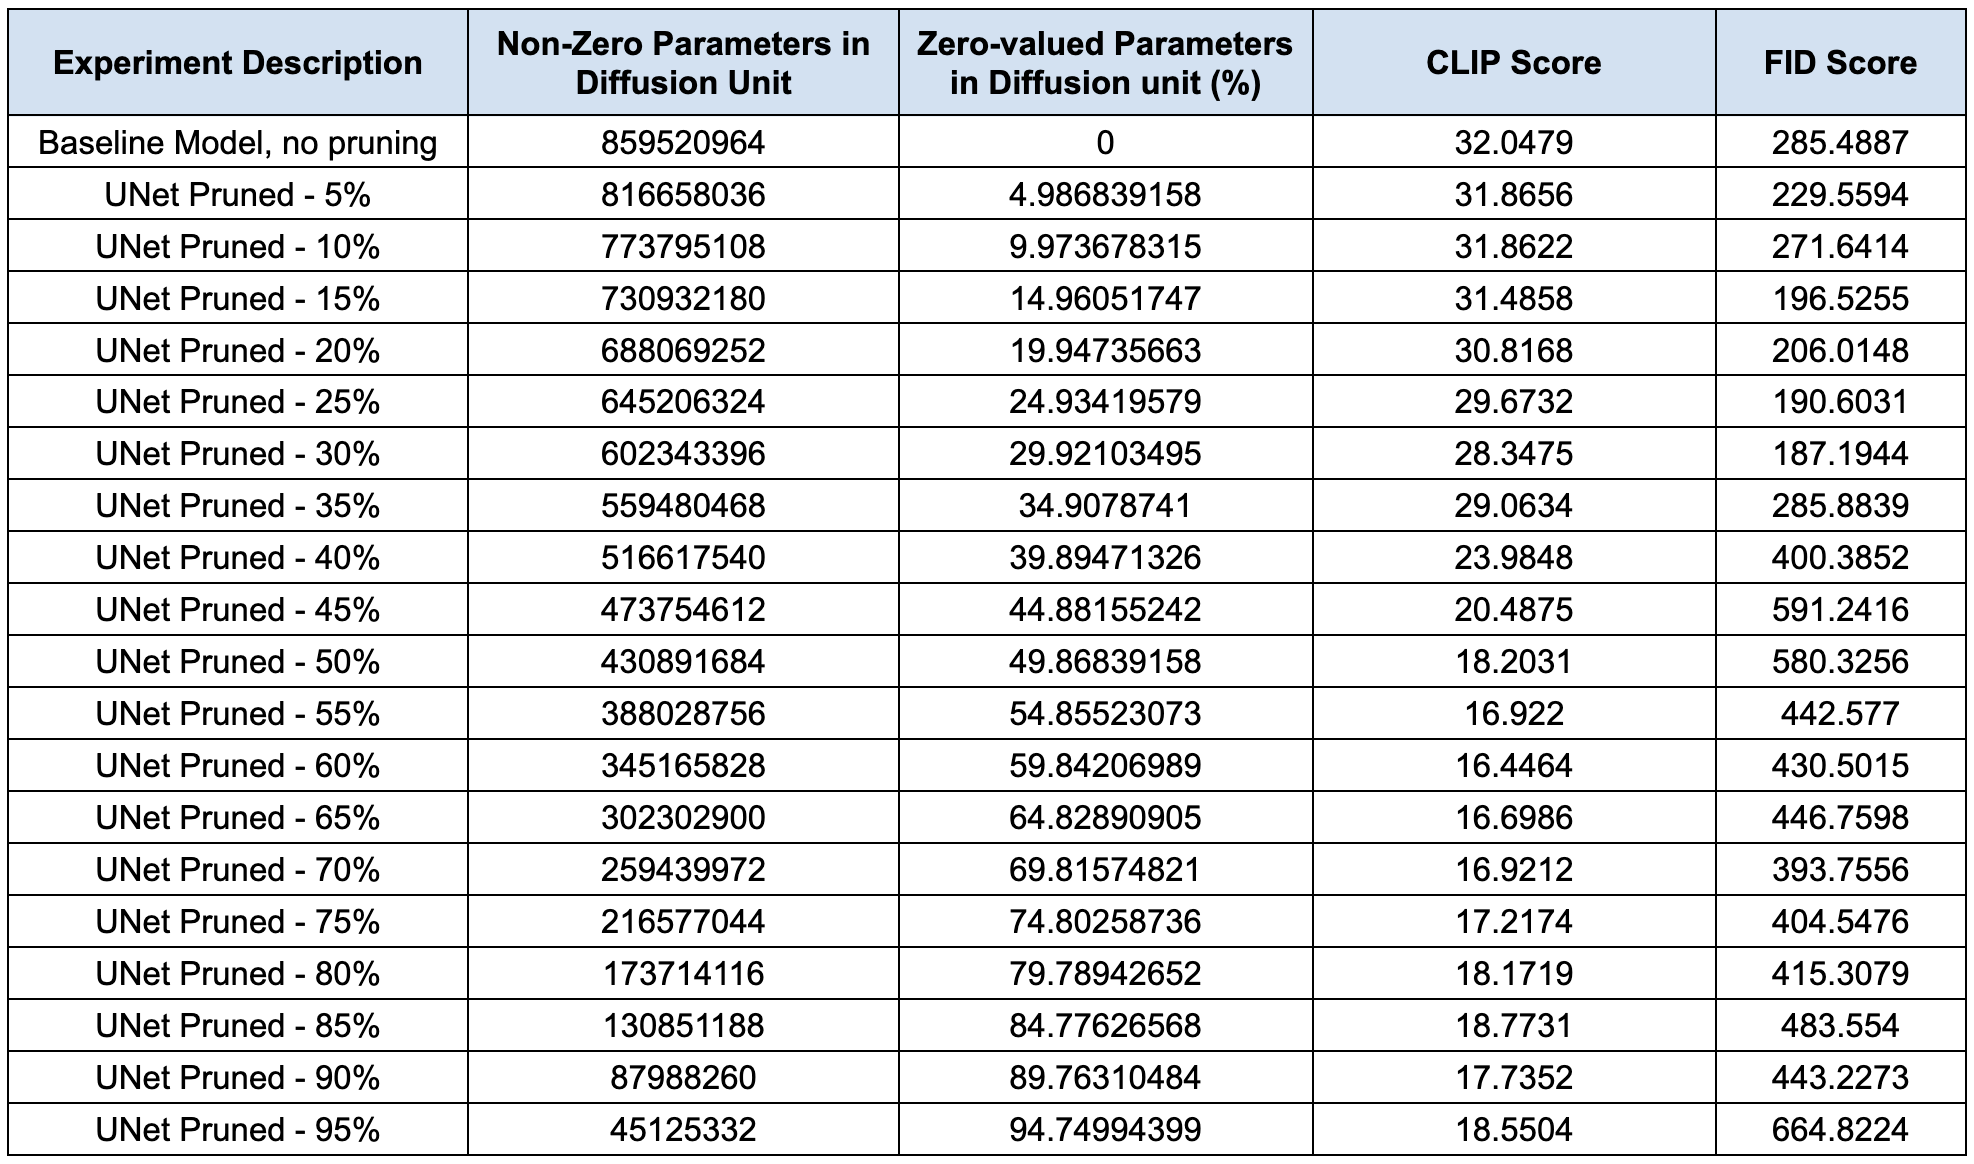
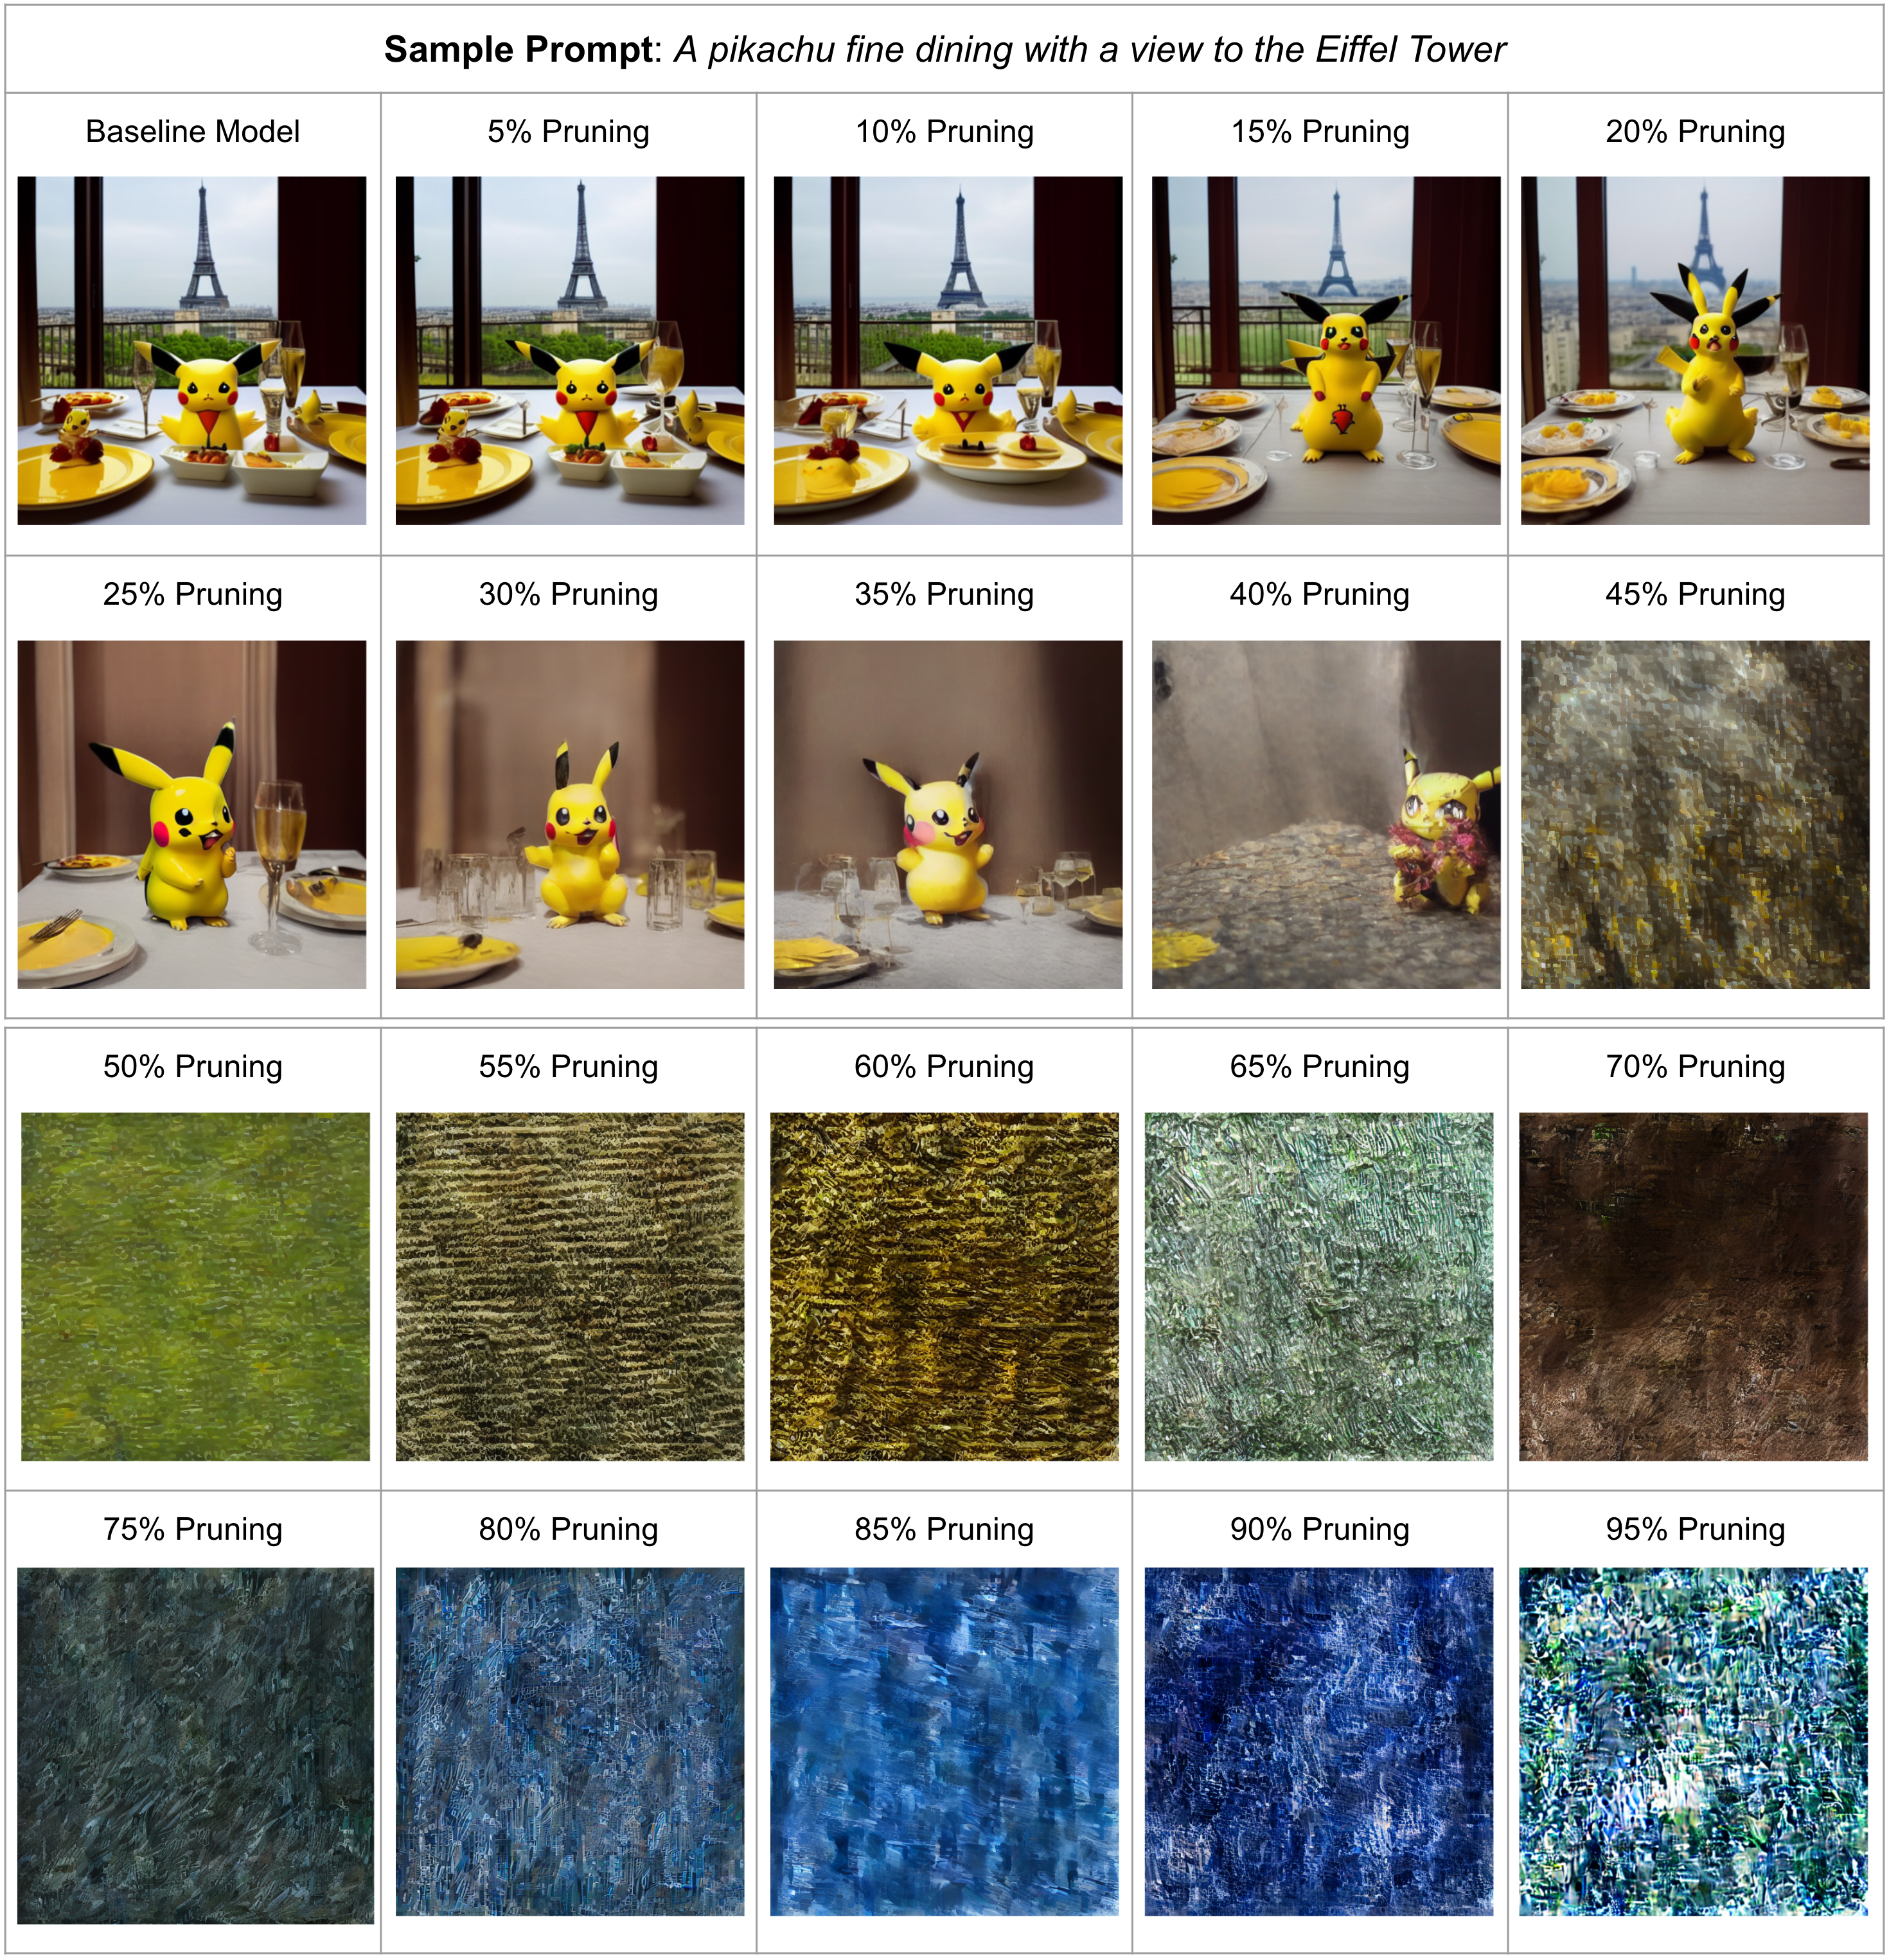
L1-unstructured pruning was carried out on all the linear and convolutional layers of the UNet architecture of the Diffusion model. The results can be seen in the report below:
WandB Experiment Report link for L1-unstructured Pruning: L1-unstructured Pruning Experiments
The experiments show that pruning till 30-35% give us satisfactory results, but further pruning degrades the performance heavily.
The results and analysis of the pruning experiments are displayed below:
Quantitative Analysis of Pruned ModelsSample Results for Pruned Models
We also experimented with structural pruning of weights of UNet, where we pruned channels based on L2 norm. However, we observed a heavy degradation in performance after 5% pruning only. This can be seen from the figures below.
WandB Experiment Report link for Structured Pruning: Structured Pruning Experiments
Quantitative Analysis of Structurally Pruned ModelsSample Results for Structurally Pruned Models
We also carried out profiling of the different components of diffusion model, and the impact of pruning. As observed from the WandB report for the experiments, it is clear that the time for UNet to complete the timesteps reduces as the model is pruned more. Note that the times are averaged for each experiment type.
Profiling Results for Unstructured Pruned ModelsWe got good results when we pruned our model unstructurally (L1-norm) by 20% and used Timestep Aware Calibrated Model with MSE for scaling the activations.
The WandB Experiment results are here.
Results for Pruning and then QuantizingCode for stable diffusion is based on the following repositories:
- https://github.com/CompVis/stable-diffusion/
- https://github.com/huggingface/diffusers/
- https://github.com/hkproj/pytorch-stable-diffusion
Code for quantisation was inspired from these repositories
We followed quantisation methods as outlined in:
