
CarND Capstone Project: System Integration
It’s not about the pieces but how they work together.
- James Dunn, lead
- Oleg Leyzerov
- Aman Agarwal
- Rajesh Bhatia
- Yousof Ebneddin
Create code to drive a vehicle in both a Unity-based simulator and a real-world Lincoln MKZ around a closed-circuit test-track. This repository contains all ROS nodes to implement the core functionality of an autonomous vehicle system.
The diagram below illustrates the system architecture. The autonomous vehicle controller is composed of three major units: perception, planning, and control.
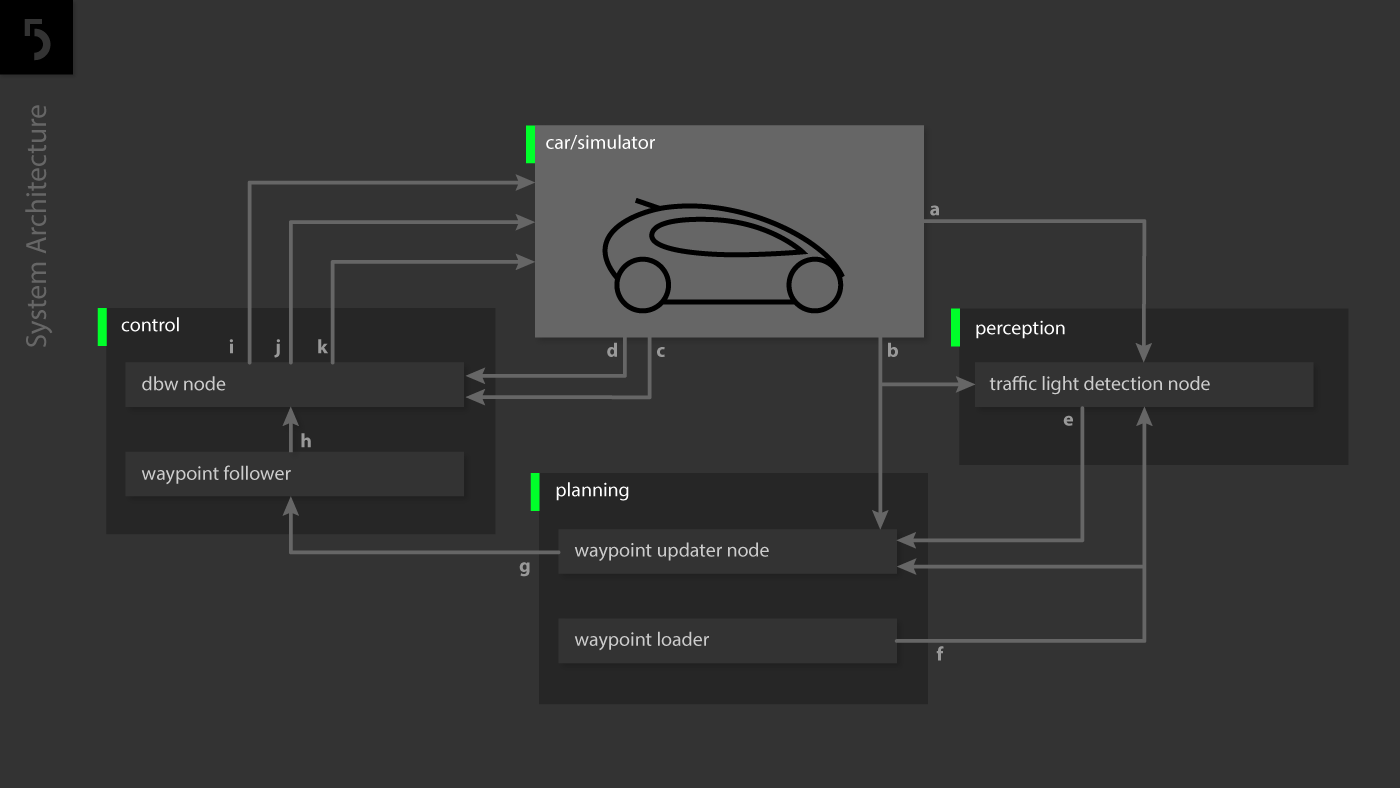 Legend: the letters a-k indicate published ROS topics
  a: /camera/image_raw
  b: /current_pose
  c: /current_velocity
  d: /vehicle/dbw_enabled
  e: /traffic_waypoint
  f: /base_waypoints
  g: /final_waypoints
  h: /twist_cmd
  i: /vehicle/throttle_cmd
  j: /vehicle/brake_cmd
  k: /vehicle/steering_cmd
The traffic light detection and classification node uses a Convolutional Neural Network to classify whole images as either red or none. The model was trained with several datasets using the transfer learning technique on the MobileNet architecture with the Tensorflow Image Retraining Example (tutorial: https://goo.gl/HgmiVo, code: https://goo.gl/KdVcMi). more...
The waypoint updater node publishes a queue of n waypoints ahead of the vehicle position, each with a target velocity. For the simulator, n=100 is sufficient. For the site (the real-world test track), we reduce to n=20. We dequeue traversed waypoints and enqueue new points, preserving and reusing those in the middle. When a light-state changes, the entire queue is updated. The vehicle stops at the final base waypoint. more...
The drive-by-wire node adjusts throttle and brakes according to the velocity targets published by the waypoint follower (which is informed by the waypoint updater node). If the list of waypoints contains a series of descending velocity targets, the PID velocity controller (in the twist controller component of DBW) will attempt to match the target velocity. more...
There are three modes in which the controller operates:
- site: When at the test site, this mode is launched. This mode can be run simultaneously with a rosbag to test the traffic light classifier. (See below)
- sitesim: emulates the test site in the simulator at the first traffic light.
- styx: When using the term3 simulator, this mode is launched. The simulator communicates through server.py and bridge.py
These modes are started by roslaunch. For example, to run the styx (simulator) version we run:
roslaunch launch/styx.launch
Traffic light image classification
Waypoint updater
Drive-by-wire
MobileNets
Transfer learning
Pure Pursuit Algorithm
Quaternion mathematics
Quaternions online visualization
PID control
This is the project repo for the final project of the Udacity Self-Driving Car Nanodegree: Programming a Real Self-Driving Car. For more information about the project, see the project wiki here.
-
Be sure that your workstation is running Ubuntu 16.04 Xenial Xerus or Ubuntu 14.04 Trusty Tahir. Ubuntu downloads can be found here.
-
If using a Virtual Machine to install Ubuntu, use the following configuration as minimum:
- 2 CPU
- 2 GB system memory
- 25 GB of free hard drive space
The Udacity provided virtual machine has ROS and Dataspeed DBW already installed, so you can skip the next two steps if you are using this.
-
Follow these instructions to install ROS
- ROS Kinetic if you have Ubuntu 16.04.
- ROS Indigo if you have Ubuntu 14.04.
-
- Use this option to install the SDK on a workstation that already has ROS installed: One Line SDK Install (binary)
-
Download the Udacity Simulator.
Build the docker container
docker build . -t capstoneRun the docker file
docker run -p 127.0.0.1:4567:4567 -v $PWD:/capstone -v /tmp/log:/root/.ros/ --rm -it capstone- Clone the project repository
git clone https://github.com/level5-engineers/system-integration.git- Install python dependencies
cd system-integration
pip install -r requirements.txt- Make the controller
cd ros
catkin_make- In a new terminal window, start roscore
roscore-
Start the simulator, select screen resolution 800x600, click SELECT, uncheck the Manual checkbox. Ideally, run the simulator in the host environment (outside of the virtual machine).
-
In a new terminal window, start the controller
cd system-integration/ros
source devel/setup.sh
roslaunch launch/styx.launch- Download training bag that was recorded on the Udacity self-driving car (a bag demonstraing the correct predictions in autonomous mode can be found here)
- Unzip the file
unzip traffic_light_bag_files.zip- Play the bag file
rosbag play -l traffic_light_bag_files/loop_with_traffic_light.bag- Launch your project in site mode
cd system-integration/ros
roslaunch launch/site.launch- Confirm that traffic light detection works on real life images