![]()


Share, remote control, and automate your game library online with self-hosted Playnite-Web.
Playnite-web offers:
- a beautiful web UI for your Playnite library to share with friends
- remote control of staring and stopping games with home automation; locked behind a username/password login screen
- a graph API to help you build other unique experiences

Playnite-Web consists the following:
All components are required.
| Component | Deployment Mechanism | Purpose |
|---|---|---|
| database | Docker image / bring your own | Mongo DB database that stores game data in games database. |
| MQTT broker | Docker image / bring your own | Provides a communication mechanism between Playnite and Playnite-Web. |
| Playnite-Web Plugin | Extension installed into Playnite | The plugin sends and receives messages via MQTT when data in Playnite is changed. |
| Playnite-Web App | Docker image | Web application and UI to browse and view game library. Updates database from Playnite-Web Plugin. Can be exposed to Internet to share with friends. |
Note, if you want to update your game library only, and not run Playnite-Web, you may do so by running the
playnite-web-game-db-updater. However, do not run both this and Playnite-Web App. See the playnite-web-game-db-updater documentation for more details.
Recommended to use docker image eclipse-mosquitto. Things to note when deploying:
- IP/hostname used to access the broker
- Port
- Username (only if configured to disable anonymous access)
- Password (only if configured to disable anonymous access)
Recommended to use docker image mongo:focal. Things to note when deploying:
- Use/mount a persistent volume. See mongodb image documentation for more details.
- IP/hostname used to access the database
- Port
- Username (only if configured to disable anonymous access)
- Password (only if configured to disable anonymous access)
- Download (latest) version release of Playnite extension (release asset named "PlayniteWeb_ec3439e3-51ee-43cb-9a8a-5d82cf45edac_0_1.pext").
- Open Playnite and drag downloaded file into the Playnite. It should prompt to install the plugin.
-
Open the plugin's settings and enter the MQTT connection information to your MQTT broker.
>  -
Open the plugin's settings and enter the a device ID and device name under Topics.
> 
Use the docker packaged image from the repo. Ensure you are using the same release version as the Plugin (above). Example image: ghcr.io/andrew-codes/playnite-web-app:1.0.0
| Environment Variable | Value | Notes |
|---|---|---|
| PORT | Defaults to 3000 | Port in which web application is accessible. |
| DB_HOST | IP address/hostname of Mongo DB database | |
| DB_PORT | Port of Mongo DB database | Default for MongoDB image is 27017 |
| DB_USERNAME | Username to access database | Optional, only required if disabled anonymous access |
| DB_PASSWORD | Password to access database | Optional, only required if disabled anonymous access |
| DB_URL | MongoDB connection URL | Optional, alternative to individual DB connection options |
| DEBUG | "playnite-web/*" |
Optional, for troubleshooting; send logs to STDIO |
| USERNAME | Username used to login | |
| PASSWORD | Password value used to login | |
| SECRET | Secret used to protect credentials | |
| MQTT_HOST | IP address/hostname of MQTT broker. | |
| MQTT_PORT | Port of MQTT broker | Default for MQTT image is 1883 |
| MQTT_USERNAME | Username to access MQTT broker | Optional, only required if disabled anonymous access |
| MQTT_PASSWORD | Password to access MQTT broker | Optional, only required if disabled anonymous access |
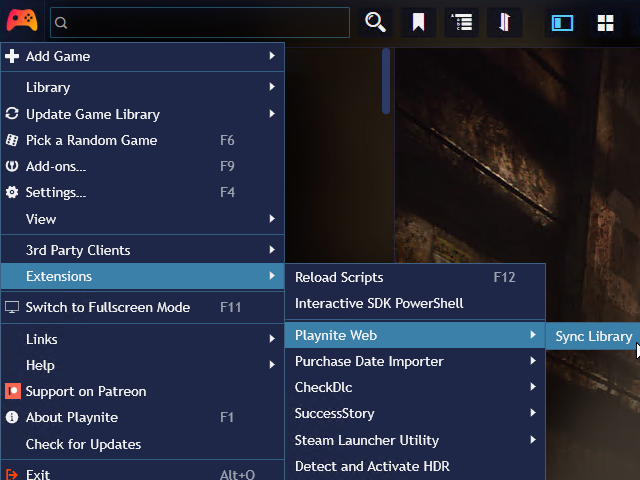
- Open Playnite and select and "Sync Library" from Playnite Web's menu setting. This is only required once.
- Navigate to the web app;
http://$PLAYNITE_WEB_APP_IP:$PORT

- Read through our contributing guidelines.
- Next, read and set up your development environment.
- Additionally, refer to the design docs.