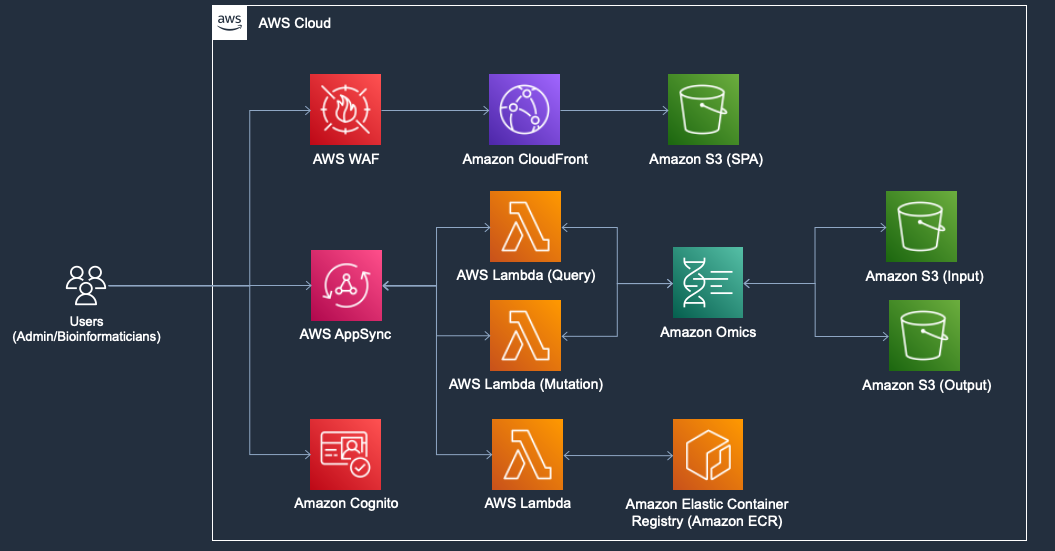
This webapp allows users such as admin and bioinformaticians to operate AWS HealthOmics workflow easily. Admin can create new users and add them a group to access this webapp. Users like bioinformaticians can create new repository in Amazon ECR, create new workflow and run the workflow in AWS HealthOmics. This webapp visualizes the run command status with the chart and tables.
 You can create new workflow, execute a run command and visualize the job status related to AWS HealthOmics in the webapp. The webapp contains the features in the following pages. As default, the
 admin and bioinformatician groups are created by this app.
You can see the run command status, run command details and run tasks timeline.
 You can create new repository in Amazon ECR.
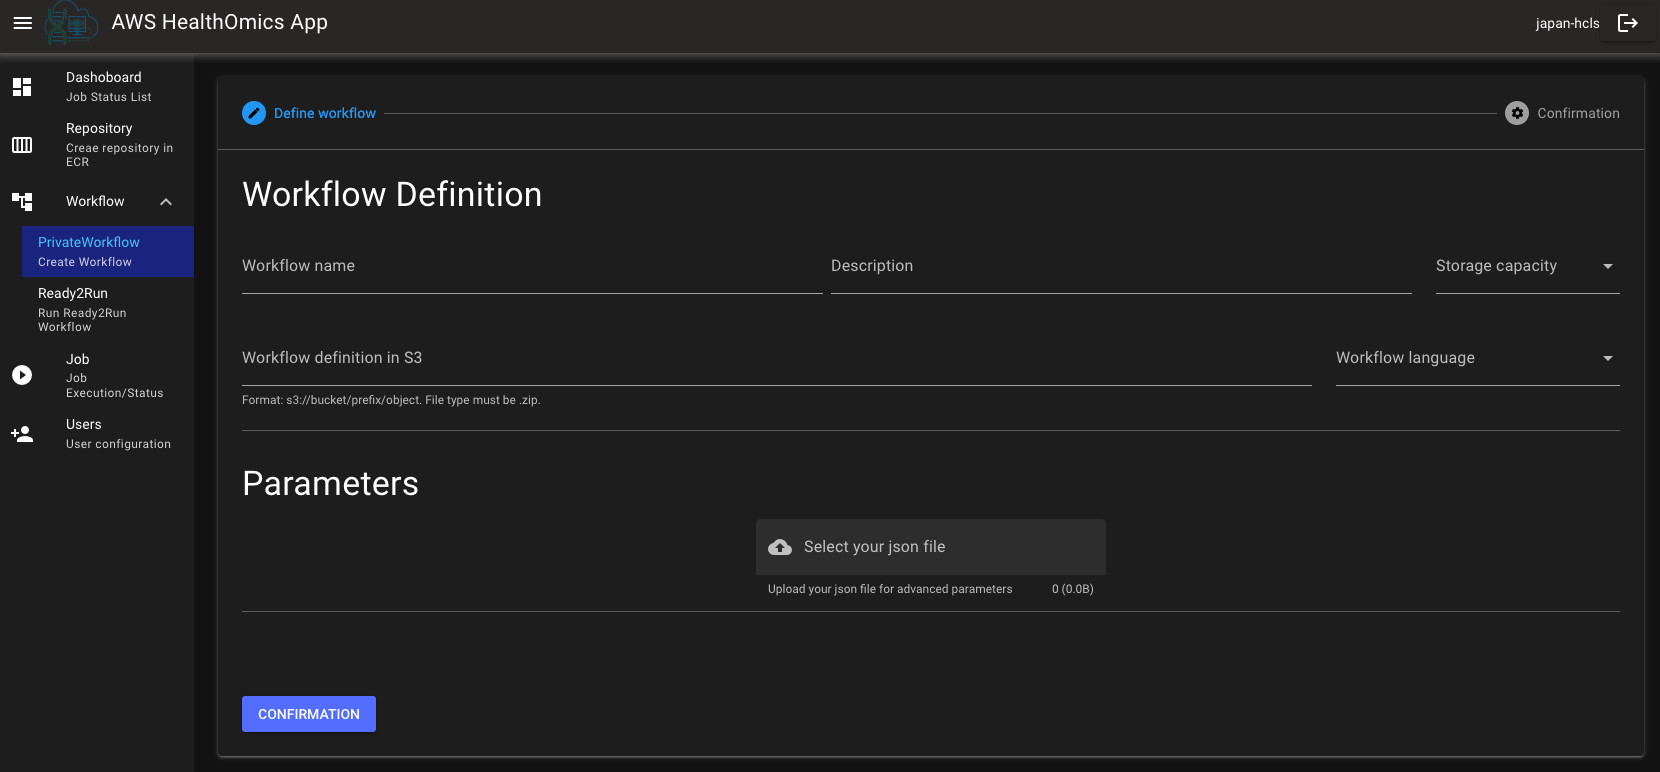 You can create new private workflow in AWS HealthOmics
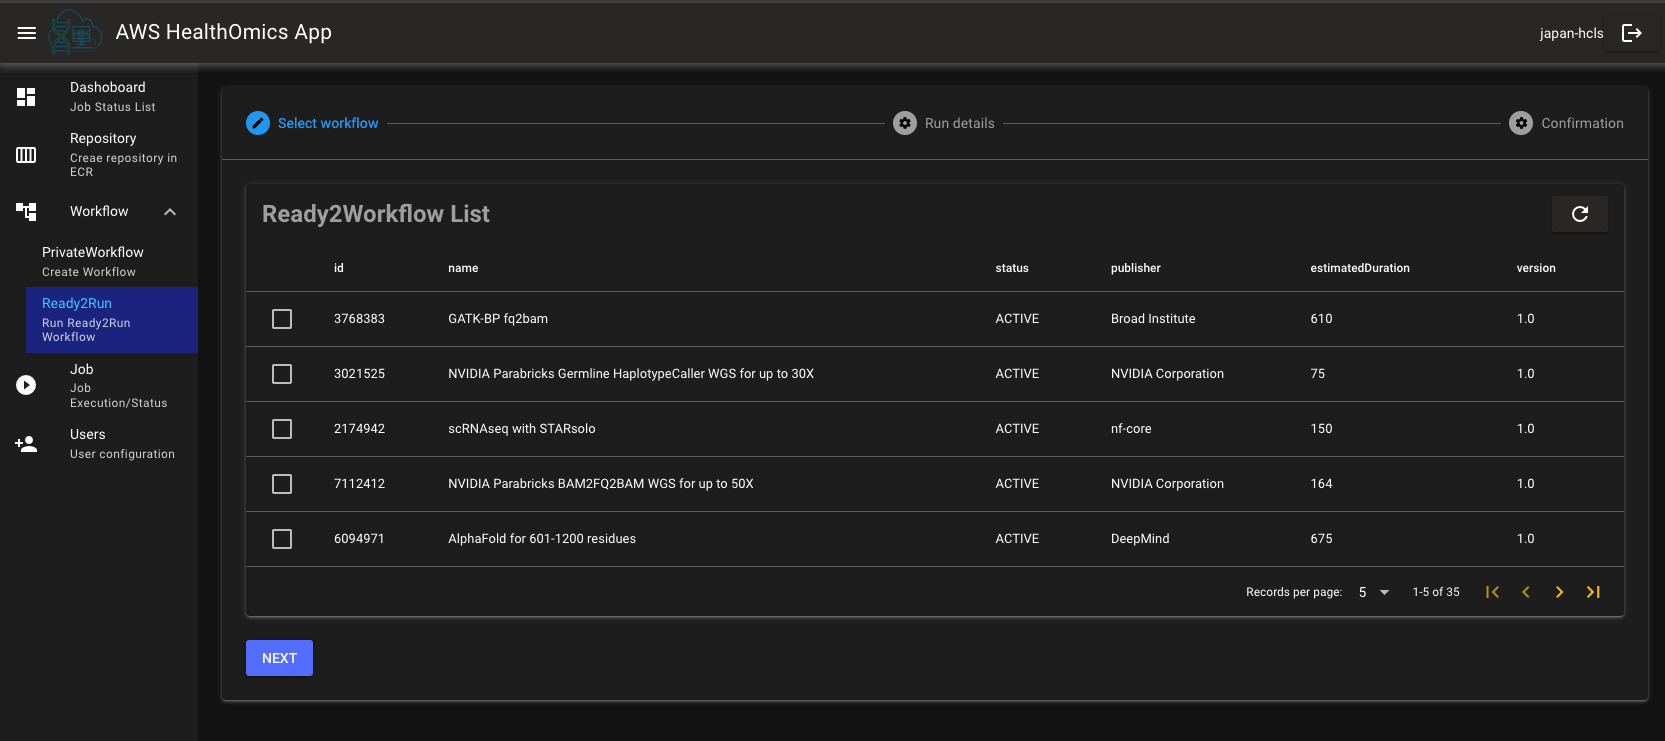 You can see the list of Ready2Run workflows, and run the selected workflow.
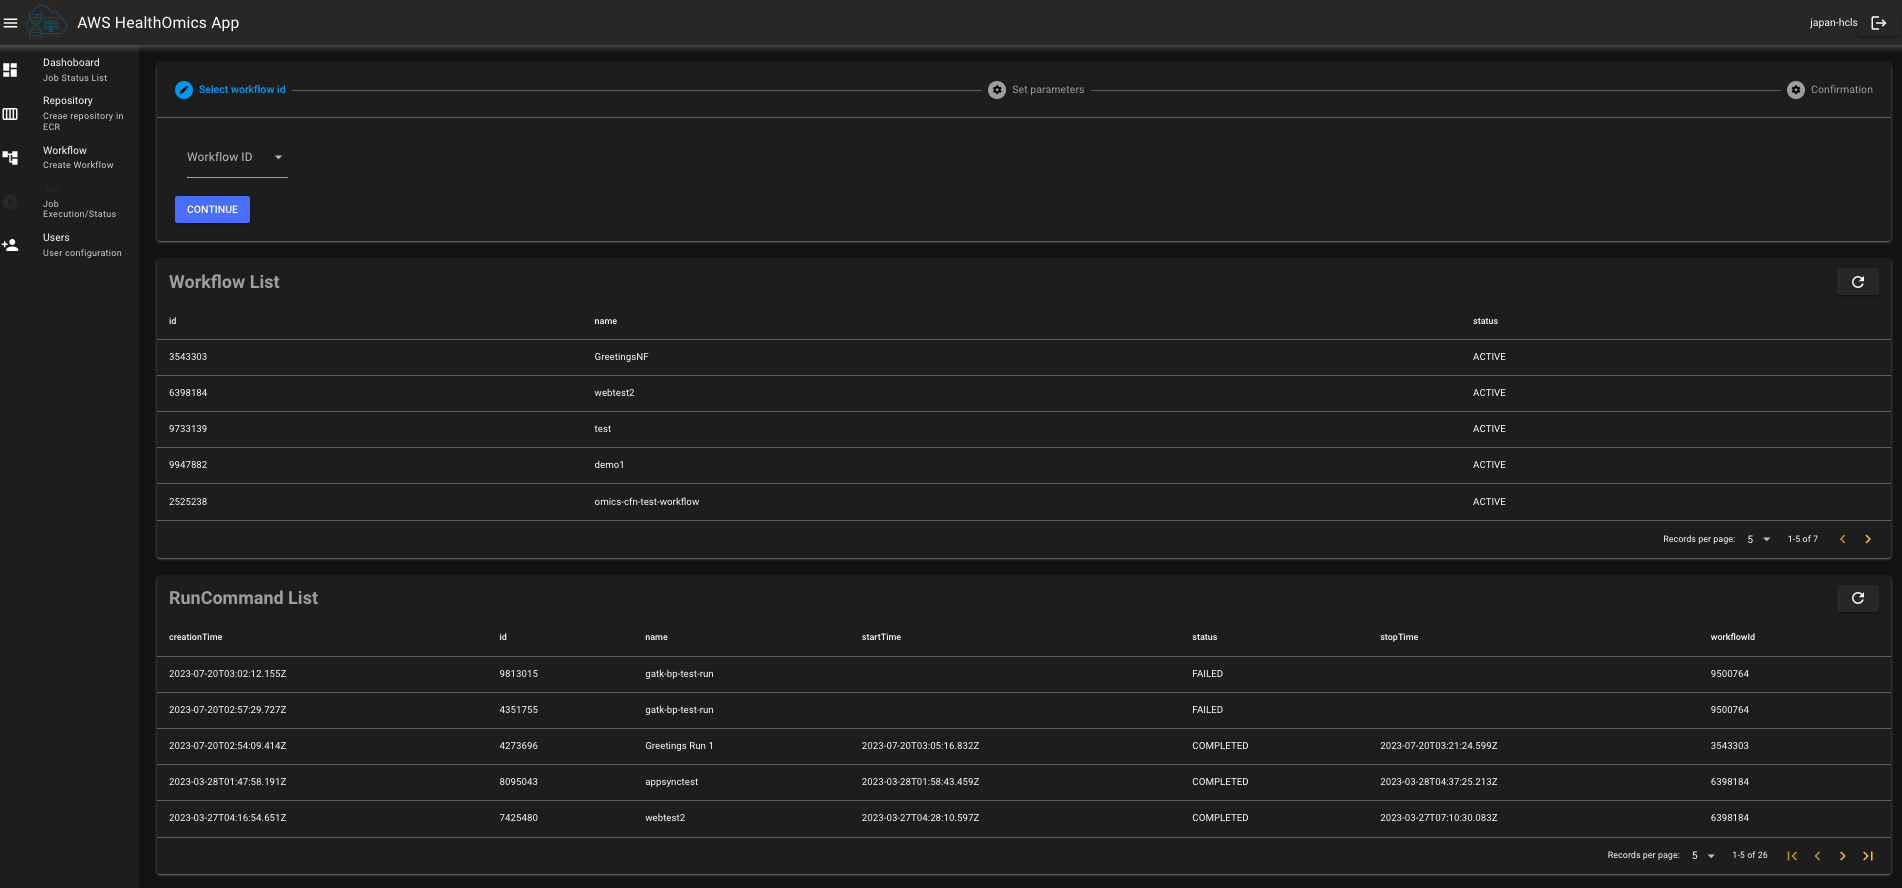 You can exectue new run command in AWS HealthOmics. In addition, you can see the AWS HealthOmics workflow list and run command list in this page.
Only admin can access to this page and add new user or add a user to a group in Amazon Cognito. Also, admin can delete a user if needed in this page.
- An AWS accoount
- Create the buckets for Omics
- Need to create the input and output bucket for AWS HealthOmics before deploying the webapp. Put the workflow definition file and datasets for running workflow in the input bucket. The output files from your run command are stored in the output bucket.
- Create reference and sequence stores in AWS HealthOmics depending on your workflow and definition
- If you want to use the webapp quickly, recommend to prepare the AWS HealthOmics - End to End environment before deploying the webapp.
- Deploy Region
- The frontend stack like AWS WAF, Amazon CloudFront and S3 is deployed on
us-east-1and other services are deployed in your selected region. However, be careful of the supported region in AWS HealthOmics. See this document if you get more information.
- The frontend stack like AWS WAF, Amazon CloudFront and S3 is deployed on
Cross region imports are not supported in AWS HealthOmics at this moment. If you want to use the sample data in the AWS HealthOmics - End to End environment for the webapp and deploy the webapp in another supported region outside of us-east-1, copy the example data to your input bucket in that region.
To deploy the web app with AWS CDK, need to add your aws profile to profile in cdk.json.
Create the config.ts based on config.sample.ts by the following command.
cp config.sample.ts config.tsThen modify the baseConfig properties as your enviroment and requirements. For the reference, baseConfig in the sample file as follows:
const baseConfig = {
  appName: 'omics-app',
  alias: 'japan-hcls',
  multiTenancy: false,
  awsProfile: 'your_profile',
  adminEmail: 'your_email@acme.com',
  allowedIps: ['192.0.3.0/24'],
  ssmPath: '/omics',
  userPoolId: 'userPoolId',
  identityPoolId: 'identityPoolId',
  userPoolClientId: 'userPoolClientId',
  functionUrl: 'functionUrl',
  graphqlUrl: 'graphqlUrl',
  omicsBuckets: {
    input: 'InputBucketName',
    output: 'outputBucketName',
  },
};
See the config doc if you check the properties in detail.
- Install the dependencies
npm ci- Deploy AWS resources
# Deploy the infrastructure and frontend stacks with AWS CDK
npm run deployAll
You can see the web app url like this after completing frontend stack deployment. You can sign in the app with your email and temporary password which you receive in your email.
Outputs:
xxx-dev-omics-app-frontendStack.cloudfrontdomain = xxxx.netExecute the
bootstarpcommand as follows if you have never executed bootstrap command with CDK in your region.npm run cdk bootstrap
# Destroy all stacks(the infrastructure and frontend stack) with AWS CDK
npm run destroyAllThe following destroy failures may occur because the files in your bucket cannot be emptied. If it occurred, please empty them from AWS Management Console and rerun the command
XXX was not successfully deleted: The following resource(s) failed to delete: [XXomicsappfrontendStackwebappspaCloudFrontLoggingB
ucketXX].
Also, delete your repositories in ECR if you need.
Set multiTenancy to true in config.ts if you would like to use this app as SaaS(Multi-tenancy).
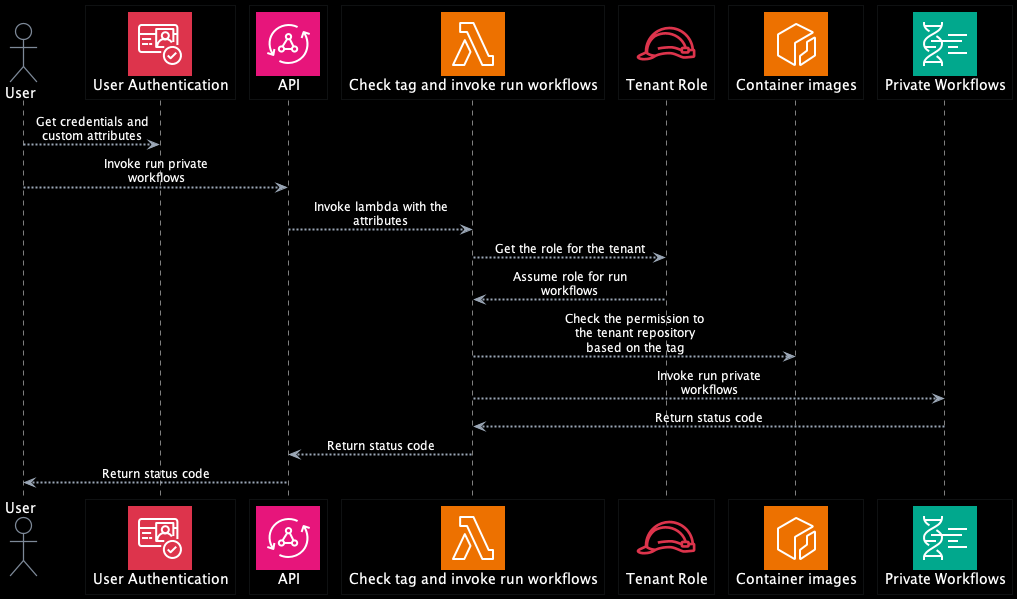
This app would restrict user access to AWS resource like Amazon ECR, Amazon S3 and AWS HealthOmics by ABAC (Attribute-based access control).
In this webapp, ABAC diagrams are as follows:
-
Create a user in Cognito user pools and add the tenant value as
custom:tenantIdto the user. (e.g. Name:custom:tenantId, Value:tenant1) -
Create the repositories with
tenantIdtag in Amazon ECR. (e.g. Key:tenantId, Value:tenant1) -
Create an IAM role with
pathfor AWS HealthOmics for each tenant- Create the role with the following command replacing both
YOUR_TENANT_IDandYOUR_AWS_PROFILEwith your own value.
aws iam create-role --path '/YOUR_TENANT_ID/' --role-name YOUR_TENANT_ID-omics-workflow --tags Key=tenantId,Value= YOUR_TENANT_ID --assume-role-policy-document '{
  "Version": "2012-10-17",
  "Statement": [
      {
          "Effect": "Allow",
          "Principal": {
              "Service": "omics.amazonaws.com"
          },
          "Action": "sts:AssumeRole"
      }
  ]
}' --profile YOUR_AWS_PROFILE
- Create your policy and attach the policy to the role. Require the permission like specific S3 bucket and ECR repository access, and CloudWatch.
{ "Version": "2012-10-17", "Statement": [ { "Action": [ "s3:GetBucketLocation", "s3:GetObject", "s3:ListBucket" ], "Resource": [ "arn:aws:s3:::omics-tenant-test", "arn:aws:s3:::omics-tenant-test/*", "arn:aws:s3:::aws-genomics-datasets", "arn:aws:s3:::aws-genomics-datasets/*", "arn:aws:s3:::aws-genomics-static-us-east-1", "arn:aws:s3:::aws-genomics-static-us-east-1/*", "arn:aws:s3:::broad-references", "arn:aws:s3:::broad-references/*", "arn:aws:s3:::gatk-test-data", "arn:aws:s3:::gatk-test-data/*" ], "Effect": "Allow" }, { "Action": [ "s3:GetBucketLocation", "s3:GetObject", "s3:ListBucket", "s3:PutObject" ], "Resource": [ "arn:aws:s3:::YOUR_BUCKET_NAME/TENANT_ID", "arn:aws:s3:::YOUR_BUCKET_NAME/TENANT_ID/*" ], "Effect": "Allow" }, { "Action": "omics:*", "Resource": "*", "Effect": "Allow" }, { "Action": "logs:CreateLogGroup", "Resource": "arn:aws:logs:us-east-1:YOUR_AWS_ACCOUNT_ID:log-group:/aws/omics/WorkflowLog:*", "Effect": "Allow" }, { "Action": [ "logs:CreateLogStream", "logs:DescribeLogStreams", "logs:PutLogEvents" ], "Resource": "arn:aws:logs:us-east-1:YOUR_AWS_ACCOUNT_ID:log-group:/aws/omics/WorkflowLog:log-stream:*", "Effect": "Allow" }, { "Action": [ "ecr:*" ], "Resource": [ "arn:aws:ecr:us-east-1:YOUR_AWS_ACCOUNT_ID:repository/TENANT_ID" ], "Effect": "Allow" } ] } - Create the role with the following command replacing both
-
npm run deployInfra- Deploy the infrastructure stack with AWS CDK
-
npm run deployFrontend- Deploy the frontend stack with AWS CDK
-
npm run deployAll- Deploy the infrastructure and frontend stacks with AWS CDK
-
npm run destroyInfra- Destroy the infrastructure stack with AWS CDK
-
npm run destroyFrontend- Destroy the frontend stack with AWS CDK
-
npm run destroyAll- Destroy all stacks(the infrastructure and frontend stack) with AWS CDK
See CONTRIBUTING for more information.
This code is licensed under the MIT-0 License. See the LICENSE.


