Brian Blaylock
July 2018
Website
These scripts were written and used throughout my Ph.D. research at the University of Utah 2017-2019.
The most useful functions have been moved and enhanced into more coherent Python packages.
- Herbie: Download HRRR, RAP, GFS, RRFS, etc. files from cloud archives to your local computer.
- GOES-2-go: Download GOES-16 and GOES-17 ABI and GLM products from AWS to your local computer.
- SynopticPy: Retrieve mesonet data from Synoptic API (MesoWest).
- Carpenter_Workshop: Miscellaneous tools that are useful to me (making Cartopy maps, color maps, unit conversions, etc).
Learn Python:
There are a lot of resources online to learn Python.
- ATMOS 5020 I helped taught: https://github.com/johnhorel/ATMOS_5020_2019
- This course by Microsoft and NASA cover several basics and can get you started: https://docs.microsoft.com/en-us/learn/paths/introduction-python-space-exploration-nasa/
Please read the documents for managing environments.
Reference: https://docs.conda.io/projects/conda/en/latest/user-guide/tasks/manage-environments.html Reference: https://github.com/Unidata/unidata-users-workshop
I installed the Anaconda python distribution and created a new environment using the environment.yml file provided in this directory. The name of the environment is pyBKB_v3 named after my initials and v3 indicates that these were written for Python 3 (as opposed to pyBKB_v2 which are older scripts written when I used Python 2).
conda env create -f ./environment.yml
NOTE:
pygribwas recently made available on Windows.
On a windows computer, to activate the pyBKB_v3 environment, do this in the Windows Command Prompt:
activate pyBKB_v3
Or, if you are in the PowerShell
cmd
activate pyBKB_v3
If you are using a bash shell in Linux:
conda init bash  # Only need to do this once to initialize the correct shell
conda activate pyBKB_v3
If you are using a tcsh shell in Linux:
conda init tsch  # Only need to do this once to initialize the correct shell
conda activate pyBKB_v3
Deactivate the environment
conda deactivate pyBKB_v3
Update the environment.yml file, and update the conda environment
conda env update -f environment.yml
List all the available environments
conda info --envs
pyBKB_v3 is kept in $HOME/pyBKB_v3. One way to use these modules into your scripts is to append the sys path in your script.
import sys
sys.path.append('/path/to/folder/pyBKB_v3')

# Load some module from pyBKB_v3
import BB_mesowest
But that is a little cumbersome when you just want to get started quick.
Instead, you can update the PYTHONPATH variable in your environment to automatically append the path. I inserted the following into my .bashrc file.
export PYTHONPATH=$HOME/pyBKB_v3:$PYTHONPATHAfter that variable is applied, when you open python and print out the value of sys.path, you will see that the pyBKB_v3 directory is included. This means that a simple module load BB_mesowest in your python script will load the module. This is an important change to know if you are not Brian and you are using these modules, as some of my scripts assume the PYTHONPATH as been set while others will explicily append the sys.path.
I primarily use Jupyter Lab and VS Code to write and run code. Here are some tips for running Jupyter Lab and VS Code on a remote server...
Jupyter Lab is included in my environment.yml file. When running Jupyter Lab on a remote computer, you can tunnel Jupyter to your local browser window.
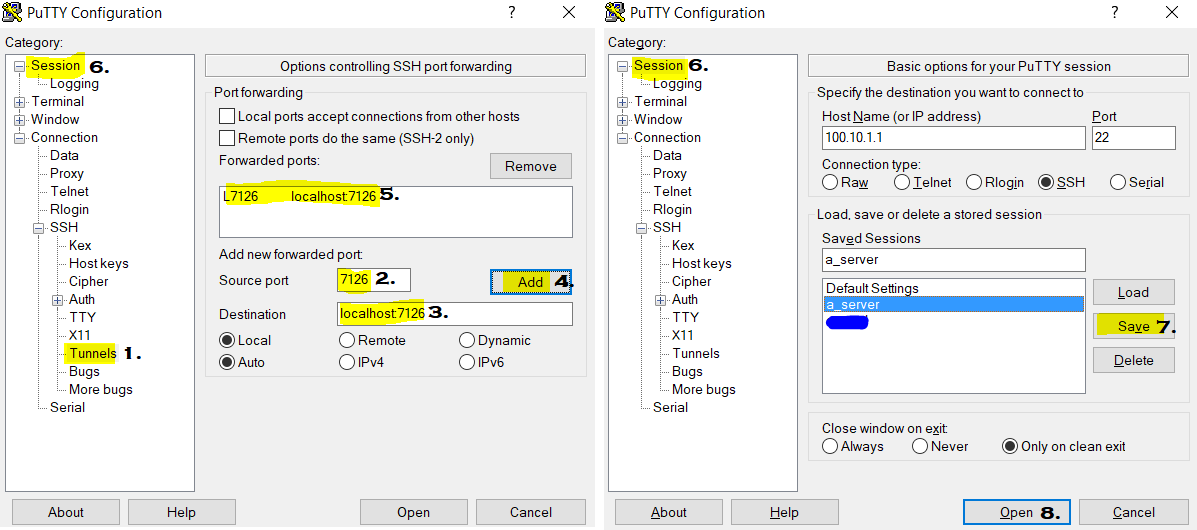
To configure Putty for an SSH Tunnel...
- In the left, click
Connection>SSH>Tunnels - In the source port, replace #### with a port number you chose between 7000 and 8000.
- In the destination, add
localhost:#### - Click
Add - Confirm that you see
L#### localhost:####in the list of forwarded paths. - REMEMBER TO SAVE THE SESSION!
Now, on the remote machine, run Jupyter Lab
jupyter lab --no-browser --port=####
Jupyter will fire up and provide a URL and token you can copy and paste into your local browser. Something like this...
copy and paste the URL:
    http://localhost:####/?token=.........
I added an alias to my ~/.bashrc file on my remote machine as a short cut
alias jupy='cd / && jupyter lab --no-browser -port=7686
Note that I first change to the root direcotry, cd /, so I have access to the full system rather than just being confined to the directory I open Jupyter.
Jupyter Lab is great for notebooks, but often I need a more powerful and mature code editor. That is when I turn to VS Code. Sometimes it's difficult to install VS Code on a remote server, but you can run code-server and through an SSH tunnel in Putty. This lets you run a version of VS Code on the remote server and view in your local browser (similar to tunneling Jupyter, as shown above).
Set up an SSH Tunnel following the instructions above. Remember the port number...you will need that later.
On the remote server, install code-server via conda (the easiest way): https://anaconda.org/conda-forge/code-server. I put this in it's own environment for now. Then, activate the new environment.
conda create -n vscode -c conda-forge code-server
conda activate vscode
Start code-server for the first time in the command line. Type the following in the terminal...
code-server
This first time running code-server creates a default config file. The screen output tells you where that config file is located. Wrote default config file to ~/.config/code-server/config.yaml. You will need to edit that file.
In that config file change *auth: password with auth: none. Also, change the port in the bind-addr to a port number you set up in the putty ssh tunnel. bind-addr: 127.0.0.1:#### For example, my config file looks like this, which forwards through port 7684
~/.config/code-server/config.yaml
bind-addr: 127.0.0.1:7684
auth: none
password: SomePasswordHereThatIsNotUsed
cert: false
Restart code-server on the remote server and open in your local browser. In a browser like Chrome, navigate to the following URL:
http://127.0.0.1:7684 <-- change the last 4 numbers to your port number
And there you go...you have an instance of VS Code running. In Chrome, you can install pages as an "app" and that is what I did with my instance of code-server and Jupyter Lab and pinned them to the task bar for quick acess.
