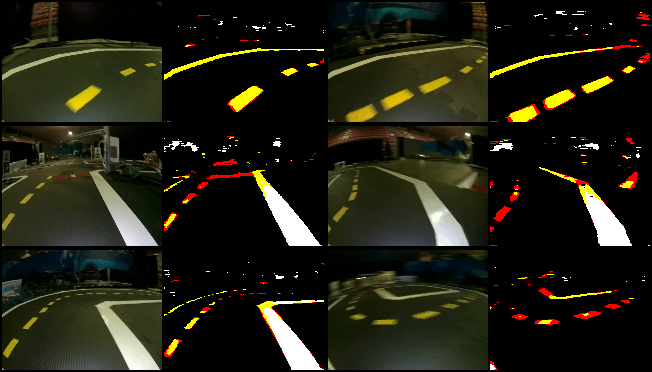
Semantic segmentation transfer
This course project was done in the context of the Autonomous Vehicles (Duckietown) course given at UdeM during Fall 2018. The slides used during our in-class presentation can are slides.pdf
All of the work was done in collaboration between Philippe Lacaille (@placaille) and Samuel Lavoie (@lavoiems).
This documentation is split into two sections, a demo section that has all the information to showcase our pre-trained models and a training section where more information to reproduce our results can be found.
Line segmentation from video file
We provide two ways of segmenting a video file coming from the duckiebot log database. Any video file from the duckietown logs database can be used for the demo. When launching any of them, our pre-trained models will be downloaded automatically and a .gif will be created after processing the images.
For more information as to how to get a video file from the duckietown database and to see which ones were used to train our models, see the this section.
Please ensure you have the necessary dependencies installed before launching the demo, see this section for more information.
WARNING: The processing can take some time, especially if not using a GPU and the video file is large. By default, we keep a high framerate to have smooth video while limiting the length of the input video to about 3 minutes. These can be changed in the source code, if necessary.
Video transformed into simulator pixel space
This is a demo where the image is brought back to the full simulator pixel space before applying our line segmentation model. While this method is useful to see the transformed version of the real image into the simulator pixel space, performance is noticeably worst.
To process a video use the make gif-transformed recipe. For example,
make gif-transformed input_file=duckie_video.mp4 output_file=duckie_transformed.gif
Video compressed into embedding space
This is a demo where the image is compressed into features from where the line segmentation model is applied. While this method offers less interpretability, performance is noticeably better.
To process a video use the make gif-embedding recipe. For example,
make gif-embedding input_file=duckie_video.mp4 output_file=duckie_embedding.gif
Running the segmentation demo on the duckietown simulator
We provide a tool to test our pre-trained segmentation network live on the simulator while the user can manually control the agent. In order to run the simulation, simply run $ python src/results/seg_control.py.
Please ensure you have the necessary dependencies installed before launching the demo, see this section for more information.
WARNING: We tested the live demo on OSX. It might possibly not work on Linux out of the box.
Training
Recipes used to train our models can be found in the makefile. In particular, the segmentation model must be trained before the models used to segment the real images can be trained.
Segmentation model
To train the segmentation model, use the make models/segnet.pth recipe.
WARNING: Training the segmentation model requires that the appropriate data is already downloaded. The data creation for the simulated data was not automated because of the very large size of the dataset (~40GB). See the data section for more information.
Transfer model
To train any of the transfer model (transformed and embedding models) to segment real duckiebot images, use the make models/style_transfer_gen.pth or make models/segnet_transfer.pth recipes.
Running locally vs on cluster
By default, any make recipe points to local directories (e.g. ./data and ./models). To run remotely (on Mila cluster) pass the argument remote=true. For example,
make models/segnet.pth remote=true
The above will run with the remote subdirectories as reference
The default remote directories are on the Mila clusters. See the makefile for more info about remote directories.
N.B. The demos can only be run locally.
Environment
Dependencies are listed in environment.yml. To create the conda environment, use the following command.
conda env create -f environment.yml
Please note for the live demo of line segmentation in the simulator with manual control, you need have the duckietown simulator installed (instruction here: https://github.com/duckietown/simulator).
Data
All data, pre-processed into .npy partitions and ready to be used can be found on the Mila cluster in the directory /data/lisa/data/duckietown-segmentation/data/split.
Data files for training and validation must be placed in ./data/split/class, ./data/split/sim and ./data/split/real under train/valid where the file format must be .npy.
We provide pre-processed samples for each dataset
Training set: simulator, classes, real
Validation set: simulator, classes, real
WARNING: All training make recipes require the data to be downloaded and pre-processed into .npy files. I.e. These recipes will process the real duckietown images automatically but won't generate the sim and segmented targets. Even if you copy .data/split (including the .sentinel), it will try to download the real videos, unless you already have them.
Simulated data and segmentation target
DIRE COMMENT FAIRE LES .NPY SIMULATED ET TARGETS
The distributions of the classes for the simulation segmented data are the following
('Valid set: ', {black: 17157, white: 1596, red: 138, yellow: 307})
('train set: ', {black: 17154, white: 1602, red: 137, yellow: 304})
Class 0: Black Class 1: White Class 2: Red Class 3: Yellow
Adjusted weights in loss for simulated data
Given our dataset is highly unbalanced (a lot more black pixels), we add an importance factor to the loss for each class which is inversely proportional to the number of pixels. I.e., reduce the importance of predicting correctly black pixels, and increase the importance of predicting the yellow pixels.
To compute the weights, we use the average number of pixels per image in the training set as mentioned above.
| Pixel color | % | ideal % | adjusted class weight |
|---|---|---|---|
| Black | 89.4 % | 25 % | 0.51% |
| White | 8.3 % | 25 % | 5.51% |
| Red | 0.7 % | 25 % | 65.38% |
| Yellow | 1.6% | 25 % | 28.60% |
Real Duckiebot images
The database of logs can be found here. Video files can be directly downloaded from here and processed using the following command.
make data/videos/download.info
A list of videos used is listed in the file data/videos/list_of_videos.txt.
Extracting frames
Frames were extracted from the raw videos from the logs and downsampled from 640x480 to 160x120. Extracting every 10 frames of the downloaded videos provided a dataset of 11419 images.
To extract the frames from the set of downloaded videos, simply use the following command.
make data/split/real/.sentinel
Tiny dataset
The code can run on tiny versions of the datasets using the following recipes.
make tiny-segnet
make tiny-transfer
See the makefile for more info. Please be aware the tiny versions of the dataset can be made using this file.
Visualisation
It is possible, but no necessary, to monitor the training using Visdom. In order to use Visdom, as server must be running a priori.
Launching a server
The instructions to launch a server are well documented here
Launching a Visdom server on the MILA cluster is a bit more involved. A script is provided in ./scripts/start_visdom.sh
You need to define a $PORT that you are the only one using and choose a machine acting as $SERVER.
Step 1
On your local machine, add the following to the file ~/.ssh/config
Host elisa1.iro.umontreal.ca
User $MILAUSER
LocalForward $PORT 127.0.0.1:$PORT
Step 2
ssh to elisa1.
Step 3
Launch the provided script on a $SERVER.
sbatch -w $SERVER --mem=8000 ./scripts/start_visdom.sh $PORT
Fineprint: You need to have visdom installed. You can add a line in the script that activate a conda environment that have visdom.
Step 4
Enjoy your visdom server in the browser at the address http://localhost:$PORT.
Fineprint: You have to be connected throught ssh on elisa1 in order see your visdom server on your local machine.
Using the server
Now that you have a server running, you may want to use it in your training script.
To do so, add the following options when launching the training script: --server http://$SERVER, --port $PORT


