Link to repo: tnwei/vqgan-clip-app. CLIP guided diffusion is WIP on a separate branch, refer to its README for instructions.
VQGAN-CLIP has been in vogue for generating art using deep learning. Searching the r/deepdream subreddit for VQGAN-CLIP yields quite a number of results. Basically, VQGAN can generate pretty high fidelity images, while CLIP can produce relevant captions for images. Combined, VQGAN-CLIP can take prompts from human input, and iterate to generate images that fit the prompts.
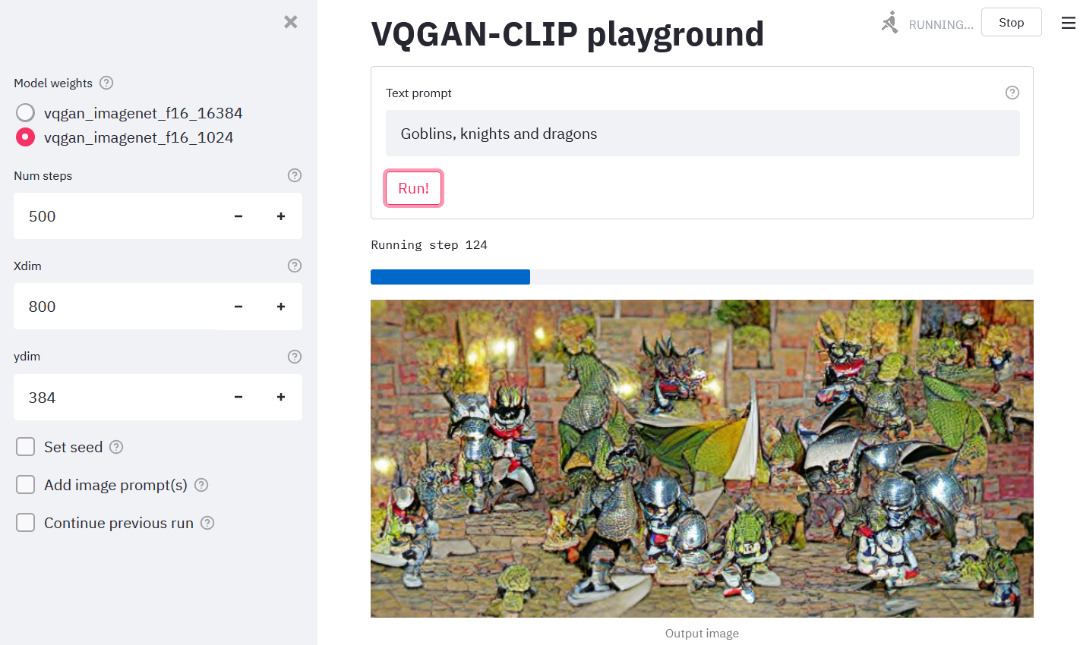
Thanks to the generosity of creators sharing notebooks on Google Colab, the VQGAN-CLIP technique has seen widespread circulation. However, for regular usage across multiple sessions, I prefer a local setup that can be started up rapidly. Thus, this simple Streamlit app for generating VQGAN-CLIP images on a local environment. Screenshot of the UI as below:
Be advised that you need a beefy GPU with lots of VRAM to generate images large enough to be interesting. (Hello Quadro owners!). For reference, an RTX2060 can barely manage a 300x300 image. Otherwise you are best served using the notebooks on Colab.
Reference is this Colab notebook originally by Katherine Crowson. The notebook can also be found in this repo hosted by EleutherAI.
The steps for setup are based on the Colab referenced above. Atm the procedure is a bit messy, there's probably room for improvement here.
- Install the required Python libraries. Using
conda, runconda env create -f environment.yml - Git clone this repo. After that,
cdinto the repo and run:git clone https://github.com/CompVis/taming-transformers. (Update to pip install when either of these two PRs are merged) - Download the pretrained weights and config files using links in the
download-weights.shscript. Note that that all of the links are commented out by default. Recommend to download one by one, as some of the downloads can take a while. You'll want to at least have both the ImageNet weights, which are used in the reference notebook.
streamlit run app.py launches the web app on localhost:8501, while python gallery.py launches a gallery viewer on localhost:5000.
In the web app, select settings on the sidebar, key in the text prompt, and click run to generate images using VQGAN-CLIP. When done, the web app will display the output image as well as a video compilation showing progression of image generation. You can save them directly through the browser's right-click menu.
The text prompts allow separating text prompts using the "|" symbol, with custom weightage for each. Example: A beautiful sunny countryside scene of a Collie dog running towards a herd of sheep in a grassy field with a farmhouse in the background:100 | wild flowers:30 | roses:-30 | photorealistic:20 | V-ray:20 | ray tracing:20 | unreal engine:20. Refer to this Reddit post for more info.
A one-time download of additional pre-trained weights will occur before generating the first image. Might take a few minutes depending on your internet connection.
Each run's metadata and output is saved to the output/ directory, organized into subfolders named using the timestamp when a run is launched, as well as a unique run ID. Example output dir:
$ tree output
├── 20210920T232927-vTf6Aot6
│   ├── anim.mp4
│   ├── details.json
│   └── output.PNG
└── 20210920T232935-9TJ9YusD
    ├── anim.mp4
    ├── details.json
    └── output.PNG
The gallery viewer reads from output/ and visualizes previous runs together with saved metadata.
If the details are too much, call python gallery.py --kiosk instead to only show the images and their prompts.
There is a lot of room for experimentation on CLIP-based image generation, thus care has been taken to make the codebase hackable. app.py houses the UI, built with Streamlit (docs), while the underlying logic is stowed away in logic.py, which in turn depends on vqgan_utils.py.
Defaults settings for the app upon launch are specified in defaults.yaml, which can be further adjusted as necessary.
To use your own weights for VQGAN, save both the yaml config and the ckpt weights in assets/, and ensure that they have the same filename, just with different postfixes. It will then appear in the app interface for use. Refer to the VQGAN repo for training VQGAN on your own dataset.
To modify the image generation logic, instantiate your own model class in logic.py and modify app.py accordingly if the inputs / outputs are modified.
gallery.py uses Flask and Jinja templating to serve a simple Bootstrap dashboard. It is separate from the code for image generation, and only depends on functions declared in gallery_utils.py.
Added the option to carry over the existing generated image and network weights for use in the next run. If a new image size is specified, the image will be cropped to size accordingly. This allows you to continue iterating on an image if you like how it has turned out thus far. Note that chaining a few consecutive short runs of the same prompt and running a single run using the same prompt with equivalent steps does not yield the same outcome.
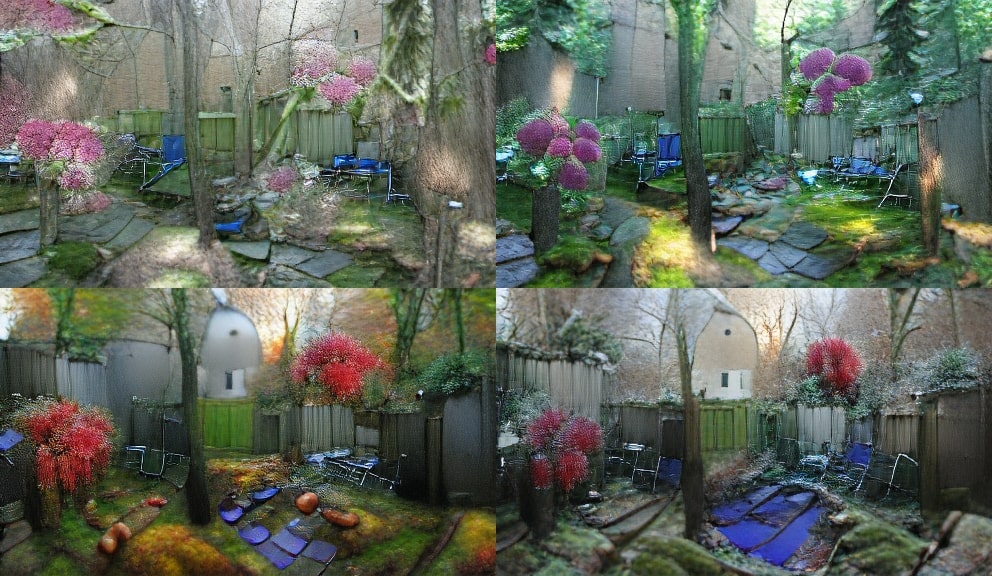
Extending upon that feature enables multi-stage iteration, where the same image can be iterated upon using different prompts at different stages. For example, you can tell the network to generate "Cowboy singing in the sky", then continue the same image and weights using a different prompt, "Fish on an alien planet under the night sky". Because of how backprop works, the network will find the easiest way to change the previous image to fit the new prompt. Should be useful for preserving visual structure between images, and for smoothly transitioning from one scene to another.
Here is an example where "Backyard in spring" is first generated, then iterated upon with prompts "Backyard in summer", "Backyard in autumn", and "Backyard in winter". Major visual elements in the initial image were inherited and utilized across multiple runs.
In addition, uploading image prompts has been simplified compared to using the Colab interface, thanks to Streamlit's file upload widget. From what I've seen thus far, image prompts have a wildcard effect on the content and style of the generated image. Probably reason why I've never seen works of VQGAN-CLIP mentioning use of the image prompt. Either way, if you like clicking "I'm Feeling Lucky" on Google, this is for you.
Generated image size is bound by GPU VRAM available. The reference notebook default to use 480x480. One of the notebooks in the thoughts section below uses 640x512. For reference, an RTX2060 can barely manage 300x300. You can use image upscaling tools such as Waifu2X or Real ESRGAN to further upscale the generated image beyond VRAM limits. Just be aware that smaller generated images fundamentally contain less complexity than larger images.
Following are GPU VRAM consumption read fromnvidia-smi as reference, using the vqgan_imagenet_f16_1024 model checkpoint. Note that your mileage may vary:
| Resolution | VRAM Consumption |
|---|---|
| 300 x 300 | 4,829 MiB |
| 480 x 480 | 8,465 MiB |
| 640 x 360 | 8,169 MiB |
| 640 x 480 | 10,247 MiB |
| 800 x 450 | 13,977 MiB |
| 800 x 600 | 18,157 MiB |
| 960 x 540 | 15,131 MiB |
| 960 x 720 | 19,777 MiB |
| 1024 x 576 | 17,175 MiB |
| 1024 x 768 | 22,167 MiB |
| 1280 x 720 | 24,353 MiB |
CUDA out of memory error If you're getting a CUDA out of memory error on your first run, it is a sign that the image size is too large. If you were able to generate images of a particular size prior, then you might have a CUDA memory leak and need to restart the application. Still figuring out where the leak is from.
VQGAN weights and art style In the download links are trained on different datasets. You might find them suitable for generating different art styles. The sflickr dataset is skewed towards generating landscape images while the faceshq dataset is skewed towards generating faces. If you have no art style preference, the ImageNet weights do remarkably well. In fact, VQGAN-CLIP can be conditioned to generate specific styles, thanks to the breadth of understanding supplied by the CLIP model (see tips section).
Some weights have multiple versions, e.g. ImageNet 1024 and Image 16384. The number represents the codebook (latent space) dimensionality. For more info, refer to the VQGAN repo, also linked in the intro above.
How many steps to run VQGAN-CLIP? There is no ground rule on how many steps to run to get a good image. Images generated are also not guaranteed to be interesting. Experiment!
- Long, descriptive prompts can have surprisingly pleasant effects: Reddit post
- Unreal engine trick
- Appending "by James Gurney" for stylization
- Rotation and zoom effect with VQGAN+CLIP and RIFE
- Maybe some kind of operation that disperses pixel intensities can help "reverse" images so that undesired features can be removed?
- Regularization using path perception loss?
- Dockerfile?
- This variation of the Colab notebook implements some form of regularization
- This variation of the Colab notebook lists more options for VQGAN pre-trained weights
- Link up w/ a database so that it's easier to save outputs?
- Add self-generated image captions from CLIP?
- Guided diffusion variant: https://colab.research.google.com/drive/1F2M1T2ZQtanFpjBUyId1VaxmqPb4eY5N


