A Temporal Learning Approach to Inpainting Endoscopic Specularities and Its Effect on Image Correspondence
Rema Daher, Francisco Vasconcelos, and Danail Stoyanov
Medical Image Analysis Journal 2023.
If any part of our paper and repository is helpful to your work, please generously cite with:
@article{daher2023temporal,
  title={A Temporal Learning Approach to Inpainting Endoscopic Specularities and Its Effect on Image Correspondence},
  author={Daher, Rema and Vasconcelos, Francisco and Stoyanov, Danail},
  journal={Medical Image Analysis},
  year={2023}
}
Since this code is based on STTN, please also cite their work:
@inproceedings{yan2020sttn,
  author = {Zeng, Yanhong and Fu, Jianlong and Chao, Hongyang},
  title = {Learning Joint Spatial-Temporal Transformations for Video Inpainting},
  booktitle = {The Proceedings of the European Conference on Computer Vision (ECCV)},
  year = {2020}
}
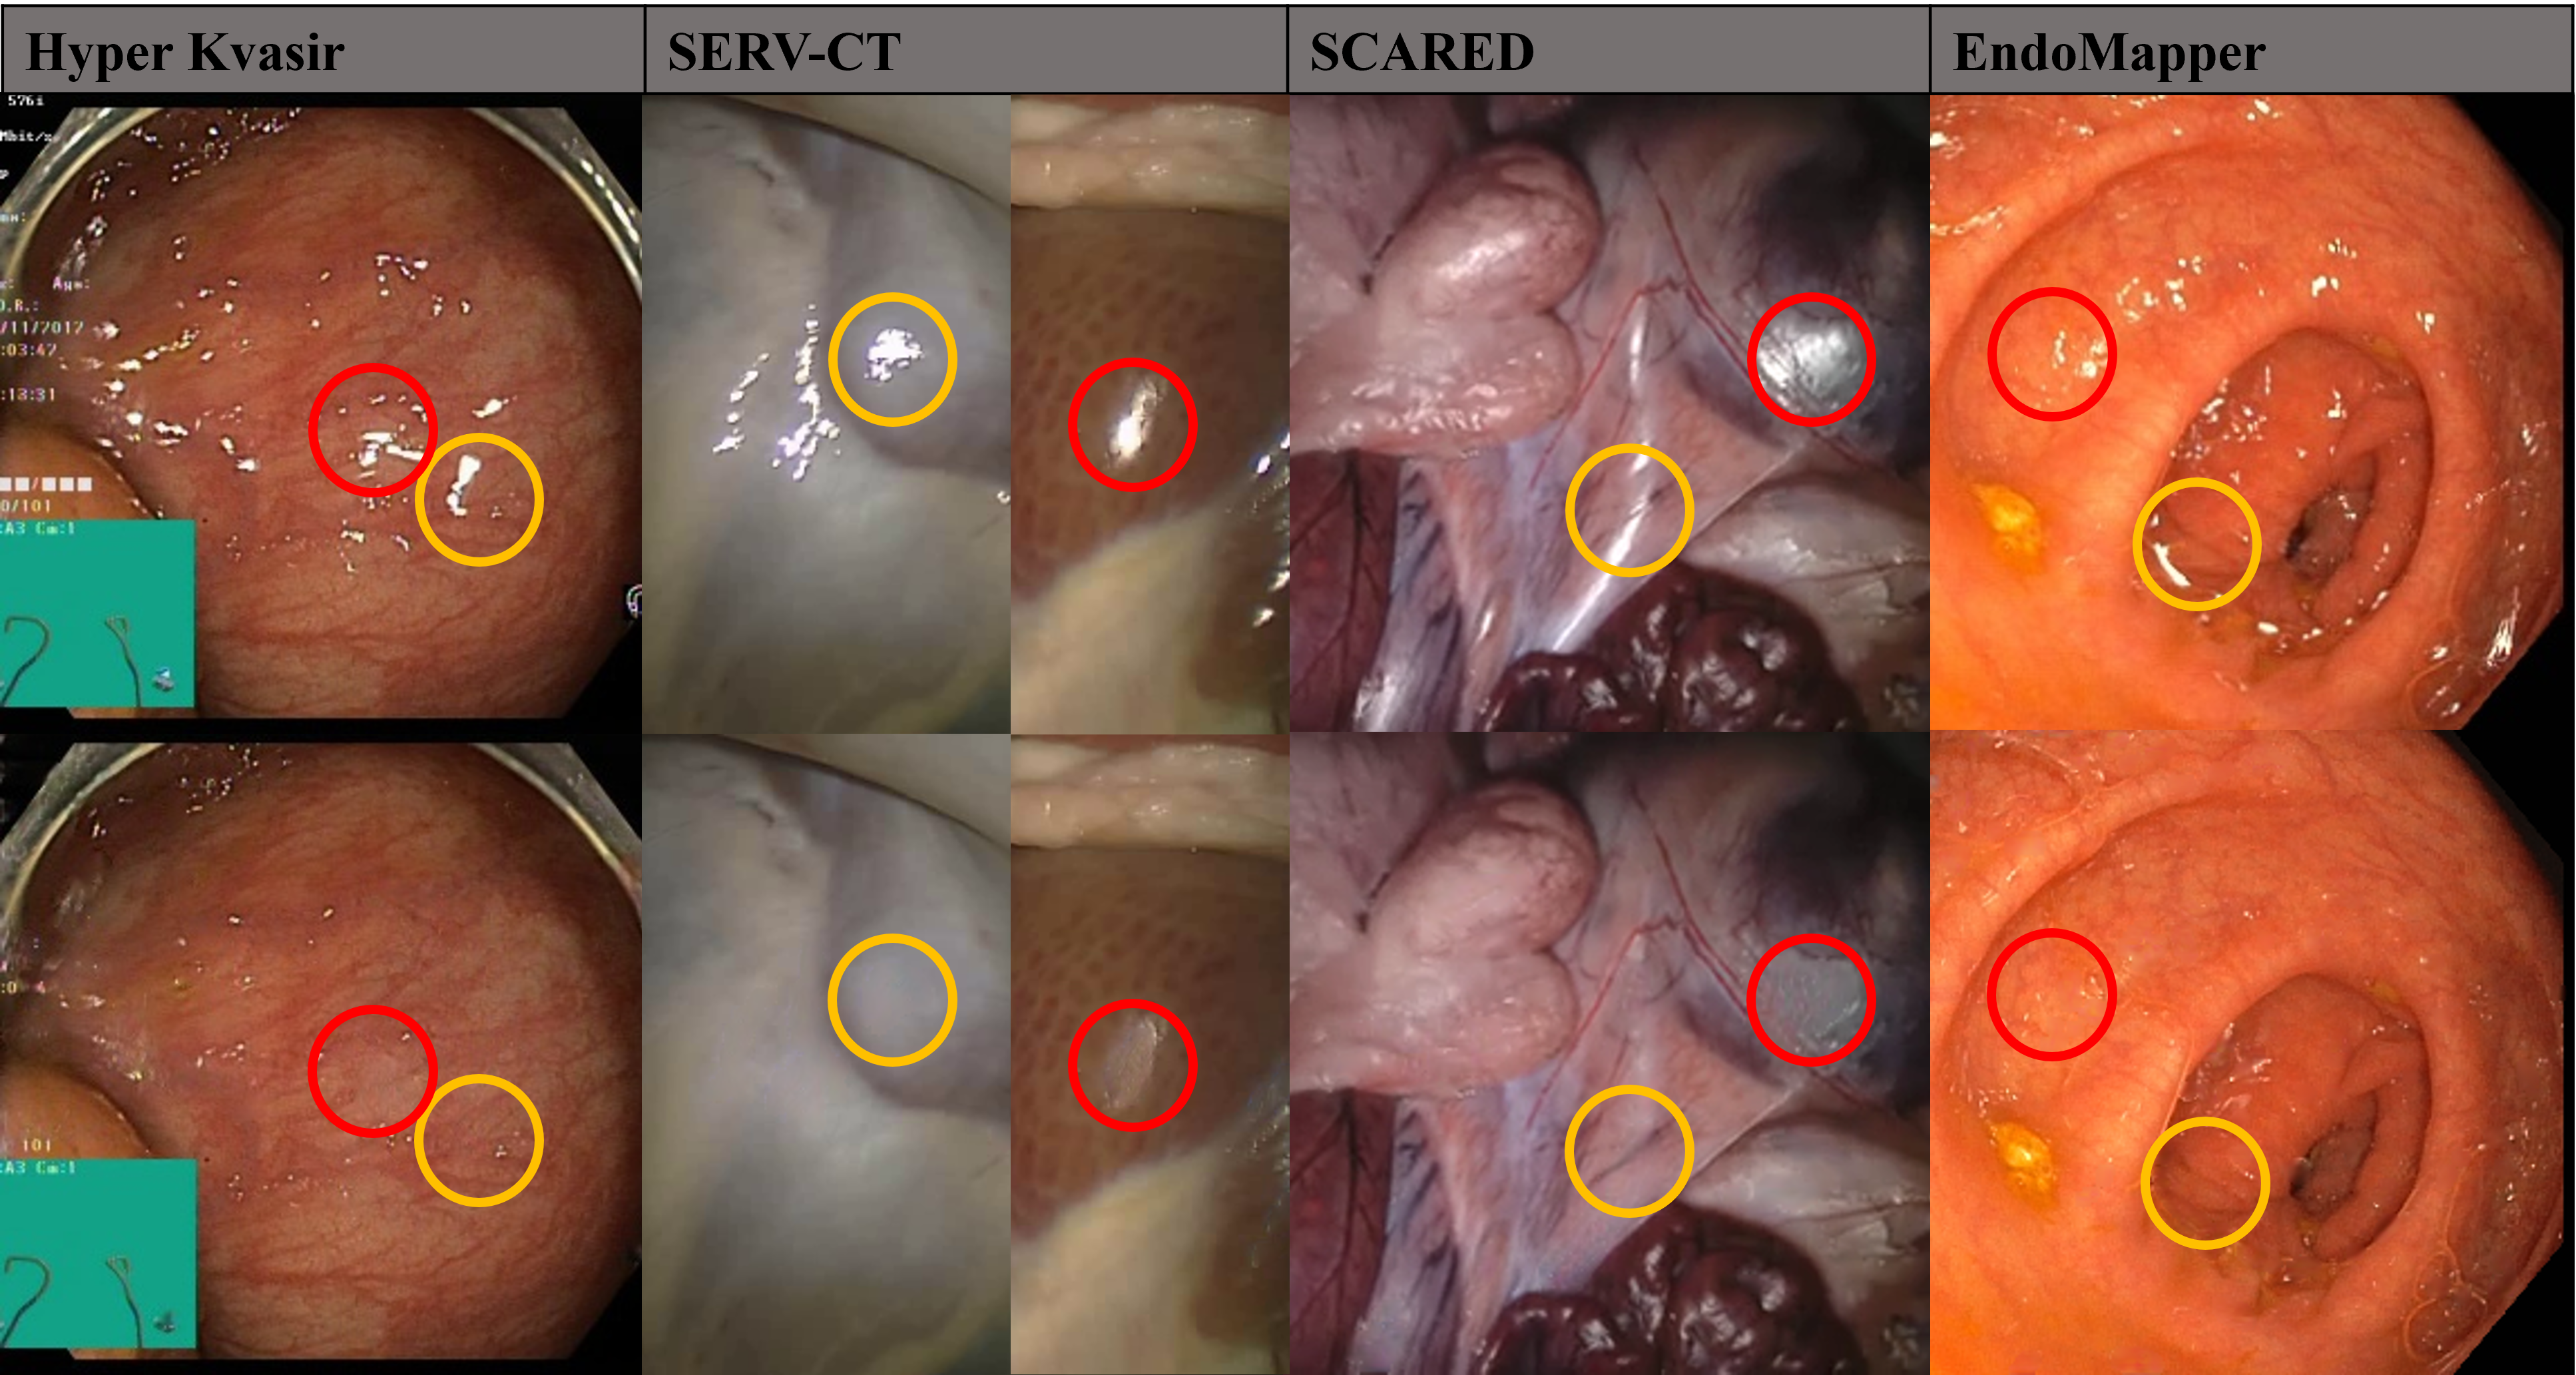
- A novel solution to specular highlight removal in endoscopic videos. This is achieved with a temporal learning based method.
- The generation of pseudo ground truth data that enables effective unsupervised training as well as quantitative evaluation.
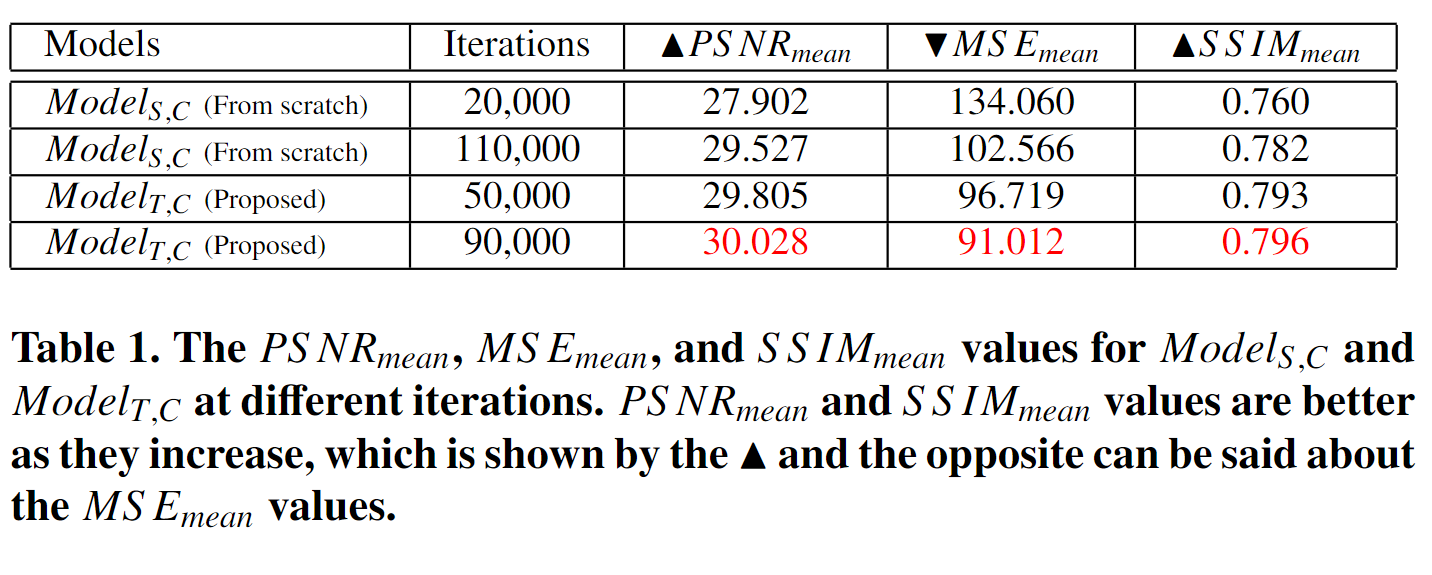
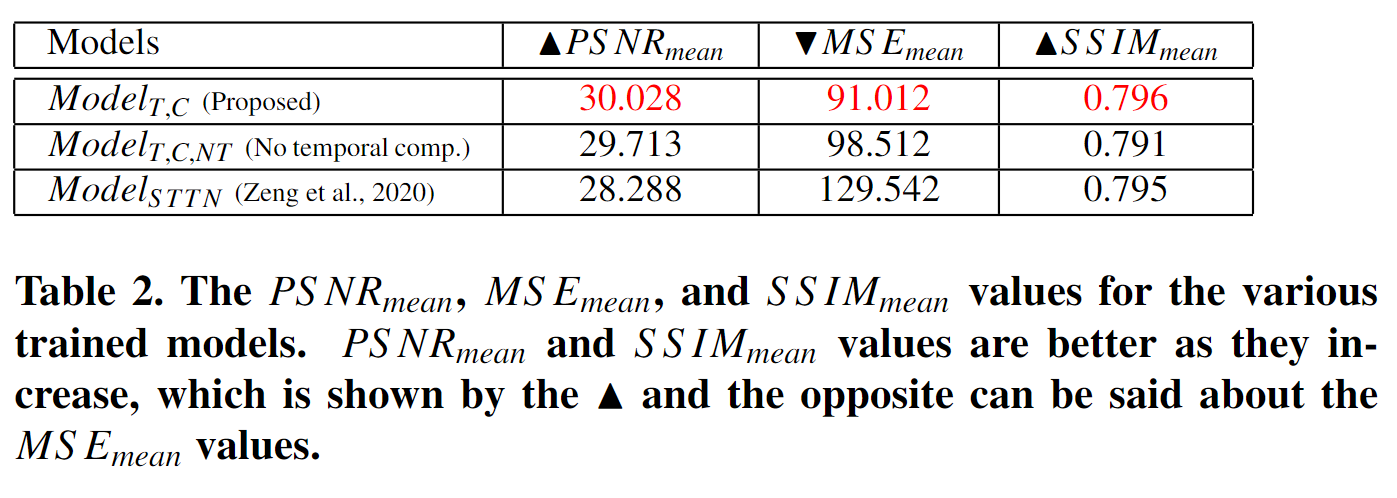
- A quantitative and qualitative comparison of our approach
- Analysing qualitatively and quantitatively the effect of inpainting specular highlights on the estimation of stereo disparity, optical flow, feature matching, and camera motion
git clone https://github.com/endomapper/Endo-STTN.git
cd Endo-STTN/
conda create --name sttn python=3.8.5
pip install -r requirements.txt
To install Pytorch, please refer to Pytorch. In our experiments we use the following installation for cuda 11.1:
pip install torch==1.10.1+cu111 torchvision==0.11.2+cu111 torchaudio==0.10.1 -f https://download.pytorch.org/whl/cu111/torch_stable.html
Navigate to ./dataset_prep/README.md for more details.
The inpainted frames can be generated using pretrained models. For your reference, we provide our model in (pretrained model):
- Download and unzip the file in ./release_model/
- Arguments that can be set with test.py:
- --overlaid: used to overlay the original frame pixels outside the mask region on your output.
- --shifted: used to inpaint using a shifted mask.
- --framelimit: used to set the maximum number of frames per video (Default = 927).
- --Dil: used to set the size of the structuring element used for dilation (Default = 8). If set to 0, no dilation will be made.
-
To test on all the test videos in your dataset, listed in your test.json:
python test.py --gpu <<INSERT GPU INDEX>> --overlaid \ --output <<INSERT OUTPUT DIR>> \ --frame <<INSERT FRAMES DIR>> \ --mask <<INSERT ANNOTATIONS DIR>> \ -c <<INSERT PRETRAINED PARENT DIR>> \ -cn <<INSERT PRETRAINED MODEL NUMBER>> \ --zip- For example, using pretrained model release_model/pretrained_model/gen_00009.pth:
python test.py --gpu 1 --overlaid \
--output results/Inpainted_pretrained/ \
--frame datasets/EndoSTTN_dataset/JPEGImages/ \
--mask datasets/EndoSTTN_dataset/Annotations/ \
-c release_model/pretrained_model/ \
-cn 9 \
--zip
NOTE: When running this script the loaded frames and masks are saved as npy files in datasets/EndoSTTN_dataset/files/so that loading them would be easier if you want to rerun this script. To load these npy files use the --readfiles argument. This is useful when experimenting with a large dataset.
- For example, using pretrained model release_model/pretrained_model/gen_00009.pth:
-
To test on 1 video:
python test.py --gpu <<INSERT GPU INDEX>> --overlaid \ --output <<INSERT VIDEO OUTPUT DIR>> \ --frame <<INSERT VIDEO FRAMES DIR>> \ --mask <<INSERT VIDEO ANNOTATIONS DIR>> \ -c <<INSERT PRETRAINED PARENT DIR>> \ -cn <<INSERT PRETRAINED MODEL NUMBER>>-
For example, for a folder "ExampleVideo1_Frames" containing the video frames, using pretrained model release_model/pretrained_model/gen_00009.pth:
python test.py  --gpu 1 --overlaid \
--output results/Inpainted_pretrained/ \
--frame datasets/ExampleVideo1_Frames/ \
--mask datasets/ExampleVideo1_Annotations/ \
-c release_model/pretrained_model/ \
-cn 9
-
-
Single frame testing:
To test a single frame at a time and thus removing the temporal component, follow the same steps above but use test-singleframe.py instead of test.py.
Once the dataset is ready, new models can be trained:
- Prepare the configuration file (ex: EndoSTTN_dataset.json):
- "gpu": <INSERT GPU INDICES EX: "1,2">
- "data_root": <INSERT DATASET ROOT>
- "name": <INSERT NAME OF DATASET FOLDER>
- "frame_limit": used to set the maximum number of frames per video (Default = 927). In the paper no limit was used for training; only for testing.
- "Dil": used to set the size of the structuring element used for dilation (Default = 8). If set to 0, no dilation will be made.
python train.py --model sttn \
--config <<INSERT CONFIG FILE DIR>> \
-c <<INSERT INITIALIZATION MODEL PARENT DIR>> \
-cn <<INSERT INITIALIZATION MODEL NUMBER>>
- For example, using pretrained model release_model/pretrained_model/gen_00009.pth as initialization:
python train.py --model sttn \
--config configs/EndoSTTN_dataset.json \
-c release_model/pretrained_model/ \
-cn 9
To quantitatively evaluate results using the pseudo-ground truth:
- Test all videos using Testing Script (2.) with the --shifted argument.
- Use quantifyResults.ipynb to generate csv files containing the quantitative results.
-
In the paper we used the following older versions, which could result in slightly different values:
Python 3.6.3 CUDA 10.1 requirements36.txt torchvision==0.3.0 torch==1.1.0 -
In Testing Script and Evaluation:
The testing script for shifted masks used for the paper differs slightly in the processing of the masks. For similar results like the paper use the following masks already shifted instead of --shifted. Similarly, quantifyResults.ipynb should also be eddited to use these masks and shifted should be set to False.
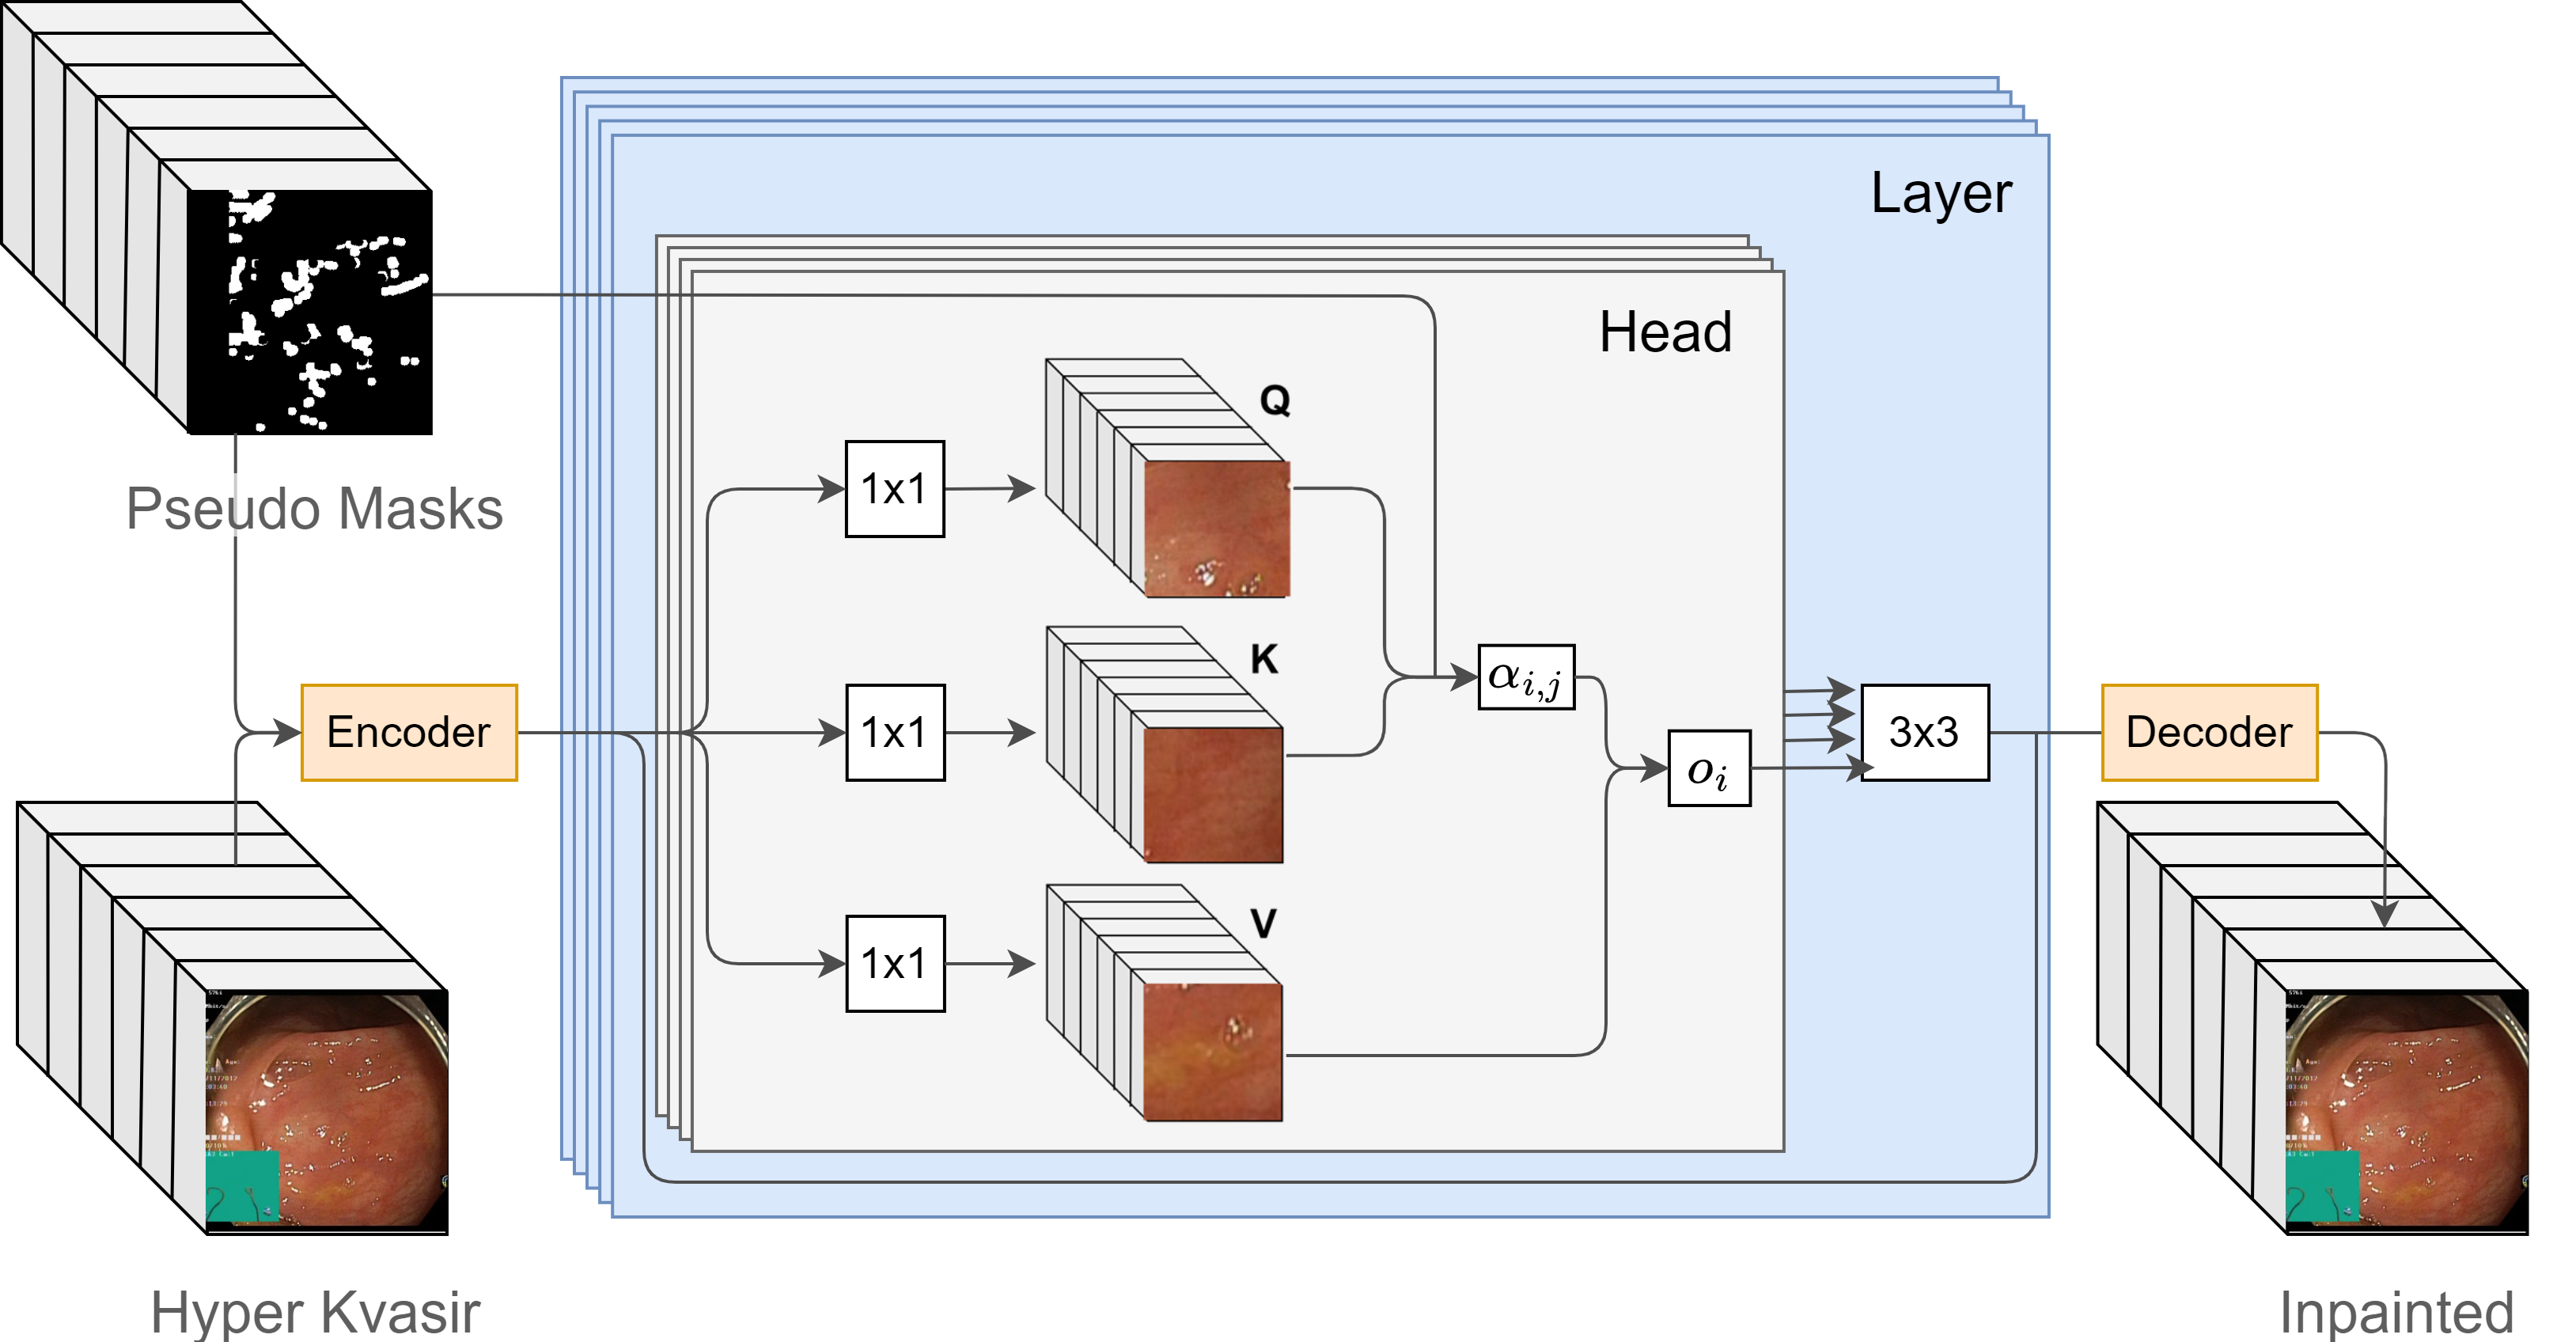
We provide an example of visualization attention maps in visualization.ipynb.
We provide training monitoring on losses by running:
tensorboard --logdir release_model
If you have any questions or suggestions about this paper, feel free to contact me (remadaher711@gmail.com).


