Important
Update, 13/09/2024:
The ability to call the DeepMirror/KymoButler through API has recently been discontinued.
As a consequence, this plugin is not functional anymore.
No information is currently available about if and/or when the service will be back online.
This plugin doesn't do any processing per-se: its aim is to provide an easy-to-use interface between ImageJ/Fiji and the KymoButler cloud-application. It allows pushing kymographs obtained using a dedicated tool (please consider using KymoToolBox) from ImageJ/Fiji to the KymoButler servers.
Important note: your data will be sent (anonymously) to the KymoButler servers and might be used to improve the algorithms.
This plugin was developed without any commercial interests, however the API that comes with this software is limited by default in terms of image size, computation time, and batch processing. If you are interested in an unrestricted API, please contact deepMirror, the company that runs the API (charges may apply).
This plugin heavily relies on external libraries, which should be installed alongside the plugin:
- commons-io, v2.6
- org.apache.httpcomponents/httpclient, v4.5.9
- org.json/json, v20180813
- Get the plugin from here and place it in your plugins folder. Alternatively, drag-and-drop the file to ImageJ toolbar: in the pop-up window, you will be asked where to save the file and proposed with ImageJ/plugins folder. Press Ok to confirm destination folder.
- commons-io, v2.6: follow this link, download the zip file, extract it, and place the commons-io-2.6.jar file in your plugins/jars folder (the location is really important to get ImageJ finding the libraries). Alternatively, drag-and-drop the file to ImageJ toolbar: the file will be automatically saved to ImageJ/plugins/jars folder (no confirmation windo should pop-up).
- org.apache.httpcomponents/httpclient, v4.5.9: follow this link, download the zip file, extract it, and place the commons-codec-1.11.jar, commons-logging-1.2.jar, httpclient-4.5.9.jar, httpcore-4.4.11.jar and httpmime-4.5.9.jar files in your plugins/jars folder (the location is really important to get ImageJ finding the libraries). Alternatively, drag-and-drop the files to ImageJ toolbar: the files will be automatically saved to ImageJ/plugins/jars folder (no confirmation windo should pop-up).
- org.json/json, v20180813: follow this link download the zip file, extract it, compile it the place the json-20180813.jar file in your plugins/jars folder (the location is really important to get ImageJ finding the libraries). Alternatively, drag-and-drop the file to ImageJ toolbar: the file will be automatically saved to ImageJ/plugins/jars folder (no confirmation windo should pop-up).
Get everything from here, unzip the file, and paste all its content into your plugins folder. The KymoButler4IJ_.jar file should be located directly in the plugins folder, other files should be placed in the plugins/jars folder.
Parameters:
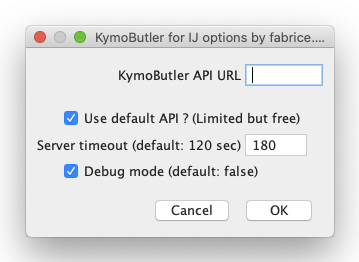
- KymoButler API URL: The URL provided by KymoButler. The default API restricts image size, computation time, and batch processing.
- Use default API? (Limited but free): This will use a completely free API that has some limitations in terms of batch processing, pixel number, and CPU time.
- Server timeout: The maximum time the plugin will wait for a response from the server before cancelling the process.
- Debug mode: Allows debugging possible communication issues with the server (see the Debug options and tools section).
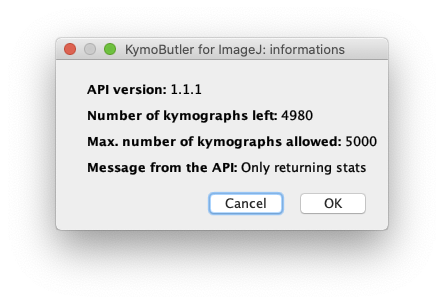
As KymoButler has a certain allowance set, you may want to check how many analysis were done/remain to be used. This is the function of the Plugins/KymoButler for ImageJ/KymoButler Info that will return all the information in a single window once called. Please allow some time (around 4 sec) for the request to be pushed and the data to be pulled:
- Before analysing a kymograph, it should be opened. Space (the path along which the object moves) should be on the x axis, and time on the y axis.
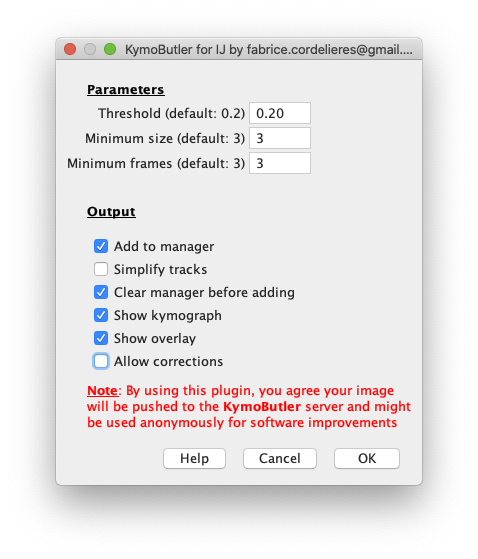
- From the plugins menu, select the following entry: KymoButler for ImageJ/KymoButler Analyse. This graphical user interface should appear:
-
Fill in the parameters/check the appropriate options:
- Threshold (default: 0.2): threshold for track detection (a probability/likelihood of the detection to be a track).
- Minimum size (default: 3): minimum size of detected objects.
- Minimum frames (default: 3): minimum number of consecutive frames per track.
- Add to manager: once returned, the tracks will be added as individual regions of interest to the ROI Manager.
- Simplify tracks: returned tracks are coded as one coordinate per time point. For linear movements along the path, the tracks might be re-encoded as segments when the speed is constant.
- _Clear manager before adding:_empties the ROI Manager before pushing the new results.
- _Show kymograph:_together with all the analysis results, KymoButler returns a copy of the original kymograph. This checkbox allows checking that the input data was indeed well interpreted by KymoButler by allowing to display what it has seen.
- Show overlay: displays an RGB image where the detected tracks are overlaid onto the original image. Each track is encoded with a different colour and the result is presented as a composite image, made of 3 channels (red, green, blue).
- Allow corrections: when activated, this options pops-up a "wait for user" window. The user is invited to modify any mis-placed (select the relevant ROI, modify it, then use the 'update' button from the ROI Manager) or missing detection (draw the ROI, then add it to the ROI Manager using the 'add' button). Once OK is pressed, the image and the content of the ROI Manager are pushed to the KymoButler's server to be added to the training set (see the Correcting and re-training KymoButler section).
-
While the plugin is waiting for the analysis to be performed, the status bar should read as follows:
- Once the analysis response has been received, the status bar should read as follows:
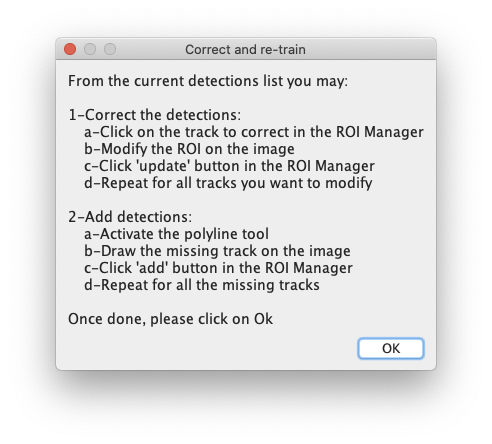
- In case the Allow corrections box has been ticked, the following dialog box will pop-up:
- Follow the instructions, make all modifications, and ONLY THEN click OK. Once the data have been uploaded, the status bar should read as follows:
This step can be performed independently in addition to the re-training (during the post-processing). It requires a kymograph to be opened and the tracks to be loaded on the ROI Manager. Once both conditions are satisfied, simply launch the KymoButler for ImageJ/KymoButler Upload plugin.
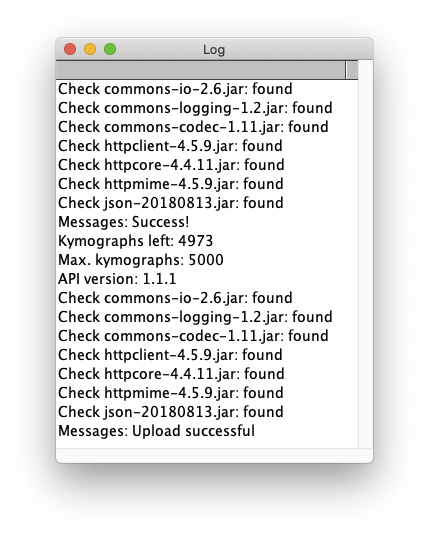
When debug mode is active, any launch of the plugin will write the output of the libraries' check to the log window. Once the process is complete, additional information will be logged, such as messages from the API (message and version of the API) and details about the allowance (kymographs left/total number of allowed analysis):
In addition, when debug mode is active, any communication from the server is automatically saved at the root of ImageJ/Fiji installation folder and as a JSON file. The filename starts with the date and time it was issued (e.g. 2019-11-18_12-40-28_debug_KymoButler.json).
For convenience, a plugin to decode the JSON file into image, tracks, and messages is provided: KymoButler for ImageJ/KymoButler JSON Parser.
All the elements of this collection of plugins are macro-recordable!
