     ___        ______
    / \ \      / / ___|
   / _ \ \ /\ / /\___ \
  / ___ \ V  V /  ___) |
 /_/   \_\_/\_/  |____/
This project creates 2 CloudFormation stacks :
-
public-private-vpc.json
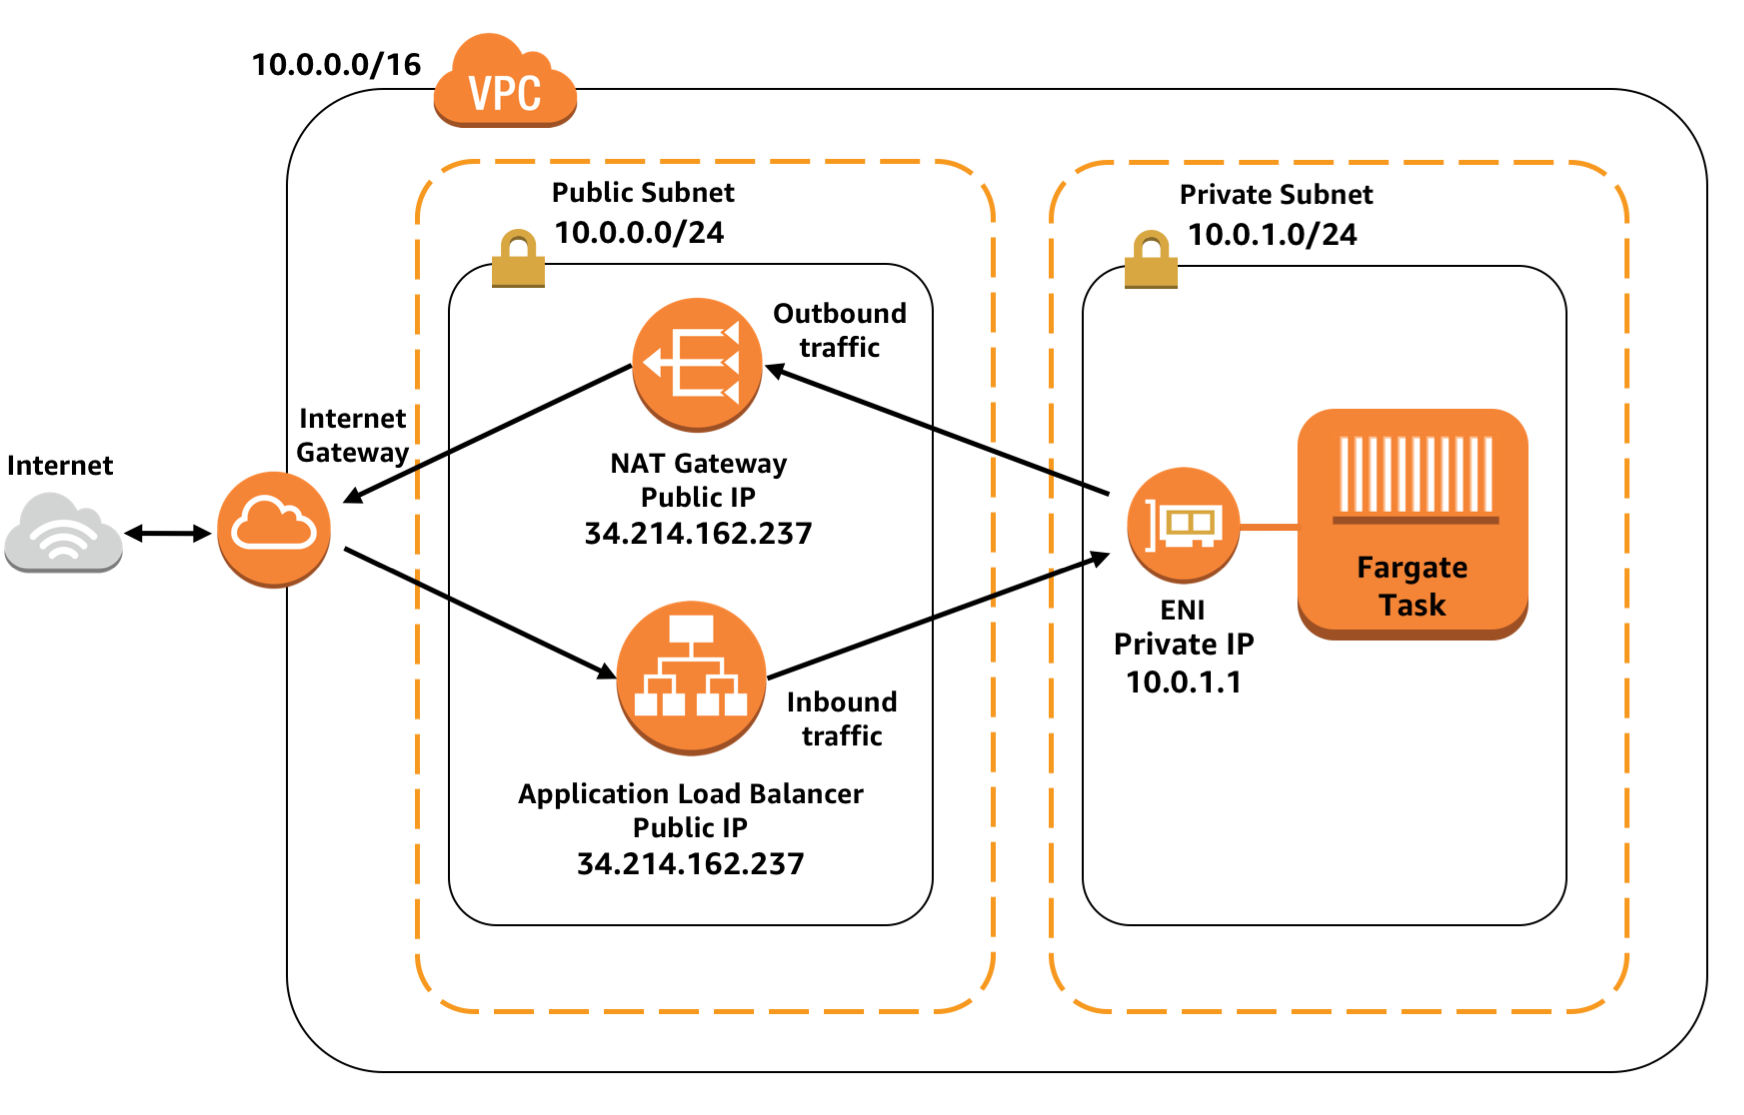
This stack deploys a Fargate cluster that is in a VPC with both\npublic and private subnets. Containers can be deployed into either\nthe public subnets or the private subnets, and there are two load\nbalancers. One is inside the public subnet, which can be used to\nsend traffic to the containers in the private subnet, and one in\nthe private subnet, which can be used for private internal traffic\nbetween internal services. -
private-subnet-public-loadbalancer.json
Deploy a service on AWS Fargate, hosted in a private subnet, but accessible via a public load balancer. This also launches an EC2 instance using Deep Learning Ubuntu AMI in the Public Subnet [not depicted in image] The Deep Learning instance creates container image using Dockerfile mentioned in this repo. It pushes it to ECR and configures task definition. The stack then creates a ECS cluster with the task definition.
-
If you are using CLI to interact with AWS, then ensure CLI is configured. [Default region US-EAST-1, considering availability of used resources] . Easiest to use the AWS Console.
-
Ensure that you have a KeyPair available to access the Deep Learning Instance.
-
By default, template launches p3.2xlarge Deep Learning Instances. Check your EC2 Limits. Also update the AZs if you get Insufficient Capacity Errors.
- Launch the CloudFormation templates in order described above.
To launch using CLI :
aws cloudformation create-stack --stack-name NetworkingStack --template-body file:///templates/public-private-vpc.json --capabilities CAPABILITY_IAM
Wait for above stack to reach CREATE_COMPLETE stage.
In the parameters/private-subnet-public-loadbalancer-params.json. Parameter Key : StackName ; ensure to update the Value provided in NetworkingStack
aws cloudformation create-stack --stack-name ServicesStack --template-body file:///templates/private-subnet-public-loadbalancer.json --capabilities CAPABILITY_IAM --parameters file:///parameters/private-subnet-public-loadbalancer-params.json
-
Use the Outputs section to determine the Deep Learning EC2 Instance Public IP or simply look for EC2 instance with Tags : [{"Key": "Name","Value": "DeepLearningInstance"}, {"Key": "Project","Value": "VisualSearch_MXNetWorkshop"}]
-
Log into the Deep Learning instance using KeyPair provided during CloudFormation stack launch. Following command for MACs. More info AWS Documentation for information on Configure the Client to Connect to the Jupyter Server
ssh -i ./<<keypair-name>>.pem -L 8888:127.0.0.1:8888 ubuntu@<<InstanceIP>>
- After logging in check the repo contents and then start the jupyter notebook :
    ls
    jupyter notebook
- Once the Jupyter Notebook is started, access it via your local browser using localhost link. The token is displayed in the terminal window where you launched the server. Look for something like:
Copy/paste this URL into your browser when you connect for the first time, to login with a token: http://localhost:8888/?token=0d3f35c9e404882eaaca6e15efdccbcd9a977fee4a8bc083
Copy the link and use that to access your Jupyter notebook server.
- Goto https://github.com/ThomasDelteil/VisualSearch_MXNet and run the steps in Jupyter Notebook to create models and indexes.
-
Once the model is created go back to the Deep Learning Instance terminal, run following commands to update the docker image and push it to ECR.
7.1 Configure aws cli to use IAM role and correct region:
   aws configure
   sudo `aws ecr get-login --region us-east-1`
7.2 Get docker login & build the Docker image using Dockerfile provided in "VisualSearch_MXNet/mms" folder. is in the outputs section of CloudFormation. can be anything!
    source activate python3
    cd <path/to/project>/VisualSearch_MXNet/mms
    mxnet-model-export --model-name visualsearch --model-path . --service-file service.py
7.3 Run the image locally using command :
    sudo docker build -t <image-name> .
    sudo docker images
    sudo docker run -d -p 8080:8080 <image-name>:latest
    curl 127.0.0.1:8080/api-description
7.4 Edit the index.html to point to http://DeepLearningInstanceIP:8080. [Replace https://api.thomasdelteil.com]
We will follow same process for the web container image.
    cd ~
    git clone https://github.com/gaonkarr/VisualSearch_MXNet_CFN
    cd VisualSearch_MXNet_CFN/web/
    vi index.html
7.5 Build web images and run it locally :
   sudo docker build -t web .
   sudo docker run -d -p 8000:8000 web:latest
7.6 Goto local browser http://:8000. This should display the index.html. Upload any image file and it should show the matches.
7.7 To push the image to ECR, Tag the image with latest tag of ECR Repository [Check out 2nd CloudFormation stack outputs section for "AppRepositoryURI"]
sudo docker tag <image-name>:latest <account-id>.dkr.ecr.<region>.amazonaws.com/<repository-name>:latest
7.5 Push the docker image to ECR repository
sudo docker push <account-id>.dkr.ecr.<region>.amazonaws.com/<repository-name>:latest
// There has been issue with docker image failing on fargate, yet to be fixed.
7.6 Update the service. Run following on local machine or Deep Learning Instance. ["ClusterName" is in outputs section of 2nd CloudFormation stack.]
aws ecs update-service --service mxnet-model-server-fargate-app --force-new-deployment --cluster <cluster-name>
- Open the 1st CloudFormation stack's output section, click on the link for "ExternalUrl". The browser should display...
