
Welcome to the Fourier-GRX SDK, your gateway to controlling Fourier's humanoid robots! This guide will help you set up your environment, calibrate your humanoid robot, and run exciting demos. Let’s dive into the future of robotics! 🤖🚀
• Operating System: Ubuntu 20.04 and up
• Python Version: Python 3.11
If you are first time using the robot, please set up the permission for IMU(HIPNUC IMU) and joysticks with permission_description
- Download and install Miniconda: Follow the instructions on the Miniconda installation guide.
-
Create and activate the environment:
[!NOTE] For now we only support Python 3.11.
conda create -n grx-env python=3.11
conda activate grx-env
For more details, see the Conda user guide.
- Clone the official repo:
git clone https://gitee.com/FourierIntelligence/wiki-grx-deploy.git
If you are using ufw, follow these steps to enable firewall access for the grx server to be able to automatically detect clients:
-
Enable firewall access:
sudo ufw allow 7446/udp
-
Check the firewall status:
sudo ufw status
-
Install the library:
python -m pip install fourier-grx
-
Verify installation:
grx --help
Caution
Ensure the sensor_offset.json file contains the correct absolute encoder values before running any code. Proper calibration is crucial for the robot’s operation and prevents potential damage. The grx run command reads the sensor_offset.json file from the directory where the server is started. Make sure this file is in the same directory when starting the server.
-
Physical calibration could be down with the instructions shown in Physical_Calibration
-
Run the
grxserver:grx run ./config/config_GR1_T1.yaml --urdf-path ./urdf
-
Open a second terminal, activate the environment, and run:
conda activate grx-env
grx calibrate
Notice: Ensure that all calibration tools have been removed before proceeding with other operations.
This saves sensor offsets to sensor_offset.json.
- Run with the sample config file:
grx run ./config/config_GR1_T1.yaml --urdf-path ./urdf
- Open a second terminal, activate the environment, and run:
conda activate grx-env
python demo_robot_client.py
- Enable: Enable the motor.
- Disable: Disable the motor.
- Set_Home: Calibrate all absolute encoders.
- Set_Gains: Set PD parameters.
- Reboot: Reboot all motors.
- Print_States: Print motor status.
- Move_to_Default: Move to default positions.
- Record: Save joint movements.
- Play: Replay recorded tasks.
- Abort: Stop current movements.
- List_Frames: List all URDF links.
- Get_Transform: Get transformation matrices.
- Exit: Exit the client panel.
Warning
Ensure a safe position with ample space. Be ready to push emergency stop if needed.
-
Start the server:
grx run ./config/config_GR1_TX.yaml --urdf-path ./urdf
-
Run the standing demo:
python demo_nohla_stand.py --act
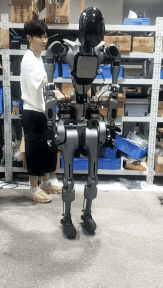
Demo result:
-
Run the walking demo:
First, you need to run
demo_nohla_stand.pyto get similar results as shown above. Then, place the robot on the ground and run the following code. Do not forget to ensure the robot is balanced before starting to walk.python demo_nohla_rl_walk.py --model-dir ./data/nohla_rl_walk --act
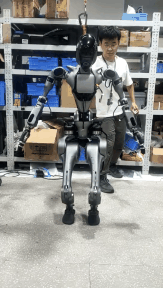
Demo result:


Now your humanoid robot should be up and walking! 🦾🚶♂️
Enjoy exploring the fascinating world of humanoid robotics with fourier-grx! 🌍🤖✨