This Terraform configurations uses the AWS provider to provision virtual machines on AWS to prepare VMs and deploy IBM Cloud Private on them. This Terraform template automates best practices learned from installing ICP on AWS at numerous client sites in production.
This template (on the master branch) provisions a highly-available cluster with ICP 3.1.2 Enterprise Edition. The template uses the terraform-module-icp-deploy sub module to install the cluster once the infrastructure has been prepared.
- Infrastructure Architecture
- Terraform Automation
- Installation Procedure
- Community Edition
- Cluster access
- AWS Cloud Provider
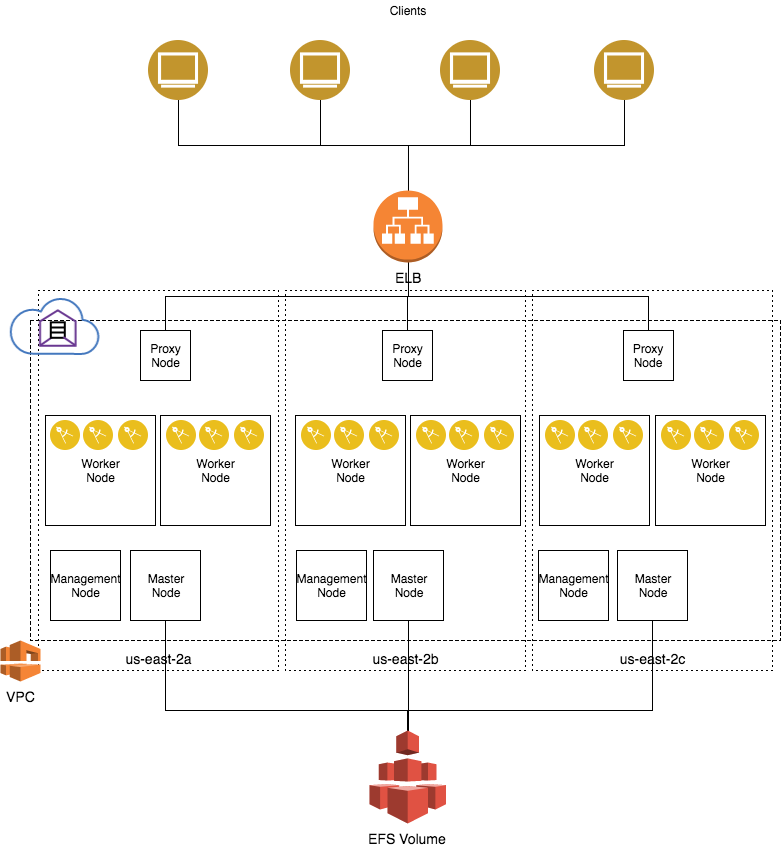
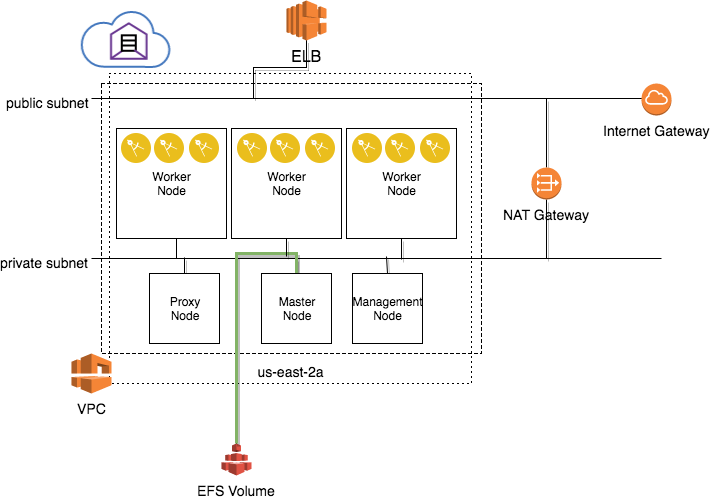
The following diagram outlines the infrastructure architecture.
In a single availability zone, we divide the network into a public subnet which is directly connected to the internet, and a private subnet that can reach the internet through the NAT gateway:
-
To use Terraform automation, download the Terraform binaries here.
On MacOS, you can acquire it using homebrew using this command:
brew install terraform
-
Create an S3 bucket in the same region that the ICP cluster will be created and upload the ICP binaries. Make note of the bucket name. You can use the AWS CLI to do this.
For ICP 3.1.2-EE, you will need to copy the following:
- the ICP binary package tarball (
ibm-cloud-private-x86_64-3.1.2.tar) - ICP Docker package (
icp-docker-18.03.1_x86_64)
- Create a file,
terraform.tfvarscontaining the values for the following:
| name | required | value |
|---|---|---|
aws_region |
no | AWS region that the VPC will be created in. By default, uses us-east-2. Note that for an HA installation, the AWS selected region should have at least 3 availability zones. |
azs |
no | AWS Availability Zones that the VPC will be created in, e.g. [ "a", "b", "c"] to install in three availability zones. By default, uses ["a", "b", "c"]. Note that the AWS selected region should have at least 3 availability zones for high availability. Setting to a single availability zone will disable high availability and not provision EFS, in this case, reduce the number of master and proxy nodes to 1. |
key_name |
yes | AWS keypair name to assign to instances |
ami |
no | Base AMI to use for all EC2 instances. For PoC and tests you can insert ubuntu or rhel and latest version of RHEL 7.5 or Ubuntu 16.04 will be searched |
docker_package_location |
no | S3 URL of the ICP docker package for RHEL (e.g. s3://<bucket>/<filename>). Ubuntu will use docker-ce from the Docker apt repository. If Docker is already installed in the base AMI, this step will be skipped. |
image_location |
no | S3 URL of the ICP binary package (e.g. s3://<bucket>/ibm-cloud-private-x86_64-2.1.0.3.tar.gz). Can also be a local path, e.g. ./icp-install/ibm-cloud-private-x86_64-2.1.0.3.tar.gz; in this case the Terraform automation will create an S3 bucket and upload the binary package. If provided, the automation will download the binaries from S3 and perform a docker load on every instance. Note that it is faster to create an instance, install docker, perform the docker load, and convert to an AMI for use as a base instance for all node role types, as loading docker images takes around 20 minutes per EC2 instance. If the installer image is already on the EC2 instance, this step is skipped. |
icp_inception_image |
no | Name of the bootstrap installation image. By default it uses ibmcom/icp-inception-amd64:3.1.2-ee to indicate 3.1.2 EE, but this will vary in each release. You can also install ICP Community edition by specifying ibmcom/icp-inception-amd64:3.1.2 for example, |
registry_server |
no | URL of registry to pull ICP images from, instead of providing S3 bucket URI where binaries are stored. |
registry_username |
no | username to log in to registry server with |
registry_password |
no | password to log in to registry server with |
existing_iam_master_instance_profile_name |
no | If an IAM role is created beforehand, will assign the role with this name to all master node EC2 instances. See section on IAM roles for more information on the required policies. If blank, will attempt to create an IAM role. |
existing_iam_node_instance_profile_name |
no | If an IAM role is created beforehand, will assign the role with this name to all non-master EC2 cluster instances. See section on IAM roles for more information on the required policies. If blank, will attempt to create an IAM role. |
user_provided_cert_dns |
no | The DNS name in a user-provided TLS certificate, if provided |
See Terraform documentation for the format of this file.
-
If using a user-provided TLS certificate containing a custom DNS name, copy
icp-auth.crtandicp-auth.keyto this directory before installation to thecfc-certsdirectory. See documentation for more details. The certificate should contain theuser_provided_cert_dnsas a common name, and the DNS entry corresponding should be a CNAME pointing at the created ELB DNS entry for the master console. -
Provide AWS credentials using environment variables:
export AWS_ACCESS_KEY_ID=AKIAADGHASKDHGAKSDHGKASDHGK
export AWS_SECRET_ACCESS_KEY=BAzxcvq^.asdgaljlajdfl235bads
-
Initialize Terraform using this command. This will download all dependent modules.
terraform init
Run this command to see what would be created in the AWS account:
terraform planTo move forward and create the objects, use the following command:
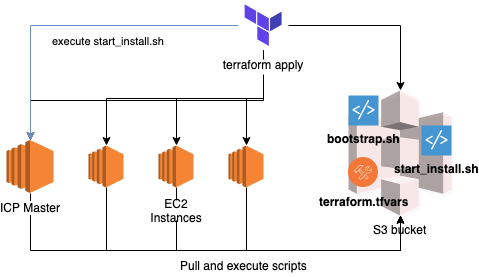
terraform applyThe following diagram illustrates the process:
- Terraform creates the infrastructure objects including EC2 instances.
- The scripts in the
scriptsdirectory will be uploaded to an S3 bucket - The EC2 instances are configured with cloud-init to retrieve the scripts from the S3 bucket on startup. The
bootstrap.shscript is executed silently on every node and bootstraps each node (install docker, prepare storage, etc). - A configuration file (
terraform.tfvars) is generated from the outputs of the infrastructure for the terraform-module-icp-deploy module and copied to the S3 bucket. - The
start_install.shscript is run on the first ICP master host, which clones the github module, downloads theterraform.tfvarsfile from the S3 bucket, and runsterraform applyin a docker container that triggers the rest of the ICP installation.
If no bastion host is provisioned, the installation runs silently on the boot master (i.e. icp-master01) using cloud-init until it completes; otherwise the installation will continue synchronously using the bastion host's public IP (by setting the number of bastion nodes in terraform.tfvars to 1).
bastion = {
 nodes = "1"
}
The installation output will be written to /tmp/icp_logs/start_install.log on the first master. Bastion hosts are not required for normal operation of the cluster, but may be desired if you want to synchronously wait for the installation to complete, such as in execution from a devops pipeline.
When the installation completes, the /opt/ibm/cluster directory on the boot master (i.e. icp-master01) is backed up to S3 in a bucket named icpbackup-<clusterid>, which can be used in master recovery in case one of the master nodes fails. It is recommended after every time terraform apply is performed, to commit the terraform.tfstate into a backend so that the state is stored in source control.
When installation completes, if a user-provided certificate is used, create a CNAME entry in your DNS provider from the DNS entry to the ELB DNS URL output at the end of the terraform process.
The Terraform automation creates the following objects.
these are tagged with the cluster id for Kubernetes-AWS integration
| Node Role | Count | AWS EC2 Instance Type | Subnet | Security Group(s) |
|---|---|---|---|---|
| Bastion | 0 | t2.large | public | icp-default, icp-bastion |
| Master | 3 | m4.xlarge | private | icp-default, icp-master |
| Management | 3 | m4.xlarge | private | icp-default |
| VA | 3 | m4.xlarge | private | icp-default |
| Proxy | 3 | m4.large | private | icp-default, icp-proxy |
| Worker | > 3 | m4.xlarge | private | icp-default |
(the instance types, base AMIs and counts can be configured in variables.tf)
For recovery, master and proxy nodes have Network Interfaces created and attached to them as the first network device. The private IP address is bound to the network interface, so when the interface is attached to a newly created instance, the IP address is preserved. This is useful for Master Recovery, which is covered in below.
An IAM role is created in AWS and attached to each EC2 instance. See AWS Cloud provider documentation for minimum permissions to enable the AWS cloud provider.
(The Kubernetes AWS Cloud Provider needs access to read information from the AWS API about the instance (i.e. which subnet it's in, the private DNS name, whether nodes that have been removed, etc), and to create LoadBalancers and EBS Volumes on demand.)
Additionally, we add S3FullAccess policy so that the IAM role can get installation images out of an S3 bucket and back up the /opt/ibm/cluster directory to an S3 bucket after installation.
- VPC with an internet gateway
- All ICP nodes are placed in private subnets, each with their own NAT Gateway.
- outbound Internet access from private subnet through NAT Gateway
- Private EC2 and S3 API endpoints are created in the VPC
- two for each AZ (one public, one private)
- (CIDR for VPC and subnets can be configured in
terraform.tfvars, seevariables.tf for values) - (these are tagged with the cluster id for Kubernetes ELB integration)
- (CIDR for VPC and subnets can be configured in
Note that the below are the defaults, and each security group can have its whitelist be configured in terraform.tfvars.
icp-bastion- allow 22 from 0.0.0.0/0
icp-default- allow ALL traffic from itself (all nodes are in this security group)
- (this is tagged with the cluster id for Kubernetes ELB integration)
icp-proxy- allow from 0.0.0.0/0 on port 80
- allow from 0.0.0.0/0 on port 443
icp-master- allow from 0.0.0.0/0 on port 8500 (image registry)
- allow from 0.0.0.0/0 on port 8600 (image registry)
- allow from 0.0.0.0/0 on port 8001 (kube api)
- allow from 0.0.0.0/0 on port 8443 (master UI)
- allow from internal on port 9443 (Auth service)
Note that the Network Load Balancer (NLB) used in the terraform template does not have explicit security groups like Application Load Balancers so the security groups are instead placed on the instances themselves.
- Network LoadBalancer for ICP console
- listen on 8443, forward to master nodes port 8443 (ICP Console)
- listen on 8001, forward to master nodes port 8001 (Kubernetes API)
- listen on 8500, forward to master nodes port 8500 (Image registry)
- listen on 8600, forward to master nodes port 8600 (Image registry)
- listen on 9443, forward to master nodes port 9443 (Auth service)
- Network LoadBalancer for ICP Ingress resources
- listen on port 80, forward to proxy nodes port 80 (http)
- listen on port 443, forward to proxy nodes port 443 (https)
A private DNS Zone is created in Route 53. The domain name can be configured in variables.tf; by default it is <clusterid>.icpcluster.icp. The domain search suffixes are added to resolv.conf, but due to a bug in cloud-init, resolv.conf is overwritten by NetworkManager in RHEL. It should be resolved in a future release of cloud-init.
An S3 Bucket for Configuration is created and the /opt/ibm/cluster is uploaded after the cluster is installed. This is not deleted after an terraform destroy.
An auto-scaling group for the ICP worker nodes is created containing the same configuration as the ICP worker nodes, if enable_autoscaling is set to true. Scaling up and down is triggered manually.
A Lambda function is created that responds to the auto-scaling events, if enable_autoscaling is set to true. The function is zipped and uploaded to an S3 bucket, along with client certificates used to talk to the Kubernetes API. The function creates Kubernetes jobs in ICP that add and remove worker nodes from the cluster using the icp-inception image. The function runs from within the VPC.
The installer automates the install procedure described here.
Suggested ICP Installation parameters specific on AWS:
---
calico_tunnel_mtu: 8981
cloud_provider: aws
kubelet_nodename: fqdn
Because AWS enables Jumbo frames (MTU 9001), the Calico IP-in-IP tunnel is configured to take advantage of the larger MTU.
The cloud_provider parameter allows Kubernetes to take advantage of some Kubernetes-AWS integration with dynamic ELB creation and dynamic EBS creation for persistent volumes. When the AWS cloud_provider is used, all node names use the private FQDN retrieved from from the AWS metadata service and nodes are tagged with the correct region and availability zone. Kubernetes will stripe deployments across availability zones. See the below section for more details.
The Terraform automation generates cluster_CA_domain, cluster_lb_address, and proxy_lb_address corresponding to the DNS names for the master and proxy ELB.
Note the other parameters in the icp-deploy.tf module. The config files are stored in /opt/ibm/cluster/config.yaml on the boot-master.
The following parameters are required settings to install IBM Cloud Private Community Edition. These values are the preferred values for any conflicting paramters in the terraform.tfvars file, as specified above in the Prerequisites section. These settings have been validated on IBM Cloud Private 3.1.0 Community Edition.
image_location = ""

icp_inception_image = "ibmcom/icp-inception-amd64:3.1.2"

bastion = {
 nodes = "1"
}

master = {
  nodes = "1"          # required to be '1' to install CE
  type = "m4.2xlarge"  # or m4.4xlarge if 'management' nodes=0
  disk = "300"
}

management = {
  nodes = "1"          # or optionally 0 if you want to run all platform services on 'master'
  type = "m4.xlarge"
  disk = "300"
}

va = {
  nodes = "0"
}

proxy = {
  nodes = "1"          # required to be '1' to install CE
  disk = "150"
}

worker = {
  disk = "150"
}
The ICP console can be accessed at https://<cluster_lb_address>:8443. See documentation.
The registry is available at https://<cluster_lb_address>:8500. See documentation for how to configure Docker to access the registry.
The Kubernetes API can be reached at https://<cluster_lb_address>:8001. To obtain a token, see the documentation or this blog post,
Ingress Resources can be created and exposed using the proxy node endpoints at http://<proxy_lb_address>:80 or https://<proxy_lb_address>:443
The AWS Cloud provider provides Kubernetes integration with Elastic Load Balancer and Elastic Block Store. See documentation on LoadBalancer and Volume


