Camera Calibration
Brief Review
A camera calibration script in python using an xml configuration file.
For calibration or load the camera parameters first you must set the xml file for specify where the calibration file will be dumped or loaded.

The calibration xml file also has a part you must specify where are the images of calibration and finally if you want to see the calibration or not. The calibration images will be showed every 500ms and will draw the chessboard pattern over it.

Also, you could select if you want to see the calibration view or not specifying the viewCalibration parameter in the file.
The script will run over a set of images from a specified folder that contains the chessboard calibration pattern. Currently is fixed for a 7x6 pattern as you could see in the images folder. For understanding generating your own calibration pattern based on chessboard click here
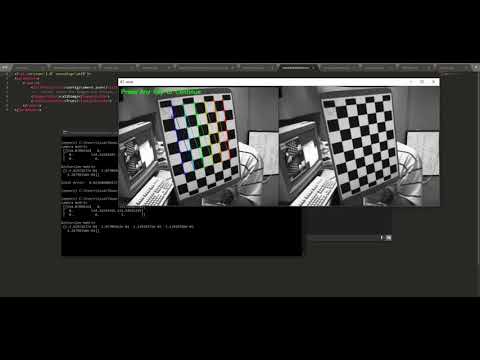
Here is the screenshots of the current output of this working example after running the camera_calibration.py script.


If you're interested in knowing the details, have a look at the original documentation.
Installation
For installing the application there are only two prerequisites that are:
Having installed python do the following commands workon <your_virtual_env> if you have a virtualenvironment installed, if not, continue to install the requirements by pip install -r requirements.txt and that's it!.
Usage
Calibration only
- After completing the pre-requisites now you are ready to run the calibration file, but firt things first!. We need to configure our xml file.
-
NOTE: A set of images over 10 is desirable to achieve a good calibration.
-
Navigate to the root folder and find the
cameracalibration.xmlfile. -
Open and modify the next xml variables.
CalibrationFile: If you are in calibration mode, this will be the path where the configuration file will be stored, if the folder does not exists, the application will create it automatically. By default, this variable is configured to dump at<ROOT_FOLDER>/config/camera.json. If you are in the usage mode, this will be the location of the calibration file to load.imagesFolder: This is where the chessboard images pattern will be stored, those images stored on that folder will be used for the calibration. By default it is on thecalibimgsfolder.viewCalibration: Youenable/disableby changing toTrue/Falsethis variable if you desire to view the calibration. The images wil run at 0.5s each one if enabled, if not it will pass directly to the results after the calibration.
-
Now that you have configured and saved the file you are ready to run the calibration. Just type on the command window
python camera_calibration.py --xml cameracalibration.xmland press enter, the calibration. -
View the calibration parameters on the command prompt window (see results on the brief review section above), but this also will be stored on the folder you specified on the xml file.
-
You can always abort the process if you are calibrating by presing
ESC,qorQat any time. -
At the end, a window displaying the results (concatenating images) of the calibration also will be present.
Inserting in your application
In resume, if you want to use it in your own application, as a calibratior you have to call/import the file and specify the parameters, please refer to camera_calibration.py for a better understanding, but its easy.
from CameraCalib.CameraCalib import CameraCalib
import cv2
.
.
.
# contruct the calibrator with the path to store the file, enable view calibration
camc = CameraCalib(<THE_CALIBRATION_FILE>, <TRUE_OR_FALSE_FOR_VIEW_THE_CALIB>)
camc.calib(<THE_FOLDER_OF_CALIBRATION_IMAGES>)
On the other hand, if you now have the configuration file and wants to use it to undistort images you could simply add as folows.
Main Application usage
There are two methods implemented to undistort the image, both of the same results.
- Enable Method 1 by
camc.undistort(img, CAM_UNDIS). Anyway, this is the default method. - Enable Method 2 by
camc.undistort(img, CAM_UNDIS2).
from CameraCalib.CameraCalib import CameraCalib
import cv2
.
.
.
camc = CameraCalib(calibrationfile, viewcalibration) # contruct the calibrator with the path to load the file, second parameter unafects the usage
camc.calibParams()  # load the camera calibration parameters
.
.
.
img = cv2.imread('calibimgs/left03.jpg')  # load the image
img = camc.undistort(img)  # undistort the image
cv2.imshow('result', img)  # show the result
cv2.waitKey(0)  # wait for finish by any key
Results
You could see the results on this youtube video. The video only shows how to use the application, not the explanation of the camera calibration.
Issues
Currently are no issues present.
Contributiong
Your contributions are always welcome! Please feel free to fork and modify the content but remember to finally do a pull request.
📱 Having Problems?
License
