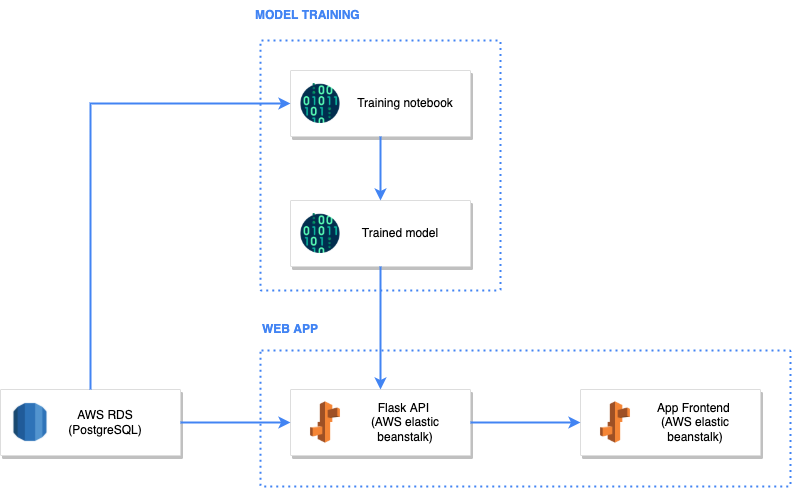
This repo is an extension of the weather-etl-aws example repo. The weather-etl example provides students of data engineering an example of an end-to-end ETL project that runs on AWS.
This project, weather-forecast-app, creates a machine learning model to predict weather with 88% accuracy, and allows users to enter inputs and receive a weather forecasted in return.
The app is hosted on AWS using Elastic Beanstalk (ELB).
images/                                     # contains images used for the README
app/
    |__ _config.template.sh                 # template for adding credentials and secrets
    |__ _config.template.bat                 # template for adding credentials and secrets
    |__ app.py                              # contains the main flask app logic and endpoints
    |__ prediction.py                       # contains the code used to perform the prediction
    |__ Procfile                            # tells Elastic Beanstalk how to run the app
    |__ requirements.txt                    # python dependencies for app
    |__ build.sh                            # shell script to build the zip file
    |__ build.bat                            # shell script to build the zip file
README.md                                   # all you need to know is in here
The solution architecture diagram was created using: https://draw.io/
Icons were taken from: https://www.flaticon.com/ and https://www.vecta.io/
Follow the steps below to run the code locally:
If you look into the app/app.py file, you will see that there are several lines for:
DB_USER = os.environ.get("DB_USER")These lines are used to store variables that are either (1) secrets, or (2) change between environments (e.g. dev, test, production).
We will first need to declare the values for these variables. This can easily be done by running the following in the terminal:
macOS:
export DB_USER="secret_goes_here"
export DB_PASSWORD="secret_goes_here"
export DB_SERVER_NAME="secret_goes_here"
export DB_DATABASE_NAME="secret_goes_here"
windows:
set DB_USER=secret_goes_here
set DB_PASSWORD=secret_goes_here
set DB_SERVER_NAME=secret_goes_here
set DB_DATABASE_NAME=secret_goes_here
To save time running each variable in the terminal, you may wish to create script files to store the declaration of each variable.
- macOS: store the declaration of the variables in a
config.local.shfile- run using
. ./config.local.sh
- run using
- windows: store the declaration of the variables in a
config.local.batfile- run using
config.local.bat
- run using
To run the application locally, simply run
cd app
python app.py
You should see the following which indicates that your app is running locally:
* Serving Flask app 'app' (lazy loading)
* Environment: production
WARNING: This is a development server. Do not use it in a production deployment.
Use a production WSGI server instead.
* Debug mode: on
* Running on http://127.0.0.1:5000/ (Press CTRL+C to quit)
* Restarting with stat
* Debugger is active!
Follow these steps to deploy the solution to AWS.
Before we can deploy the app, we need to first build the app.
Building the app refers to packaging and compiling the app so that it is in a state that can be readily deployed onto the target platform (e.g. AWS, Heroku, Azure, GCP, etc). We can skip the compilation since Python is not a compiled language, however we still need to package the app.
To package the app, we will run the following lines of code:
macOS:
zip -r web-app.zip templates static
zip -g web-app.zip app.py prediction.py requirements.txt Procfile
windows:
Note for Windows-only - You will need to install 7z (7-zip) which is a command line tool used for zipping files.
- Go to https://www.7-zip.org/ and download the version for your windows PC (usually 64-bit x64)
- Run the installer .exe file
- Add the path
C:\Program Files\7-Zipto your environment variablespath
7z a -tzip web-app.zip templates static
7z a -tzip web-app.zip app.py prediction.py requirements.txt Procfile
This will produce a .zip file which contains all the code and library packages required to run the app on AWS Lambda.
For re-use, we've stored the commands in build.sh and build.bat respectively.
You can just build the app by running either
macOS:
. ./build.sh
windows:
build.bat
- In the AWS Console, search for "Elastic Beanstalk".
- Choose the region closest to you on the top-right e.g. Sydney (ap-southeast-2)
- Select "Create Application"
- Configure ELB. Note: Unless specified, leave the settings to default.
- Provide the application name
- Select Platform: "Python"
- Select Platform Branch: "Python 3.8 running on 64bit Amazon Linux 2"
- In the "Application code" section, select "Upload your code"
- Select "Local file" > "Choose file" and select the
.zipfile you have built
- Select "Local file" > "Choose file" and select the
- Select "Configure more options"
- Select "Software" > "Edit"
- Provide the environment properties based on your environment variables in _config.template.sh or _config.template.bat.
- Select "Save"
- Select "Capacity" > "Edit"
- Under "Instance types", ensure that only "t2.micro" is selected.
- Select "Save"
- Select "Software" > "Edit"
- Select "Create app"
