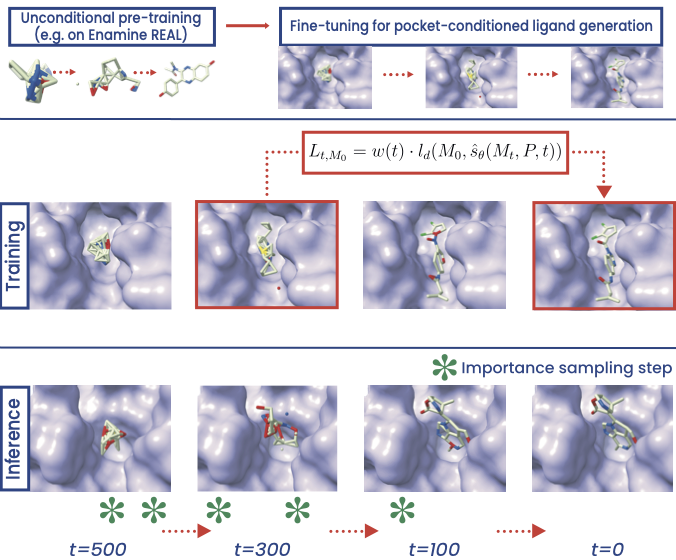
PILOT: Equivariant diffusion for pocket conditioned de novo ligand generation with multi-objective guidance via importance sampling
This is the official repository for PILOT - a model for guided structure-based drug discovery via equivariant (continuous and discrete) denoising diffusion. If you have any questions, feel free to reach out to us: julian.cremer@pfizer.com, tuan.le@pfizer.com.
Install the main environment via mamba
mamba env create -f environment.ymlFor preparing pdbqt files, install a new environment
conda create -n mgltools -c bioconda mgltoolsWe also recommend installing a separate environment for running the docking
mamba env create -f environment_vina.ymlActivate the main environment
conda activate e3molDownload the CrossDocked data as described in https://github.com/pengxingang/Pocket2Mol/tree/main/data
Create the CrossDocked data
python experiments/data/ligand/process_crossdocked.py --basedir /path/to/crossdocked_pocket10-folder --outdir /your/data/folder --no-H --dist-cutoff 7 Download the Kinodata-3D dataset here (only kinodata_docked_with_rmsd.sdf.gz needed) https://zenodo.org/records/10410259
Create Kinodata-3D dataset
python experiments/data/ligand/process_kinodata.py --basedir /path/to/kinodata_folder --outdir /your/data/folder --no-H --dist-cutoff 5 Create the pdbqt files for the test complexes Activate the mgltools environment
conda activate mgltoolspython experiments/docking_mgl.py path/to/test_dir /where/to/store/pdbqt_files dataset(replace dataset with "crossdocked" or "kinodata")
Activate the main environment
conda activate e3molTrain PILOT from scratch on CrossDocked
python experiments/run_train.py --conf configs/diffusion_crossdocked.yaml --save-dir /your/save/dirTrain PILOT from scratch on Kinodata-3D
python experiments/run_train.py --conf configs/diffusion_kinodata.yaml --save-dir /your/save/dirCurrently, we provide the model weights upon request. Please contact us via email.
Sample de novo ligands given the CrossDocked (Kinodata-3D) test set, the sampling can be started on multiple GPU nodes:
Modify scripts/generate_ligands_multi.sl (scripts/generate_ligands_multi_kinodata.sl):
- num-gpus: Number of GPU nodes you want to use (number of test files divided by num-gpus)
- model-path: Set the path to the trained model (normally save_dir/best_valid.ckpt)
- save-dir: Where the sampled molecules as SDF files shall be saved
- test-dir: Path to test directory containing .pdb, .sdf and .txt files
- pdb-dir: Path to the pre-processed pdb files (see above: experiments/data/ligand/fetch_pdb_files.py)
- dataset-root: Main path to the dataset
- batch-size: Batch size (40-50 on a V100 GPU)
- n-nodes-bias: The ligand sizes are sampled from the ligand size distribution extracted from the training data. With n-nodes-bias an additional number of atoms is added (for crossdocked: 10)
- num-ligands-per-pocket-to-sample: 100 [default on CrossDocked 100]
- num-ligands-per-pocket-to-save: 100 [default on CrossDocked 100]
- max-sample-iter: 50 [max. number of iterations to fulfill num-ligands-per-pocket-to-sample]
- batch-size: 40
- n-nodes-bias: 0 [increase sampled/fixed ligand size by the number provided]
- vary-n-nodes: [0, n-nodes-bias] is added randomly (uniform)
- fix-n-nodes [whether or not to use the ground truth ligand size for number of atoms (hence no sampling of ligand sizes)]
- prior-n-atoms: targetdiff [conditional or targetdiff - sample ligand size from pocket conditional ligand size distribution]
- property-importance-sampling [whether or not to use property importance sampling]
- property-importance-sampling-start: 200 [when on the diffusion trajectory to start importance sampling]
- property-importance-sampling-end: 300 [when on the diffusion trajectory to end importance sampling]
- property-every-importance-t: 5 [every n-th step perform importance sampling]
- property-tau 0.1 [temperature for importance sampling]
- sa-importance-sampling [whether or not to use SA importance sampling]
- sa-importance-sampling-start: 0 [when on the diffusion trajectory to start importance sampling]
- sa-importance-sampling-end: 300 [when on the diffusion trajectory to start importance sampling]
- sa-every-importance-t: 5 [every n-th step perform importance sampling]
- sa-tau: 0.1 [temperature for importance sampling]
sbatch scripts/generate_ligands_multi.slAfter sampling is finished, aggregate the results from all jobs to print the full evaluation
python experiments/aggregate_results.py --files-dir /your/sampling/save_dirAll ligands per target are saved in sdf files. The molecules in the sdf files contain all properties as well.
As soon ligands are generated for the respective pockets, we can start docking.
Modify scripts/docking_multi.sl (scripts/docking_multi_kinodata.sl):
- num-cpus: Number of CPU nodes you want to use (number of generated sdf files divided by num-cpus; see IMPORTANT note below)
 -sdf-dir: Path to the generated ligands
 -save-dir Path where all evaluations are saved at
 -pdbqt-dir Path where all pdbqt files are stored (see above: experiments/docking_mgl.py)
 -pdb-dir: Path to the pre-processed pdb files (see above: experiments/data/ligand/fetch_pdb_files.py)
 -dataset: Which dataset, e.g., crossdocked
 -docking-mode: vina_dock or qvina2 (default)
sbatch scripts/docking_multi.slAfter docking is finished, aggregate the results from all jobs to print the full evaluation
python experiments/aggregate_results.py --files-dir /your/docking/save_dir --docked --docking-mode qvina2Activate the main environment
conda activate e3molIn general, we assume a ground truth ligand docked to a protein, from which the binding site can be extracted. Otherwise the binding site must be found first.
To get all necessary files for sampling, run
python experiments/data/ligand/process_pdb.py --main-path /path/to/main_folder --pdb-id PDB_ID --ligand-id LIGAND_ID --no-H --dist-cutoff 7Activate the mgltools environment and create the pdbqt file
conda activate mgltoolspython experiments/docking_mgl.py path/to/pdb_dir /where/to/store/pdbqt_file dataset(replace dataset with "pdb_file")
Then for sampling run
sbatch scripts/generate_ligands_multi_pdb_file.sl(specify all arguments to your needs as before)
Afterwards, for docking run
sbatch scripts/docking_multi_pdb_file.sl(again, specify the arguments; the docking mode can be set to "vina_dock", "vina_score", "qvina2". Default is "qvina2".)
This study was partially funded by the European Union’s Horizon 2020 research and innovation programme under the Marie Skłodowska-Curie Actions grant agreement “Advanced machine learning for Innovative Drug Discovery (AIDD)” No. 956832.

