I've update the code to support both Python2 and Python3, PyTorch 0.4. If you want the old version code please checkout branch v0.3
This project is a Simplified Faster R-CNN implementation based on chainercv and other projects . It aims to:
- Simplify the code (Simple is better than complex)
- Make the code more straightforward (Flat is better than nested)
- Match the performance reported in origin paper (Speed Counts and mAP Matters)
And it has the following features:
- It can be run as pure Python code, no more build affair. (cuda code moves to cupy, Cython acceleration are optional)
- It's a minimal implemention in around 2000 lines valid code with a lot of comment and instruction.(thanks to chainercv's excellent documentation)
- It achieves higher mAP than the origin implementation (0.712 VS 0.699)
- It achieve speed compariable with other implementation (6fps and 14fps for train and test in TITAN XP with cython)
- It's memory-efficient (about 3GB for vgg16)

VGG16 train on trainval and test on test split.
Note: the training shows great randomness, you may need a bit of luck and more epoches of training to reach the highest mAP. However, it should be easy to surpass the lower bound.
| Implementation | mAP |
|---|---|
| origin paper | 0.699 |
| train with caffe pretrained model | 0.700-0.712 |
| train with torchvision pretrained model | 0.685-0.701 |
| model converted from chainercv (reported 0.706) | 0.7053 |
| Implementation | GPU | Inference | Trainining |
|---|---|---|---|
| origin paper | K40 | 5 fps | NA |
| This[1] | TITAN Xp | 14-15 fps | 6 fps |
| pytorch-faster-rcnn | TITAN Xp | 15-17fps | 6fps |
[1]: make sure you install cupy correctly and only one program run on the GPU. The training speed is sensitive to your gpu status. see troubleshooting for more info. Morever it's slow in the start of the program -- it need time to warm up.
It could be faster by removing visualization, logging, averaging loss etc.
requires PyTorch >=0.4
-
install PyTorch >=0.4 with GPU (code are GPU-only), refer to official website
-
install cupy, you can install via
pip install cupy-cuda80or(cupy-cuda90,cupy-cuda91, etc). -
install other dependencies:
pip install -r requirements.txt -
Optional, but strongly recommended: build cython code
nms_gpu_post:cd model/utils/nms/ python build.py build_ext --inplace cd -
-
start visdom for visualization
nohup python -m visdom.server &Download pretrained model from Google Drive or Baidu Netdisk( passwd: scxn)
See demo.ipynb for more detail.
-
Download the training, validation, test data and VOCdevkit
wget http://host.robots.ox.ac.uk/pascal/VOC/voc2007/VOCtrainval_06-Nov-2007.tar
wget http://host.robots.ox.ac.uk/pascal/VOC/voc2007/VOCtest_06-Nov-2007.tar
wget http://host.robots.ox.ac.uk/pascal/VOC/voc2007/VOCdevkit_08-Jun-2007.tar
-
Extract all of these tars into one directory named
VOCdevkittar xvf VOCtrainval_06-Nov-2007.tar tar xvf VOCtest_06-Nov-2007.tar tar xvf VOCdevkit_08-Jun-2007.tar
-
It should have this basic structure
$VOCdevkit/                           # development kit
$VOCdevkit/VOCcode/                   # VOC utility code
$VOCdevkit/VOC2007                    # image sets, annotations, etc.
# ... and several other directories ...
-
modify
voc_data_dircfg item inutils/config.py, or pass it to program using argument like--voc-data-dir=/path/to/VOCdevkit/VOC2007/.
If you want to use caffe-pretrain model as initial weight, you can run below to get vgg16 weights converted from caffe, which is the same as the origin paper use.
python misc/convert_caffe_pretrain.pyThis scripts would download pretrained model and converted it to the format compatible with torchvision. If you are in China and can not download the pretrain model, you may refer to this issue
Then you could specify where caffe-pretraind model vgg16_caffe.pth stored in utils/config.py by setting caffe_pretrain_path. The default path is ok.
If you want to use pretrained model from torchvision, you may skip this step.
NOTE, caffe pretrained model has shown slight better performance.
NOTE: caffe model require images in BGR 0-255, while torchvision model requires images in RGB and 0-1. See data/dataset.pyfor more detail.
mkdir checkpoints/ # folder for snapshotspython train.py train --env='fasterrcnn-caffe' --plot-every=100 --caffe-pretrainyou may refer to utils/config.py for more argument.
Some Key arguments:
--caffe-pretrain=False: use pretrain model from caffe or torchvision (Default: torchvison)--plot-every=n: visualize prediction, loss etc everynbatches.--env: visdom env for visualization--voc_data_dir: where the VOC data stored--use-drop: use dropout in RoI head, default False--use-Adam: use Adam instead of SGD, default SGD. (You need set a very lowlrfor Adam)--load-path: pretrained model path, defaultNone, if it's specified, it would be loaded.
you may open browser, visit http://<ip>:8097 and see the visualization of training procedure as below:

-
dataloader:
received 0 items of ancdatasee discussion, It's alreadly fixed in train.py. So I think you are free from this problem.
-
Windows support
I don't have windows machine with GPU to debug and test it. It's welcome if anyone could make a pull request and test it.
- training on coco
- resnet
- Maybe;replace cupy with THTensor+cffi?
- Maybe:Convert all numpy code to tensor?
- python2-compatibility
This work builds on many excellent works, which include:
- Yusuke Niitani's ChainerCV (mainly)
- Ruotian Luo's pytorch-faster-rcnn which based on Xinlei Chen's tf-faster-rcnn
- faster-rcnn.pytorch by Jianwei Yang and Jiasen Lu.It mainly refer to longcw's faster_rcnn_pytorch
- All the above Repositories have referred to py-faster-rcnn by Ross Girshick and Sean Bell either directly or indirectly.
Licensed under MIT, see the LICENSE for more detail.
Contribution Welcome.
If you encounter any problem, feel free to open an issue, but too busy lately.
Correct me if anything is wrong or unclear.
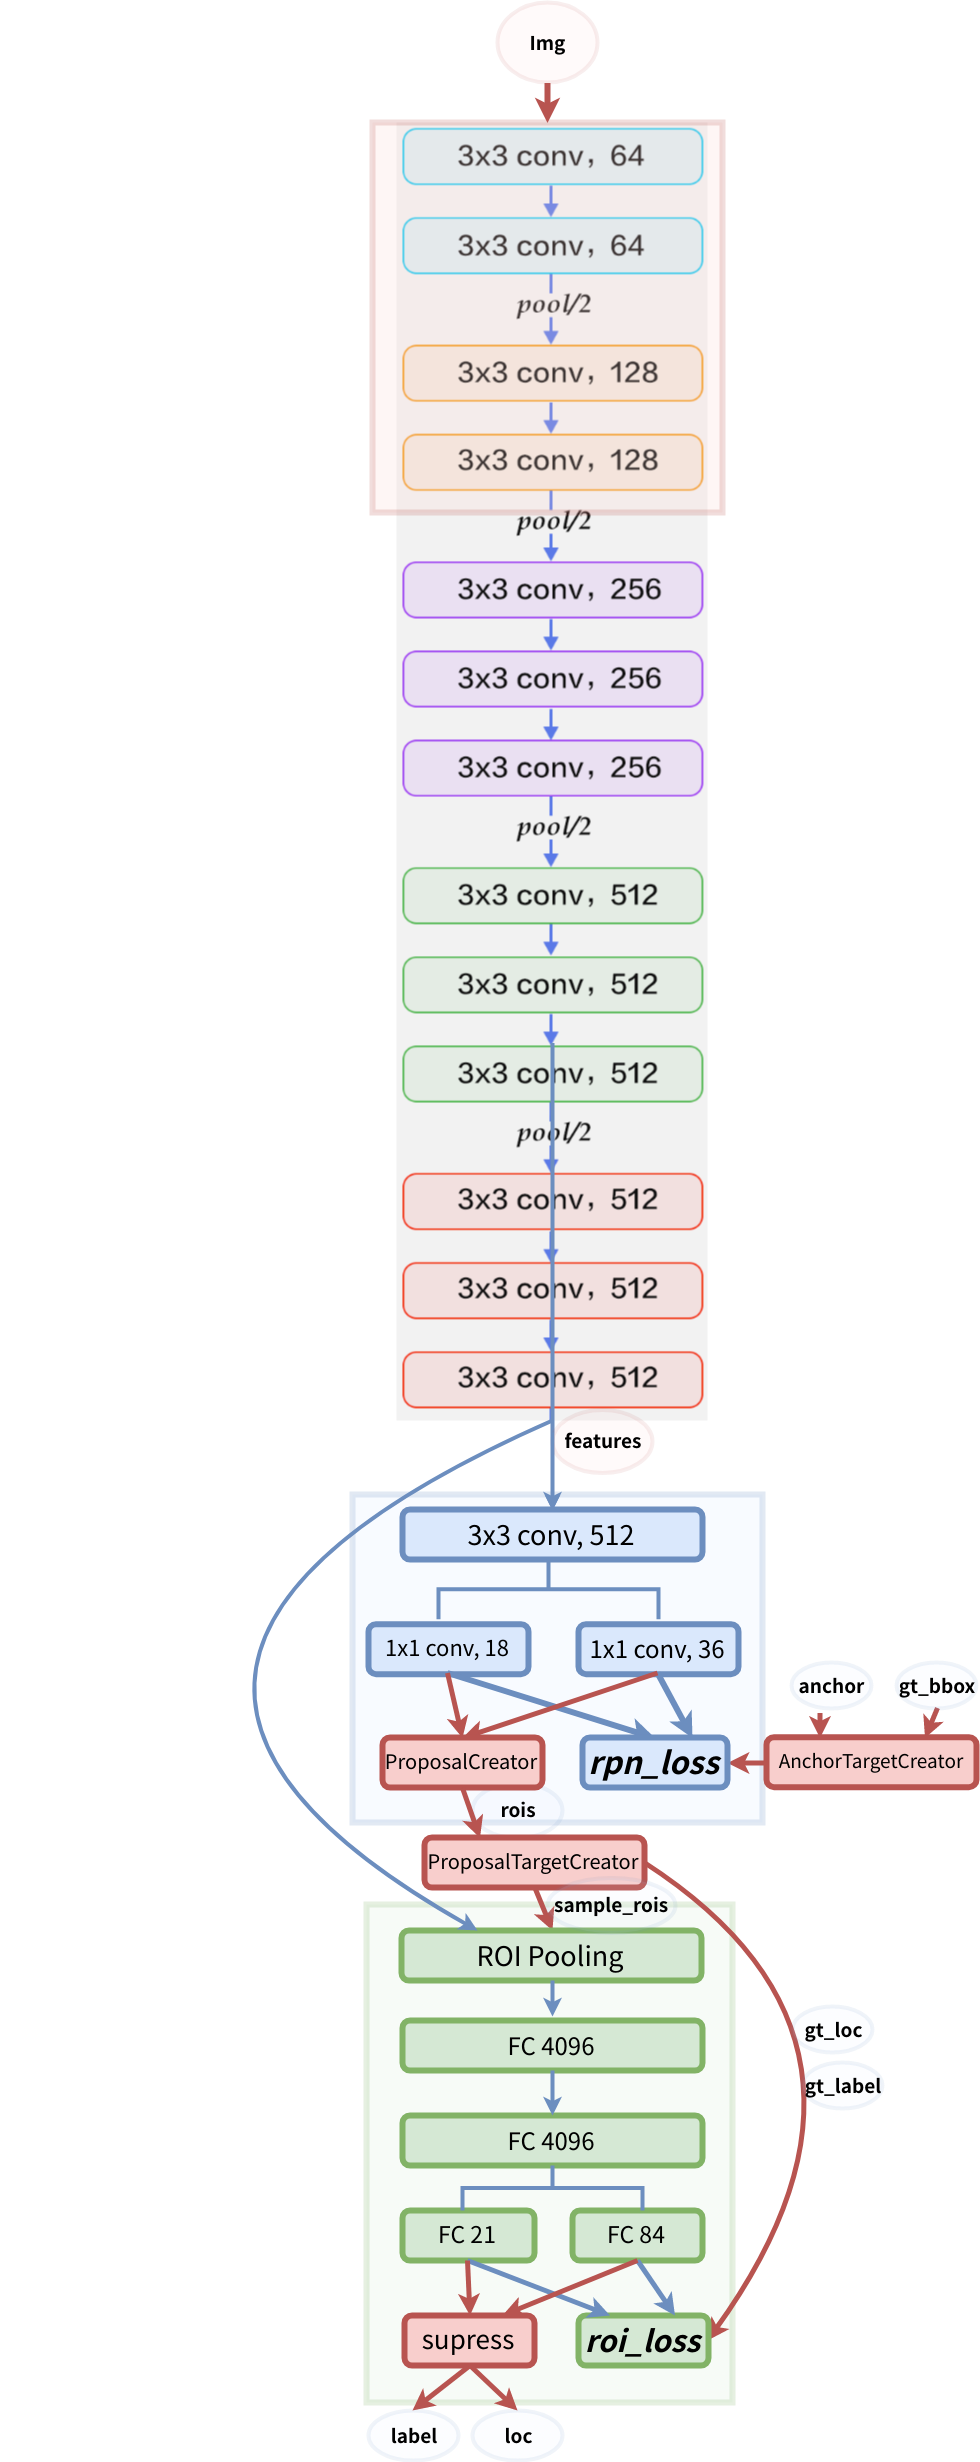
model structure
花了三天终于是把这套代码大致注释(汉化)完了
首先要膜拜一下论文提出者,模型的思路很正常而且及其的顺畅(正常是说整个方法非常的正统且正派且正义。。。什么乱七八遭的)
然后要膜拜一下github原作者,整个工程写的非常整洁而清晰
最后就注释方面借鉴了两位博主的大作:
CSDN:Chan_Zeng
博客园:三年一梦
- checkpoints:vgg16预训练模型参数,同时也是默认的模型参数保存路径
- data:对于数据的打包、处理、根据不同预训练模型调整相应结构、旋转等操作
- misc:
- convert_caffe_pretrain.py:下载预训练模型并重新打包,所以如果重新下载模型的话一定要运行这个模块,不能手动下载(除非再手动打包)
- train_fast.py:快速训练,epoch只有7
- demo.jpg:一位帅气的骑士和他的狗子
- model:
- utils:\
- nms:非极大值抑制代码,大量运用cpython。里面的c代码我基本都看不懂。。。
注意到原作者在上面墙裂建议:python build.py build_ext --inplace,也就是编译里面的c代码(据说能够提升一倍的速度?)
希望我以后能看懂写的是什么。。。\ - bbox_tools.py:bbox和loc相互转化;计算iou;生成base anchor
- creator_tool.py:
- ProposalTargetCreator:提供样本供ROISHeads网络训练
- AnchorTargetCreator:提供样本供RPN网络训练
- ProposalCreator:生成ROIS
- faster_rcnn(_vgg16).py为主体的模型结构
- region_proposal_network.py为RPN网络
- roi_module.py同样使用了cupy,主体的C代码在model/utils/roi_cupy.py
- utils:
- array_tool.py:格式转化
- config.py:设置文档
- eval_tool.py:VOC官方评测函数
- vis_tool.py:可视化
- 需要注意的一点是可视化使用了visdom库,为实现功能必须保证端口打开,即:nohup python -m visdom.server &,否则会报错
- train.py:训练文件
- trainer.py:训练过程