This repo contains my notes and code for the ROS2 For Beginners (ROS Foxy - 2021) on Udemy.
Final project of the course with turtlesim using a P controller. Code can be found in packages/turtlesim_catch_them_all submodule.

- Ubuntu 20
You can try to install on Windows and Mac too.
Clone this repository:
git clone --recurse-submodules git@github.com:saratrajput/learning_ros2.git
In case you have installed Anaconda too and are having problems running the examples:
- Then first deactivate the base Anaconda environment.
conda deactivate
Your terminal should change from:
(base)user@pc-name:~$
to:
user@pc-name:~$
- Delete build, install and log directory from your ROS2 Workspace
cd ros2_ws/
rm -r build/ install/ log/
- Build all the packages again:
colcon build --symlink-install
- Launch final project launch file to make sure everything is running fine.
ros2 launch my_robot_bringup turtlesim_catch_them_all.launch.py
If the turtle is catching other turtles and the behaviour is similar to the GIF shown above, then everything is running fine.
-
Install the latest ROS2 distribution with LTS. Find the distributions here.
-
We will install ROS2 Foxy.
-
Install locales first
locale  # check for UTF-8

sudo apt update && sudo apt install locales
sudo locale-gen en_US en_US.UTF-8
- We will install ROS2 via Debian Packages.
sudo apt update && sudo apt install curl gnupg2 lsb-release
curl -s https://raw.githubusercontent.com/ros/rosdistro/master/ros.asc | sudo apt-key add -
sudo sh -c 'echo "deb [arch=$(dpkg --print-architecture)] http://packages.ros.org/ros2/ubuntu $(lsb_release -cs) main" > /etc/apt/sources.list.d/ros2-latest.list'
- Install all packages
sudo apt update
sudo apt install ros-foxy-desktop
- This is optional. Can be useful for python development
sudo apt install -y python3-pip
pip3 install -U argcomplete
- Start a talker
source /opt/ros/foxy/setup.bash
ros2 run demo_nodes_cpp talker
- In another terminal, start listener
source /opt/ros/foxy/setup.bash
ros2 run demo_nodes_py listener
sudo apt install python3-colcon-common-extensions
- Enable auto-complete for colcon
source /usr/share/colcon_argcomplete/hook/colcon-argcomplete.bash
Add the following to your .bashrc
# Source ROS2 Foxy
source /opt/ros/foxy/setup.bash
# Ros2 workspace
source ~/ros2_ws/install/setup.bash

# Source colcon argcomplete (For Ros2)
source /usr/share/colcon_argcomplete/hook/colcon-argcomplete.bash
mkdir ros2_ws
cd ros2_ws
mkdir src
colcon build
source install/setup.bash
Note: There is also local_setup.bash inside install folder. This sources only the local directory. We don't need to know about this nuance at this stage.
cd ~/ros2_ws/src/
ros2 pkg create my_py_pkg --build-type ament_python --dependencies rclpy
# A folder named my_py_pkg is created. You place your scripts inside my_py_pkg/my_py_pkg
# directory
cd ~/ros2_ws
colcon build
OR
colcon build --packages-select my_py_pkg
cd ~/ros2_ws/src/
ros2 pkg create my_cpp_pkg --build-type ament_cmake --dependencies rclcpp
cd ~/ros2_ws/
colcon build
OR
colcon build --packages-select my_cpp_pkg
- Subprograms in your application, responsible for only one thing.
- Combined into a graph.
- Communicate with each other through topics, services, and parameters.

Benefits:
- Reduce code complexity.
- Fault tolerance.
- Can be written in Python, C++, .... One node can be written in Python and another in C++ and they can communicate easily with each other.
- Ros client Library.
- Pure C library.
- Uses DDS: Data distribution service
- We don't use RCL directly, but the client libraries built on top of it like rclcpp for Cpp nodes and rclpy for Python nodes.
- ros2 node
ros2 node list
ros2 node info <node_name>
ros2 node info /py_test
- /rosout: Gets all the logs of all the applications.
NOTE: You shouldn't launch the same node with the same name more than once.
You'll get this error in ros2 node list output:
WARNING: Be aware that there are nodes in the graph that share an exact name, this can
have unintended side effects.
And for ros2 node info /py_test
ros2 node info /py_test
There are 2 nodes in the graph with the exact name "/py_test". You are seeing information about only one of them.
/py_test
- Rename a Node at Runtime
ros2 run my_py_pkg py_node --ros-args --remap __node:=abc
The node is now named abc.
- Build all packages
colcon build
- Build a single package
colcon build --packages-select my_py_pkg
- Make sure to have this line in your .bashrc for colcon auto-completion to work
source /usr/share/colcon_argcomplete/hook/colcon-argcomplete.bash
- For python nodes, if you compile with the following line, then you don't need to compile everytime. It creates a symlink to the python executable in your package
colcon build --packages-select my_py_pkg --symlink-install
- Make sure the python file is an executable.
chmod +x my_first_node.py
- To start rqt:
rqt
-
To open node graph:
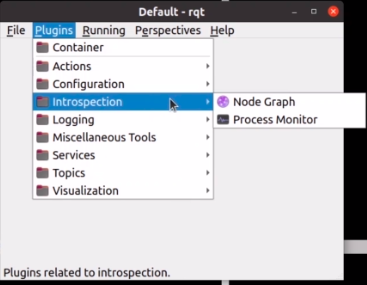
-
Or you can directly open rqt_graph:

rqt_graph
- Launch turtlesim
ros2 run turtlesim turtlesim_node
- Launch turtlesim_teleop_key to control the turtle
ros2 run turtlesim turtle_teleop_key
-
With rqt_graph you can visualize:

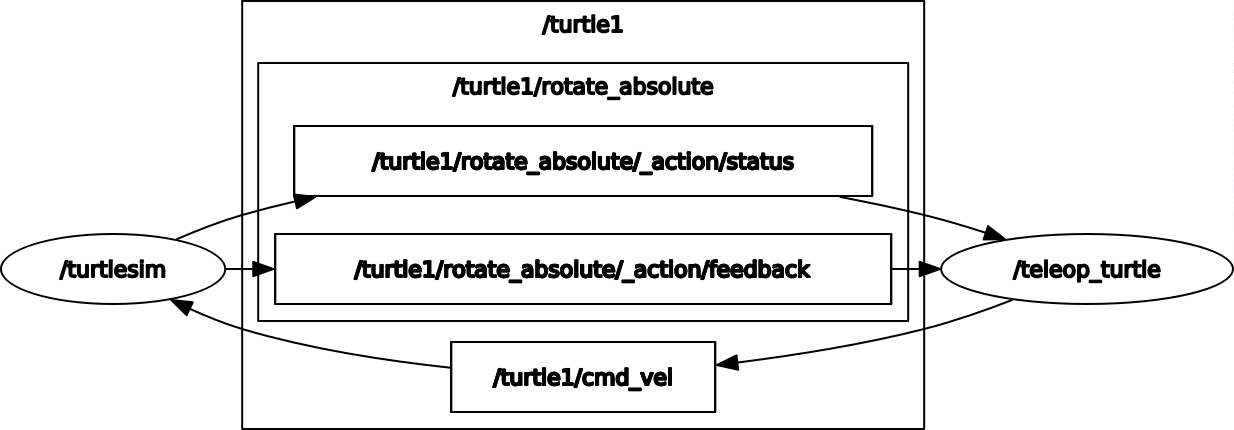
-
Relaunch turtlesim with a different name


ros2 run turtlesim turtlesim_node --ros-args -r __node:=my_turtle

- A topic is a named bus over which nodes exchage messages.
- Unidirectional data stream (publisher/subscriber)
- Anonymous
- A topic has a message type.
- Can be written in Python, C++,... directly inside ROS nodes.
- A node can have many publishers/subscribers for many different topics.
ros2 topic ...
- To see topics currently active
ros2 topic list
- To see info about a topic
ros2 topic info <topic_name>
- To echo a topic
ros2 topic echo <topic_name>
- To see detailed message definition so that you know what you need to send for this topic
ros2 interface show example_interfaces/msg/String
- To get publishing frequency for a topic
ros2 topic hz <topic_name>
- To know the bandwidth used for the node
ros2 topic bw <topic_name>
- To publish directly from terminal to a topic
ros2 topic pub -r 10 <topic_name> example_interfaces/msg/String "{data: 'hello from terminal'}"
Publish at 10 Hz to topic with data-type.
- For nodes: To see all active nodes
ros2 node list
- To see which topic this node is publishing to or subscribing from
ros2 node info <node_name>
- We know how to rename a node
ros2 run my_py_pkg robot_news_station --ros-args -r __node:my_station
- To rename a topic
ros2 run my_py_pkg robot_news_station --ros-args -r __node:my_station -r
robot_news:=my_news
Remember that when subscribing, you need to change the name of the topic too.
ros2 run my_py_pkg smartphone --ros-args -r robot_news:=my_news
- Start a publisher in one terminal
ros2 run my_cpp_pkg robot_news_station
- Start a subscriber in another terminal
ros2 run my_py_pkg smartphone

- Start another publisher with a different name
ros2 run my_py_pkg robot_news_station --ros-args -r __node:=my_station

- You can add another publisher
ros2 run my_py_pkg robot_news_station --ros-args -r __node:=my_station2

- You can add another subscriber
ros2 run my_py_pkg smartphone --ros-args -r __node:=smartphone2


A topic is:
- A named bus over which nodes exchange messages.
- Used for unidirectional data streams.
- Anonymous: publishers don't know who is subscribing, and subscribers don't know who is publishing.
To implement topics in your ROS2 application:
-
First create a node (or start from an existing one), then inside your node you can create any number of publishers/subscribers.
-
A publishers and subscriber must publish/subscribe to the same topic name, and use the same data type. Those are the 2 conditions for successful topic communication.
-
Then, once you've added some publishers/subscribers in your nodes, just launch your nodes, and the communication starts! You can debug them using the "ros2" command line tool, as well as rqt.

-
A ROS2 Service is a client/server system.
-
Synchronous or asynchronous.
-
One message type for Request, one message type for Response.
-
Can be written in Python, C++, ... directly inside ROS nodes.
-
Every service defintion has 3 dashes (---) which is the separation between the request and the response.
-
List the services
ros2 service list
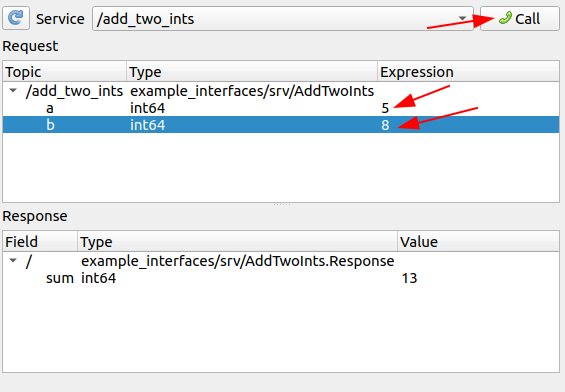
- Call a ROS2 Service
ros2 service call /add_two_ints example_interfaces/srv/AddTwoInts "{a: 3, b: 4}"
-
A future object is a value which maybe set in the future.
-
Call is a synchronous call which will block until the response is given.
-
Not recommened by ROS team as it can wait forever.
-
call_async is recommended.
-
In CPP ROS Client If you call the function directly: the program starts -> we start the node -> we create the client -> we wait for service -> if we start the server on another terminal it passes -> we send the request -> we'll wait for the response at future.get (problem) -> This will block the thread here -> which means the function will not exit -> so the constructor will not exit -> so we'll still be in this line: "auto node = std::make_shared();" -> and spin(node) will not be executed. -> But we need spin(node) in order to get the result from the future. So we need to start this in a different thread so that we can continue the execution, and the constructor can exit and we can call spin on the node. So we create a thread object in private.
-
ros2 service <list, call, find, type>
-
To see all the services for all the nodes in the graph
ros2 service list
The services listed other than the one you created are for the parameters.
-
With ros2 node info <node_name>, you can see the service along with its interface.
-
To see the interface
ros2 service type /add_two_ints
- To see details about the interface
ros2 interface show example_interfaces/srv/AddTwoInts
- To call the service
ros2 service call /add_two_ints example_interfaces/srv/AddTwoInts "{a: 3, b: 5}"
- ROS2 Service Plugin for RQT
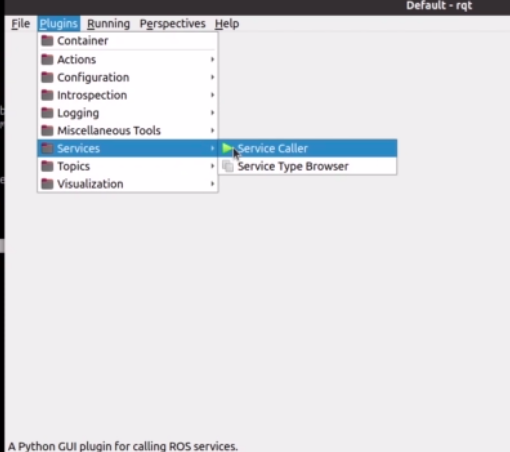 A GUI to call services.


You CANNOT see the services in the rqt-graph. Only the nodes.
- You can have two services of similar kind but with different names
ros2 run my_cpp_pkg add_two_ints_server
ros2 run my_cpp_pkg add_two_ints_server --ros-args -r add_two_ints:=new_name
- And for the client to request to that particular server
ros2 run my_py_pkg add_two_ints_client
ros2 run my_py_pkg add_two_ints_client --ros-args -r add_two_ints:=new_name
ros2 run turtlesim turtlesim_node
ros2 run turtlesim turtle_teleop_key
ros2 service list
- To clear the line put by the turtle on the screen
ros2 service type /clear
to first check the type. (NOTE: Turtle sim is still using std_srvs which has been now replaced by example_interfaces in ROS2.)
- You can check the interface details
ros2 interface show std_srvs/srv/Empty - And then call the service
ros2 service call /clear std_srvs/srv/Empty
- You can reset the turtle by
ros2 service call /reset std_srvs/srv/Empty
- You can spawn another turtle
# Check service type
ros2 service type /spawn # turtlesim/srv/Spawn
# Check details about the interface
ros2 interface show turtlesim/srv/Spawn
# Call the service
ros2 service call /spawn turtlesim/srv/Spawn "{x: 1.0, y: 3.0, theta: 20.0, name: "my_turtle"}
With topics you've seen that all the nodes publishing to a topic must use the same data type. With services, you've seen that the clients must send a message respecting a certain data type. And the server must respond respecting another data-type.
-
Topic is defined by
- Name (ex: /number_count)
- Msg definition (ex: example_interfaces/msg/Int64)
-
Service is also defined by:
- Name (ex: /reset_number_count)
- Srv definition (ex: example_interfaces/srv/SetBool): One for the request and another for response.
-
Topics and Services can be seen as communication layer tools and Interfaces are messages which are the actual content of the message.
-
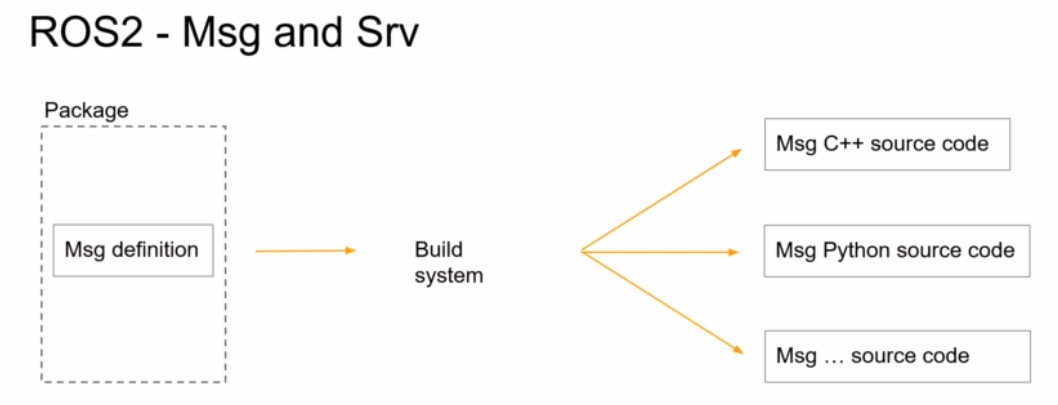
When a msg definition is made inside a package -> Colcon build system builds it. -> And a souce code is generated for this message in any ROS2 supported language.
-
Type of data-types that can be used to create a msg or service definition can be found at this link.
-
Use msg primitive types to create a message definition.
-
You can create a message definition using other message definitions.

# Inside your ~/ros2_ws/src folder
ros2 pkg create my_robot_interfaces
cd my_robot_interfaces

# Delete the include and src folders as we don't need them
rm -r include/ src/

# Create msg folder
mkdir msg

# Configure package.xml and CMakeLists.txt
# Add these 3 lines to your package.xml
<build_depend>rosidl_default_generators</build_depend>
<exec_depend>rosidl_default_runtim</exec_depend>
<member_of_group>rosidl_interface_packages</member_of_group>

# In your CMakeLists.txt:
# Remove 3 lines under "# Default to C99"
# And remove the lines from "if(BUILD_TESTING)" to "endif()"
# As we don't need anything related to C++ here.
# And add line
find_package(rosidl_default_generators)

# And to generate source code add
rosidl_generate_interfaces(${PROJECT_NAME}
    "msg/HardWareStatus.msg"
)
-
Use PascalCase when naming a msg.
-
Build msg package with
colcon build --packages-select my_robot_interfaces
- You can see the built msg at
~/ros2_ws/install/my_robot_interfaces/lib/python3.8/site-packages/my_robot_interfaces/msg
- And the hpp file can be found at
~/ros2_ws/install/my_robot_interfaces/include/my_robot_interfaces/msg
If you're using autocompletion, you can add the following path to your Python path:
/home/sp/ros2_ws/install/my_robot_interfaces/lib/python3.8/site-packages/my_robot_interfaces
And add dependencies in your package.xml of your node.
<depend>my_robot_interfaces</depend>
cd /path/to/my_robot_interfaces/
mkdir srv
cd srv/
touch ComputeRectangleArea.srv

# After adding lines to the above file, add this line to your CMakelists.txt
"srv/ComputeRectangleArea.srv"
And build the package with:
colcon build --packages-select my_robot_interfaces
You can see your interface with
ros2 interface show my_robot_interfaces/srv/ComputeRectangleArea
- See info about interfaces
ros2 interface show my_robot_interfaces/srv/ComputeRectangleArea
- List all available ROS2 interfaces
ros2 interface list
- To see all the msg and srv inside a package
ros2 interface package sensor_msgs
- Create a new package only for your msg and srv definitions.
- Setup the package (CMakeLists.txt and package.xml)
- Create a msg/ and srv/ folders, place your custom msg definitions and srv definitions here.
Once you've setup your package, adding a new interface is really simple:
- Add a new file in the right folder: msg/ or srv/
- Add one line into CMakeLists.txt
- Compile with "colcon build"
- And don't forget to source your ROS2 workspace when you want to use those messages!
Here's what you can use inside a msg or srv definition:
- Any primitive type defined by ROS2 (most common ones: int64, float64, bool, string, and array of those)
- Any message you've already created in this package.
- Any message from another package. In this case don't forget to add a dependency for the other package in both package.xml and CMakeLists.txt.
And now, when you compile the definitions, new interfaces will be created, along with headers/modules ready to be included in your C++ or Python nodes.
A ROS2 parameter is a configuration value for a node useful for any kind of setting at run time.

- Settings for your nodes, value set at run time.
- A parameters is specific to a node.
- ROS2 Parameter types:
- Boolean
- Int
- Double
- String
- Lists
- List ROS2 parameters
ros2 param list
-
There's a default parameter for every node: use_sim_time
-
Get the value of parameter
ros2 param get /number_publisher use_sim_time
-
Each parameter is private to the node.
-
To declare parameter, declare it after initialization of the node:
self.declare_parameter("test123")
- To define a parameter directly from the command line
ros2 run my_py_pkg number_publisher --ros-args -p test123:=3
# Output of ros param get: Integer value is: 3
# The type is set dynamically
ros2 run my_py_pkg number_publisher --ros-args -p test123:=3.13
# Output of ros param get: Double value is: 3.13

# Multiple parameters
ros2 run my_py_pkg number_publisher --ros-args -p test123:="hello" -p another_param:="hi"
- Declare parameter in C++
this->declare_parameter("name");
Inside a Python node:
class NumberPublisherNode(Node):
    def __init__(self):
        super().__init__("number_publisher")
        self.declare_parameter("number_to_publish")

        self.number_ = self.get_parameter("number_to_publish").value
        ...
And launch it with:
ros2 run my_py_pkg number_publisher --ros-args -p number_to_publish:=4
- In this case, if you don't set the parameter it'll run into an error as the number to publish needs to be set before running the node. To avoid this you can set a default value.
self.declare_parameter("number_to_publish", 2)
- You can also set publish frequency with parameters, and then check it with:
ros2 topic hz /number
Inside a C++ Node:
class NumberPublisherNode : public rclcpp::Node
{
public:
    NumberPublisherNode() : Node("number_publisher")
    {
        this->declare_parameter("number_to_publish", 2);

        number_ = this->get_parameter("number_to_publish").as_int();
        // In C++ unlike Python, the type is not dynamically cast so we have to
        // cast the type when getting the parameter.
        ...
Then after building it, you can launch it similar to the Python node:
ros2 run my_cpp_pkg number_publisher --ros-args -p number_to_publish:=3 -p
publish_frequency:=6.0
Here, you need to enter 6.0, as the type is cast dynamically to "int" if you enter only "6", when using ROS2 parameter. But inside the node you're trying to extract a double from the given parameter.
If you don't declare the parameter and try to get it, then you'll get a ParameterNotDeclaredException error.
- When passing a list as a parameter, leave no spaces between values
ros2 run my_py_pkg led_panel --ros-args -p led_states:=[1,1,1]
- You can also additional states
ros2 run my_py_pkg led_panel --ros-args -p led_states:=[1,1,1,0,0]
- If you want to have spaces in your string parameter
ros2 run my_py_pkg robot_news_station --ros-args -p robot_name:="giskard 2"
With parameters you don't need to modify + re-compile your code for each different set of configuration. Just write your code once, and choose your settings at run-time.
Using parameters is one of the first steps to make your application more scalable.
To handle parameters:
-
Don't forget to declare any parameter before you even try to use it!
-
When you run your node, set values for your parameters.
-
In your node's code, get the parameter's values and use them. You can also define default values (best practice to avoid errors at run-time).

- Create a new ROS2 pkg
ros2 pkg create my_robot_bringup
The naming is a convention in ROS community, with <name_of_the_robot> followed by "bringup". If you don't specify a build-type, it'll automatically select ament-cmake build type.
- Add these lines to your CMakeLists.txt
install(DIRECTORY
    launch
    DESTINATION share/${PROJECT_NAME}
)
- Launch files are python files.
touch number_app.launch.py
- Make it an executable
chmod +x number_app.launch.py
- And add these lines
from launch import LaunchDescription

# The name has to be exactly this because when you install the launch file the
# launch functionality will create a new program which will look for a function
# with this name to launch the application
def generate_launch_description():
    ld = LaunchDescription()


    return ld
This is a minimal template for a launch file.
- Build the package with launch file
colcon build --packages-select my_robot_bringup --symlink-install
- Execute the launch file
ros2 launch my_robot_bringup number_app.launch.py
- To add a node inside the launch file
ld = LaunchDescription()

    number_publisher_node = Node(
            package="my_py_pkg",
            executable="number_publisher"
    )

    counter_node = Node(
            package="my_cpp_pkg",
            executable="number_counter"
    )

    ld.add_action(number_publisher_node)
    ld.add_action(number_counter_node)
    return ld
- And add "exec_depend" for those packages in the "package.xml" file.
<exec_depend>my_py_pkg</exec_depend>
<exec_depend>my_cpp_pkg</exec_depend>
# You can declare a tuple which can be used with any node
remap_number_topic = ("number", "my_number")

number_publisher_node = Node(
    package="my_py_pkg",
    executable="number_publisher",
    remappings=[
        remap_number_topic,
        #("number", "my_number") # This needs to be a tuple with the original
        # name and the replacement name
        ],
        # Parameters need to be dictionary
        parameters=[

        ]
    )
With a launch file, you can start your entire application with only one command line, in one terminal. You can add any number of nodes and fully configure them. That wil make your application fully customizable in no time.
Setup for launch files:
- Create a new package <robot_name>_bringup (best practice).
- Create a launch/folder at the root of the package.
- Configure CMakeLists.txt to install files from this launch/ folder.
- Create any number of files you want inside the launch/ folder, ending with .launch.py.
Run a launch file:
- After you've written your file, use "colcon build" to install the file.
- Don't forget to source your environment.
- Start the launch file with "ros2 launch <name_of_the_file>
- Launch the turtlesim node
ros2 run turtlesim turtlesim_node
- Check the active topics
ros2 topic list
/turtle1/pose: Gives you the current position of the turtle
- Create a new pkg
ros2 pkg create turtlesim_catch_them_all --build-type ament_python
- Create a node to control the turtle
touch turtle_controller.py
chmod +x turtle_controller.py
- To compute distance between current pose and target pose, we compute the euclid distance.
$ distance = \sqrt ((target_x - current_x)**2 + (target_y - current_y)**2) $
* To calculate the angle we use the following:

If you want to test your robot in real life with specific conditions and want to save the data in those specific conditions for testing later, you can use ROS2 bags.
- Start a publisher node
ros2 run my_py_pkg number_publisher
- Create a directory where you want to save the data
mkdir bags
cd bags/
- Record the topic data
ros2 bag record /number
Once you exit, a file with the name of current date and time is saved.
- To specify filename
ros2 bag record /number -o test
- To check the info for the saved file
ros2 bag info test/
- To replay the bag
ros2 bag play test
You can listen to the topic /number again although the original publisher is not actually running. You can also run the subscriber node.
ros2 topic echo /number
ros2 run my_cpp_pkg number_counter
- You can record two topics with the same name
ros2 bag record /my_number /my_number_count -o test2
- To record all topics
ros2 bag record -a -o test3
-
ROS2: what, how, when, why?
-
Install and configure ROS2
-
ROS2 Core concepts
- Packages
- Nodes
- Topics
- Services
- Interfaces (Msg and Srv)
- Parameters
- Launch files
-
In Python and C++
-
ROS2 Tools
- ros2 cli
- rqt(graph, srv, topic,..)
- Build system
-
Complete project with Turtlesim
-
Best Practices