Code for Real-time self-adaptive deep stereo, accepted as ORAL at CVPR 2019.
| paper | video | CVPR_Live_Demo |
Abstract:
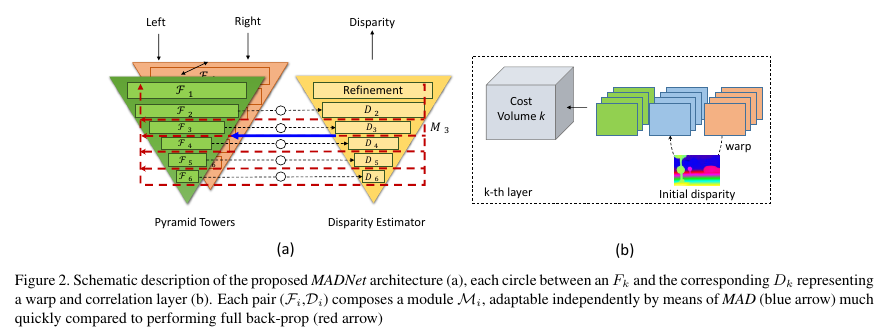
Deep convolutional neural networks trained end-to-end are the undisputed state-of-the-art methods to regress dense disparity maps directly from stereo pairs. However, such methods suffer from notable accuracy drops when exposed to scenarios significantly different from those seen in the training phase (e.g.real vs synthetic images, indoor vs outdoor, etc). As it is unlikely to be able to gather enough samples to achieve effective training/ tuning in any target domain, we propose to perform unsupervised and continuous online adaptation of a deep stereo network in order to preserve its accuracy independently of the sensed environment. However, such a strategy can be extremely demanding regarding computational resources and thus not enabling real-time performance. Therefore, we address this side effect by introducing a new lightweight, yet effective, deep stereo architecture Modularly ADaptive Network (MADNet) and by developing Modular ADaptation (MAD), an algorithm to train independently only sub-portions of our model. By deploying MADNet together with MAD we propose the first ever realtime self-adaptive deep stereo system.
If you use this code please cite:
@InProceedings{Tonioni_2019_CVPR,
    author = {Tonioni, Alessio and Tosi, Fabio and Poggi, Matteo and Mattoccia, Stefano and Di Stefano, Luigi},
    title = {Real-time self-adaptive deep stereo},
    booktitle = {The IEEE Conference on Computer Vision and Pattern Recognition (CVPR)},
    month = {June},
    year = {2019}
}
This software has been tested with python3 and tensorflow 1.10. All required packages can be installed using pip and requirements.txt
pip3 install -r requirements.txt
Pretrained weights for both DispNet and MADNet available here.
-
Create a csv file for your video sequence similar to
example_list.csv.Each row should contain absolute paths to the input data in the following order:
"path_to_left_rgb,path_to_right_rgb,path_to_groundtruth"
Ground truth data will only be used to compute the network performance not for the online adaptation.
-
Download pretrained network from here.
-
Perform different kinds of online adaptation with
Stereo_Online_Adaptation.py, to list all available options usepython3 Stereo_Online_Adaptation.py -h.
Example of online adaptation using MADNet and MAD:
LIST="path/to/the/list/of/frames/" #the one described at step (1)
OUTPUT="path/to/output/folder"
WEIGHTS="path/to/pretrained/network"
MODELNAME="MADNet"
BLOCKCONFIG="block_config/MadNet_full.json"

python3 Stereo_Online_Adaptation.py \
    -l ${LIST} \
    -o ${OUTPUT} \
    --weights ${WEIGHTS} \
    --modelName MADNet \
    --blockConfig ${BLOCKCONFIG} \
    --mode MAD \
    --sampleMode PROBABILITY \
    --logDispStep 1
Additional details on available parameters:
- --modelName: choose which disparity inference model to use, currently supports either "DispNet" or "MADNet"
- --mode: how to perform online adaptation: NONE (no online adaptation only inference), FULL (adaptation by full online backprop), MAD (adaptation by partial backprop using MAD)
- --blockConfig: path to a json file that specify how to subdivide the network into independent blocks for adaptation using MAD, some example are provided inside the
block_configfolder. Each innermost array inside the json file should correspond to layers belonging to the same independent group. - --sampleMode: specify how to sample portions of the network to train when using MAD.
- --weights: path to the initial weights for the network, e.g., referring to the weights linked above and assuming of having extracted the zip file in the same folder as the python script, to load MADNet trained on synthetic data use
--weights MADNet/synthetic/weights.ckpt - --logDispStep: save the disparity predicted every this number of steps.
The Demo sub-folder contains python code to run stereo online inference and/or adaptation from a webcam stream. Before running the demo you should implement in Demo/grabber.py a class that extends ImageGrabber and is tagged with the @register_camera_to_factory() decorator. The class should handle connection and disconnection from your stereo camera as well as all the op necessary to read/decode and rectify stereo frames. The file grabber.py contains: a commented SmattCam class with an implementation for a custom stereo camera implemented on an FPGA and a ZEDMini class to connect to a ZED stereo camera.
Once you have implemented the code to connect to your camera you should be able to run the demo using the Demo/Live_Adaptation_Demo.py script. The script accepts a bunch of parameters from the command line to, all the options can be listed using
python Live_Detection_Demo.py -hOnce started the script spawn two threads, one to read frames from the camera the others to process them through a stereo CNN. To stop execution just press something followed by enter on the shell where Live_Detection_Demo.py is running.
All the test in the paper were conducted using correlation layers implemented in pure tensorflow operations, however we provide also a native CUDA version of the same layer that might be usefull for deployment on memory constrained devices. To use the native correlation layer:
cd Nets/Nativemakecd ..vim sharedLayers.py- Comment line 6, uncomment line from 12 to 19
