A set of web components to build custom dashboards for the FIRST Robotics Competition (FRC).
FRC Web Components works with pynetworktables2js to communicate with your robot over NetworkTables. To use, run pynetworktables2js where you're serving your HTML files, include the frc-web-components.js file as a script in your HTML page, and wrap your HTML in an frc-dashboard tag, and you're ready to go!
<html>
  <head>
    <title>My Robot Dashboard!</title>
  </head>
  <body>
    <frc-dashboard>
      <nt-string key="/robotName" value="Dozer"></nt-string>
      <nt-number key="/angle" value="135"></nt-number>
      <h1>
        My robot's name is <frc-label source-key="/robotName"></frc-label>
      </h1>
      <frc-differential-drivebase
        source-key="/LiveWindow/Ungrouped/DifferentialDrive[1]"
      ></frc-differential-drivebase>
      <frc-gyro source-key="/angle" precision="2"></frc-gyro>
    </frc-dashboard>
    <script src="./frc-web-components.js"></script>
  </body>
</html>- Install pynetworktables2js
- Download the frc-web-components.js file from the releases page and include it in your HTML dashboard.
Usage examples can be found here.
To use wrap your HTML dashboard code in the <frc-dashboard></frc-dashboard> element. This will include the necessary code for your dashboard to run as well as asynchronously load the pynetworktables2js script in your page.
Since the script is loaded asynchronously, you'll need to use the frc-dashboard's onload event.
<html>
  <body>
    <frc-dashboard onload="ntLoaded()">
      <!-- Dashboard code goes here -->
    </frc-dashboard>
    <script src="./frc-web-components.js"></script>
    <script>
      function ntLoaded() {
        NetworkTables.addGlobalListener(function(key, value, isNew) {
          // do something with the values as they change
        }, true);

        NetworkTables.putValue('/networktablesLoaded', true);
      }
    </script>
  </body>
</html>
More on the NetworkTables API can be found here: https://robotpy.readthedocs.io/projects/pynetworktables2js/en/stable/api_js.html
FRC Web Components are used by adding them inside the <frc-dashboard></frc-dashboard> component:
<frc-dashboard onload="ntLoaded()">
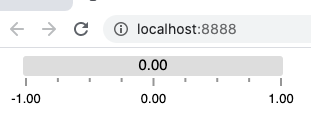
  <frc-number-bar></frc-number-bar>
</frc-dashboard
They can be changed by setting their attributes:
<frc-dashboard onload="ntLoaded()">
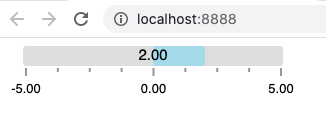
  <frc-number-bar value="2" min="-5" max="5"></frc-number-bar>
</frc-dashboard
You can also set a component's attributes by giving it a NetworkTable key:
<frc-dashboard onload="ntLoaded()">
  <nt-number key="/bar/value" value="3"></nt-number>
  <nt-number key="/bar/min" value="0"></nt-number>
  <nt-number key="/bar/max" value="10"></nt-number>
  <!-- Here we pass the subtable "/bar" -->
  <frc-number-bar source-key="/bar"></frc-number-bar>
  <!-- Here we pass the single NetworkTable entry "/bar/value" -->
  <frc-number-bar source-key="/bar/value"></frc-number-bar>
</frc-dashboard>
Above we passed NetworkTable keys into two separate <frc-number-bar> components through the source-key attribute. If we pass in a subtable, all the subtable's entries will be mapped to the component's attributes. If we pass in a single entry, the component's primary attribute will be set, if it has one. In this case <frc-number-bar>'s primary attribute is value.
You can also set a component's attributes through a mixture of NetworkTables and manually setting its attributes:
<frc-dashboard onload="ntLoaded()">
  <nt-number key="/bar/value" value="3"></nt-number>
  <nt-number key="/bar/min" value="0"></nt-number>
  <nt-number key="/bar/max" value="10"></nt-number>

  <frc-number-bar source-key="/bar" min="-5" precision="4"></frc-number-bar>
</frc-dashboard>
Above you may notice the component's min attribute took on the value passed in through NetworkTables. NetworkTables takes precedence and will override hard coded attribute values.
Also note that NetworkTable keys will always be converted to camelCase to match the attribute's properties. For example:
<frc-dashboard onload="ntLoaded()">
  <nt-number key="/bar/.value" value="3"></nt-number>
  <nt-number key="/bar/Min" value="0"></nt-number>
  <nt-number key="/bar/ max " value="10"></nt-number>

  <frc-number-bar source-key="/bar" min="-5" precision="4"></frc-number-bar>
</frc-dashboard>
Will still display correctly:
Because of this conversion it's possible for name collisions to happen.
<nt-number key="/bar/.value" value="-1"></nt-number>
<nt-number key="/bar/Value" value="-.5"></nt-number>
<nt-number key="/bar/value" value="0"></nt-number>
<nt-number key="/bar/ value" value=".5"></nt-number>

<frc-number-bar source-key="/bar/value"></frc-number-bar>
All of these will result in the same attribute being set. The attribute's value will be .5 since that was the last line executed.
The list of FRC Web Components will continue being updated and expanded, but many teams will probably want to create their own for their custom dashboards. The frc-web-components.js file exposes a couple of modules for creating and registering components: webbit and webbitRegistry. The webbit module is used to define components and webbitRegistry is used to register them. Both modules contain a number helper functions and classes used to create custom components, but these are the most commonly used:
// These are the functions you need to define your component
var { Webbit, css, html } = webbit;

class MyComponentClass extends Webbit {

  // This is the function needed to define properties, which automatically
  // update the component when their values change. They also by default
  // reflect their values in your component's attributes. That means when
  // you change the name attribute in your component's HTML element,
  // this.name will also change, and when you change this.name internally,
  // the name attribute in your component's HTML element will also change.
  static get properties() {
    return {
      name: { type: String, primary: true },
      moodRating: { type: Number, attribute: 'mood-rating' }
    }
  }

  // This is the function needed to define the styles for your component.
  // The css here only affects the HTML rendered in your component. CSS
  // defined outside your component also doesn't affect your component's
  // rendered HTML.
  static get styles() {
    return css`
      p span {
        color: green;
      }
    `;
  }

  // This is needed to initialize things in your component and set default
  // property values.
  constructor() {
    super();
    this.name = 'Bob';
    this.moodRating = 8.5;
  }

  // This is the function needed to define the HTML your component renders
  render() {
    return html`
      <p>Hello, my name is <span>${this.name}</span>!</p>
      <p>My mood is a <span>${this.moodRating}/10</span> right now.</p>
    `;
  }
}

// This is the function you need to register your component
webbitRegistry.define('my-component', MyComponentClass);
Create a file called my-component.js in the same folder as your index.html and frc-web-components.js, and add the above code to the file. Include the script below where you included the frc-web-components.js script in your index.html file:
<html>
  <body>
    <frc-dashboard>
      <my-component name="Amory" mood="10"></my-component>
    </frc-dashboard>
    <script src="./frc-web-components.js"></script>
    <script src="./my-component.js"></script>
  </body>
</html>
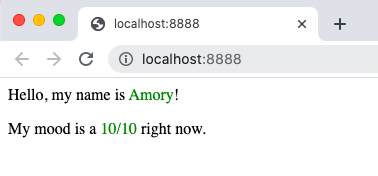
Your webpage should now look like this:
You can also now connect your component to NetworkTables:
<html>
  <body>
    <frc-dashboard>
      <nt-string key="/myComponent/name" value="Amory"></nt-string>
      <nt-number key="/myComponent/moodRating" value="10"></nt-number>
      <my-component source-key="/myComponent"></my-component>
    </frc-dashboard>
    <script src="./frc-web-components.js"></script>
    <script src="./my-component.js"></script>
  </body>
</html>
Your webpage should look the same:
The Webbit class itself extends LitElement, which is a library used to create custom components. There are some differences and gotchas, but if you know how to create components using LitElement, you know almost everything you need to create custom FRC components. To understand how LitElement works, look over the project's live examples, guide and API here: https://lit-element.polymer-project.org/
More in-depth tutorials on how to create your own components will be added soon. You can also look at the source code for the existing list of components if you need help getting started: https://github.com/frc-web-components/frc-web-components/tree/master/src/components


