@[toc]
1)安装zsh
sudo apt-get update安装一些工具
sudo apt-get install cmake git zsh curl net-tools2)安装ohmyzsh
sh -c "$(curl -fsSL https://raw.github.com/robbyrussell/oh-my-zsh/master/tools/install.sh)"3)安装插件
git clone https://github.com/zsh-users/zsh-syntax-highlighting.git ${ZSH_CUSTOM:-~/.oh-my-zsh/custom}/plugins/zsh-syntax-highlighting
git clone https://github.com/zsh-users/zsh-autosuggestions ${ZSH_CUSTOM:-~/.oh-my-zsh/custom}/plugins/zsh-autosuggestions
4)修改zshrc
gedit ~/.zshrc在文件中添加
plugins=(zsh-autosuggestions zsh-syntax-highlighting  git)
source $ZSH/oh-my-zsh.sh
alias ezs="gedit ~/.zshrc"
alias szs="source ~/.zshrc"
alias sss="source devel/setup.zsh"
source /opt/ros/noetic/setup.zsh
# export PATH=~/anaconda3/bin:$PATH

export https_proxy=http://127.0.0.1:8889
export http_proxy=http://127.0.0.1:8889
export all_proxy=socks5://127.0.0.1:8889

setopt no_nomatch # 允许使用 *缺省
4)安装terminator
sudo apt-get install terminator安装后创建目录
mkdir ~/.config/terminator
gedit ~/.config/terminator/config
讲下面内容拷贝进去,并保存
[global_config]
  title_font = Ubuntu Mono 11[keybindings]
[keybindings]
[layouts]
  [[default]]
    [[[child1]]]
      parent = window0
      type = Terminal
    [[[window0]]]
      parent = ""
      size = 1200, 600
      type = Window
[plugins]
[profiles]
  [[default]]
    background_color = "#002b36"
    background_darkness = 0.91
    background_image = None
    background_type = transparent
    font = Ubuntu Mono 15
    foreground_color = "#e0f0f1"
    show_titlebar = False
    use_system_font = False
anaconda直接官网下载就好了,安装完后在zshrc中添加
export PATH=~/anaconda3/bin:$PATH# >>> conda initialize >>># !! Contents within this block are managed by 'conda init' !!__conda_setup="$('/home/yunfan/anaconda3/bin/conda' 'shell.zsh' 'hook' 2> /dev/null)"if [ $? -eq 0 ]; then eval "$__conda_setup"else if [ -f "/home/yunfan/anaconda3/etc/profile.d/conda.sh" ]; then . "/home/yunfan/anaconda3/etc/profile.d/conda.sh" else export PATH="/home/yunfan/anaconda3/bin:$PATH" fifiunset __conda_setup# <<< conda initialize <<<sudo apt-get install libeigen3-dev
sudo ln -s /usr/include/eigen3/Eigen /usr/include/Eigenros-noetic
# Setup your computer to accept software from packages.ros.org.
sudo sh -c '. /etc/lsb-release && echo "deb http://mirrors.ustc.edu.cn/ros/ubuntu/ `lsb_release -cs` main" > /etc/apt/sources.list.d/ros-latest.list'
# Set up your keys
sudo apt install curl # if you haven't already installed curl
curl -s https://raw.githubusercontent.com/ros/rosdistro/master/ros.asc | sudo apt-key add -

sudo apt update
sudo apt install ros-noetic-desktop-full
echo "source /opt/ros/noetic/setup.zsh" >> ~/.zshrc
source ~/.zshrc
sudo apt install ros-noetic-mavros*
sudo apt install ros-noetic-pcl*
sudo ln -s /usr/include/pcl-1.8/pcl /usr/include/pcl
sudo apt install ros-noetic-plotjuggler*
sudo apt install ros-noetic-view-controller-msgs
sudo apt install ros-noetic-octomap*
sudo apt install ros-noetic-serial*sudo usermod -a -G dialout $USER
sudo apt-get remove modemmanager -y
sudo apt install gstreamer1.0-plugins-bad gstreamer1.0-libav gstreamer1.0-gl -y
sudo apt install libqt5gui5 -y
sudo apt install libfuse2 -yDownload QGroundControl.AppImage. Copy it to App folder. Install (and run) using the terminal commands:
sudo /opt/ros/noetic/lib/mavros/install_geographiclib_datasets.sh
chmod +x ./QGroundControl.AppImage
./QGroundControl.AppImageclion装好后要装三个插件比较舒服
- CodeGlance
- Hatchery
- Rainbow Brackets
录屏软件
sudo apt-get install simplescreenrecorderhttps://shurufa.sogou.com/linux
截图软件
sudo apt-get install flameshot添加快捷键:在系统设置的keymap里

视屏播放软件
sudo apt-get install vlcssh-keygen -t rsa -C “your-email”一路回车 然后
cat ~/.ssh/id_rsa.pub将得到的链接复制进入github -> Settings -> SSH and GPG keys -> new SSH key,取个名字即可
安装相关依赖
# CMake
sudo apt-get install cmake
# google-glog + gflags
sudo apt-get install libgoogle-glog-dev libgflags-dev
# BLAS & LAPACK
sudo apt-get install libatlas-base-dev
# Eigen3
sudo apt-get install libeigen3-dev
# SuiteSparse and CXSparse (optional)
sudo apt-get install libsuitesparse-dev
下载压缩包并解压,压缩包地址 http://ceres-solver.org/ceres-solver-2.0.0.tar.gz (Release里面也有)
tar zxf ceres-solver-2.0.0.tar.gz #安装了zsh的extract插件,则可以直接用 x + filename解压
cd ceres-solver-2.0.0
mkdir build
cd build
cmake .. #生成makefile
make -j4 #编译
make test
sudo make install #安装
测试,继续在build路径下输入
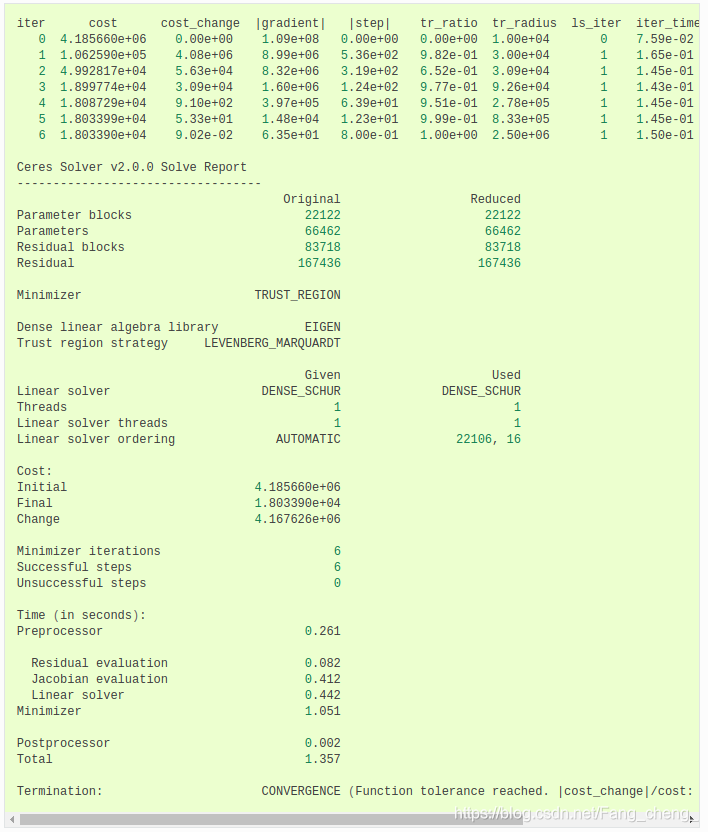
bin/simple_bundle_adjuster ../data/problem-16-22106-pre.txt 若出现下图所示结果,则说明安装成功。
find_package(Ceres REQUIRED)
include_directories(include ${CERES_INCLUDE_DIRS})sudo apt-get install byzanz #下载byzanz有一个小工具xdotool可以获取鼠标的所在坐标
sudo apt-get install xdotool命令行输入
xdotool getmouselocation可以得到鼠标当前的X,Y值,只需要知道所需举行区域左上和右下角的坐标即可截取GIF
byzanz-record -x 506 -y 132 -w 1019 -h 616 -d 10 --delay=5 -c test.gif这里设置延时5秒开始录制,录制时长为10秒,并输出到当前位置成test.gif文件,矩形左上角坐标为x=506, y=132,宽度为1019, 高度616.
byzanz主要的参数选项有: -d, --duration=SECS 动画的时间 (默认:10 秒) -e, --exec=COMMAND Command to execute and time --delay=SECS 开始之前的延时(默认:1 秒) -c, --cursor 录制鼠标光标 -a, --audio 录音 -x, --x=像素 要录制矩形的 X 坐标 -y, --y=像素 要录制矩形的 Y 坐标 -w, --width=像素 录制矩形的宽度 -h, --height=像素 录制矩形的高度 -v, --verbose 详细 --display=显示 要使用的 X 显示
sudo apt-get install libdw-dev 随后下载头文件 https://raw.githubusercontent.com/bombela/backward-cpp/master/backward.hpp 复制到根目录 sudo mv backward.hpp /usr/include 在CmakeLists.txt target_link lib 后面加个 "dw"
#define BACKWARD_HAS_DW 1
#include "backward.hpp"
namespace backward {
    backward::SignalHandling sh;
}
当编译程序报错:找不到<Python.h>时,可能是没有声明环境变量。 修改 ~/.zshrc
export CPATH=/usr/include/python3.8:$CPATH
export LD_LIBRARY_PATH=/usr/lib:$LD_LIBRARY_PATHhttps://github.com/RENyunfan/ooqp_group
进入fmt库的文件夹,执行以下命令
mkdir build
cd build/
cmake -DBUILD_SHARED_LIBS=TRUE ..
make
sudo make install
sudo cp /usr/local/lib/libfmt.so.8 /usr/lib
livox-sdk
mkdir build && cd build
cmake ..
make
sudo make install安装依赖
sudo apt-get install libboost-all-dev
sudo apt-get install cmake
sudo apt-get install libtbb-dev
下载GTSAM压缩包(见Release)并解压,进入GTSAM文件夹
mkdir build
cd build
cmake ..
make check (optional, runs unit tests)
sudo make install
sudo cp /usr/local/lib/libgtsam.so.4 /usr/lib
sudo cp /usr/local/lib/libmetis-gtsam.so /usr/lib
常规安装 驱动解压的用户目录的下载目录,打开解压后的驱动文件夹,空白处点击鼠标右键打开终端 sudo gedit /etc/NetworkManager/NetworkManager.conf 将 managed=false 改成 true 然后在有makefile的目录里 sudo make sudo make install reboot
- 将ad_hoc.sh复制到主目录下
sudo chmod 777 ad_hoc.sh #授予权限-
将脚本中的wlo1修改为自己电脑中的网卡名,可以用
ifconfig查看10.0.0.x即为设定的IP,要确保每个电脑的这个值不同。目前已有的三架飞机分别为
10.0.0.101, 10.0.0.102, 10.0.0.103,之后依次递增。控制飞机的主机以及地面站可以设置为
10.0.0.x,x < 100且不相同即可,如10.0.0.8。 -
启动AdHoc模式
sh ad_hoc.sh然后用iwconfig查看网卡状态,如果如下所示有Cell值,且ESSID为设定的名称 djiadhoc,Mode为Ad-Hoc即为成功。
Exit the AdHoc convert to WiFi mode use command "sudo service network-manager restart"
开机自启动 crontab -e, Select an editor, choose 1. crontab -l, 在最后写入
@reboot sleep 5; echo " " | sudo -S ~/ad_hoc.sh
@reboot sleep 30; echo " " | sudo -S ~/ad_hoc.sh
ctrl + x保存退出
# or use
# wget -qO - https://typora.io/linux/public-key.asc | sudo apt-key add -
wget -qO - https://typoraio.cn/linux/public-key.asc | sudo tee /etc/apt/trusted.gpg.d/typora.asc

# add Typora's repository
sudo add-apt-repository 'deb https://typora.io/linux ./'
sudo apt-get update

# install typora
sudo apt-get install typorasudo add-apt-repository ppa:appimagelauncher-team/stable
sudo apt install appimagelauncherhttps://blog.csdn.net/weijifen000/article/details/88370085
sudo gedit ~/.zshrc
sh xxx.shinstall backport-iwlwifi-dkms_9858-0ubuntu3_all.deb in Release/Libs
lsusb 查看设备ID 创建配置文件
sudo gedit /etc/udev/rules.d/fcu.rules
写入,注意修改idVendor和IDProduct。
KERNEL=="ttyACM*", ATTRS{idVendor}=="3163", ATTRS{idProduct}=="004c", MODE:="0777", SYMLINK+="pixhawk"
随后更新
sudo udevadm control --reload-rules
sudo udevadm trigger