Project Page | Paper | Poster | Video | Code
If you find our work useful in your research, please consider citing:
@inproceedings{demmel2021rootba,
 author = {Nikolaus Demmel and Christiane Sommer and Daniel Cremers and Vladyslav Usenko},
 title = {Square Root Bundle Adjustment for Large-Scale Reconstruction},
 booktitle = {IEEE Conference on Computer Vision and Pattern Recognition (CVPR)},
 year = {2021}
}
Note: The initial public release in this repository corresponds to the code version evluated in the CVPR'21 paper, after refactoring and cleanup. Except for minor numerical differences, the results should be reproducible on comparable hardware. As the code evolves, runtime differences might become larger.
The following describes the needed dependencies in general, followed by concrete instructions to install them on Linux or macOS.
Toolchain
- C++17 compiler
- CMake 3.13 or newer
Included as submodule or copy
See the external folder and the
scripts/build-external.sh script.
The following libraries are submodules:
EigenSophusceres-solverbasalt-headersPangolinclipp{fmt}toml11visit_structcerealabseil-cppwise_enumenum-flagsnameofgoogletest
Some external libraries have their source copied directly as part of
this repository, see the
external/download_copied_sources.sh
script:
Externally supplied
The following dependencies are expected to be supplied externally, e.g. from a system-wide install:
-
Note: You can control the location where TBB is found by setting the environment variable
TBB_ROOT, e.g.export TBB_ROOT=/opt/intel/tbb. -
BLAS and LAPACK routines are needed by
SuiteSparse, and optionally used by Eigen and Ceres directly for some operations.On
UNIXOSes other than macOS we recommend ATLAS, which includesBLASandLAPACKroutines. It is also possible to use OpenBLAS. However, one needs to be careful to turn off the threading insideOpenBLASas it conflicts with use of threads in RootBA and also Ceres. For example, exportOPENBLAS_NUM_THREADS=1.MacOS ships with an optimized
LAPACKandBLASimplementation as part of theAccelerateframework. The Ceres build system will automatically detect and use it.
Python
Python dependencies are needed for scripts and tools to generate
config files, run experiments, plot results, etc. For generating
result tables and plots you additionally need latexmk and a LaTeX
distribution.
Developer Tools
These additional dependencies are useful if you plan to work on the code:
ccachehelps to speed up re-compilation by caching the compilation results for unchanged translation units.ninjais an alternative cmake generator that has better parallelization of your builds compared to standardmake.clang-formatversion >= 10 is used for formatting C++ code.clang-tidyversion >= 12 is used to style-check C++ code.yapfis used for formatting Python code.
There are scripts to help apply formatting and style checks to all source code files:
scripts/clang-format-all.shscripts/clang-tidy-all.shscripts/yapf-all.sh
Ubuntu 20.04 and newer are supported.
Note: Ubuntu 18.04 should also work, but you need to additionally install GCC 9 from the Toolchain test builds PPA.
Toolchain and libraries
# for RootBA and Ceres
sudo apt install \
    libgoogle-glog-dev \
    libgflags-dev \
    libtbb-dev \
    libatlas-base-dev \
    libsuitesparse-dev
# for Pangolin GUI
sudo apt install \
    libglew-dev \
    ffmpeg \
    libavcodec-dev \
    libavutil-dev \
    libavformat-dev \
    libswscale-dev \
    libavdevice-dev \
    libjpeg-dev \
    libpng-dev \
    libtiff5-dev \
    libopenexr-dev
To get a recent version of cmake you can easily install it from pip.
sudo apt install python3-pip
python3 -m pip install --user -U cmake

# put this in your .bashrc to ensure cmake from pip is found
export PATH="$HOME/.local/bin:$PATH"
Note: If you run this in a plain Ubuntu docker container you might need to install some additional basic packages (which should already be installed on a desktop system):
sudo apt install git-core wget curl time software-properties-common
Python (optional)
Other python dependencies (for tools and scripts) can also be installed via pip.
python3 -m pip install --user -U py_ubjson matplotlib numpy munch scipy pylatex toml
For generating result tables and plots you additionally need
latexmk and a LaTeX distribution.
sudo apt install texlive-latex-extra latexmk
Developer tools (optional)
For developer tools, you can install ninja and ccache from apt:
sudo apt install ccache ninja-build
You can install yapf from pip:
python3 -m pip install --user -U yapf
For clang-tidy you need at least version 12, so even on Ubuntu 20.04
you need to get it from the llvm website:
wget -O - https://apt.llvm.org/llvm-snapshot.gpg.key | sudo apt-key add -
sudo add-apt-repository "deb http://apt.llvm.org/$(lsb_release -sc)/ llvm-toolchain-$(lsb_release -sc)-12 main"
sudo apt update
sudo apt install clang-tidy-12
On Ubuntu 20.04 and above, clang-format from apt is recent enough
(we require at least version 10):
sudo apt install clang-format
Note: on 18.04 you need to install clang-format version 10 or newer from the llvm website. For example, after following the instructions above for installing clang-tidy, you can install clang-format version 12:
sudo apt install clang-format-12
We support macOS 10.15 "Catalina" and newer.
Note: We have not yet tested this codebase on M1 macs.
Toolchain and libraries
Install Homebrew, then use it to install dependencies:
brew install cmake glog gflags tbb suitesparse
brew install glew ffmpeg libjpeg libpng libtiff
Python (optional)
Python dependencies (for tools and scripts) can be installed via pip after installing python 3 from homebrew.
brew install python
python3 -m pip install --user -U py_ubjson matplotlib numpy munch scipy pylatex toml
For generating result tables and plots you additionally need
latexmk and a LaTeX distribution.
brew install --cask mactex
Developer tools (optional)
Developer tools can be installed with homebrew.
brew install ccache ninja clang-format clang-tidy yapf
Build dependencies
./scripts/build-external.sh [BUILD_TYPE]
You can optionally pass the cmake BUILD_TYPE used to compile the
third party libraries as the first argument. If you don't pass
anything the deafult is Release. This build script will use ccache
and ninja automaticaly if they are found on PATH.
Note: The
build-external.shbuild script will init, synchronize and update all submodules, so usually you don't have to worry about submodules. For example, you don't have to rungit submodule update --recursivemanually when the submodules were updated upstream, as long as you run thebuild-external.shscript. But there is a small caveat, should you ever want to update a submodule yourself (e.g. update Eigen to a new version). In that case you need to commit that change before running this script, else the script will revert the submodule back to the committed version.
Build RootBA option a)
Use the build script.
./scripts/build-rootba.sh [BUILD_TYPE]
You can optionally pass the cmake BUILD_TYPE used to compile RootBA
as the first argument. If you don't pass anything the default is
Release. The cmake build folder is build, inside the project
root. This build script will use ccache and ninja automaticaly if
they are found on PATH.
Build RootBA option b)
Manually build with the standard cmake workflow.
mkdir build && cd build
cmake ..
make -j8
The cmake project will automatically use ccache if it is found on
PATH (unless you override by manually specifying
CMAKE_C_COMPILER_LAUNCHER/CMAKE_CXX_COMPILER_LAUNCHER). To use
ninja instead of make, you can use:
cmake .. -G Ninja
ninja
You can set the following options when calling cmake. For setting
option OPTION to a value of VALUE, add the command line argument
-DOPTION=VALUE to the cmake call above.
ROOTBA_DEVELOPER_MODE: Presets for convenience during development. If enabled, the binaries are not placed in the cmake's default location in the cmake build folder, but instead inside the source folder, in<PROJECT_ROOT>/bin. Turn off if you prefer to work directly in multiple build folders at the same time. Default:ONROOTBA_ENABLE_TESTING: Build unit tests. Default:ONROOTBA_INSTANTIATIONS_DOUBLE: Instantiate templates withScalar = double. If disabled, running with config optionuse_double = truewill cause a runtime error. But, disabling it may reduce compile times and memory consumption during compilation significantly. While developing, we recommend leaving only one ofROOTBA_INSTANTIONS_DOUBLEorROOTBA_INSTANTIATIONS_FLOATenabled, not both. Default:ONROOTBA_INSTANTIATIONS_FLOAT: Instantiate templates withScalar = float. If disabled, running with config optionuse_double = falsewill cause a runtime error. But, disabling it may reduce compile times and memory consumption during compilation significantly. While developing, we recommend leaving only one ofROOTBA_INSTANTIONS_DOUBLEorROOTBA_INSTANTIATIONS_FLOATenabled, not both. Default:ONROOTBA_INSTANTIATIONS_STATIC_LMB: Instatiate statically sized specializations for small sized landmark blocks. If disabled, all sizes use the dymanically sized implementation, which depending on the problem, might have slightly higher runtime (maybe around 10%). But, disabling it might reduce compile times and memory consumption during compilation significantly. We recommend turning this off during development. Default:ONBUILD_SHARED_LIBS: Build all rootba modules as shared libraries (see the cmake documentation). Default:ON
Unit tests are implemented with the
GoogleTest framework and can
be run with CMake's ctest
command after
compilation.
cd build
ctest
In the "Bundle Adjustment in the Large"
(BAL) problem
formulation cameras are represented as world-to-cam poses and points
as 3D points in world frame, and each camera has its own set of
independent intrinsics, using the "Snavely projection" function with
one focal length f and two radial distortion parameters k1 and
k2. This is implemented in the BalProblem class. Besides the BAL
format, we also implement a reader for "bundle"
files,
but the internal representation is the same.
Note: In our code we follow the convention that the positive z-axis points forward in camera viewing direction. Both BAL and bundle files specify the projection function assuming the negative z-axis pointing in viewing direction. We convert to our convention when reading the datasets.
For testing and development, two example datasets from BAL are
included in the data/rootba/bal folder:
data/rootba/bal/ladybug/problem-49-7776-pre.txt
data/rootba/bal/final/problem-93-61203-pre.txt
We moreover include a download-bal-problems.sh script to
conveniently download the BAL datasets. See the batch evaluation
tutorial below for more details.
Additionally, we provide a mirror of BAL and some additional publicly available datasets: https://gitlab.vision.in.tum.de/rootba/rootba_data
Please refer to the README files in the corresponding folders of that repository for further details on the data source, licensing and any preprocessing we applied. Large files in that repository are stored with Git LFS. Beware that the full download including LFS objects is around 15GB.
Note: The tutorial examples below assume that the data is found in a
rootba_datafolder parallel to the source folder, so if you decide to clone the data git repository, you can use (after installing and enabling Git LFS):cd .. git clone https://gitlab.vision.in.tum.de/rootba/rootba_data.git
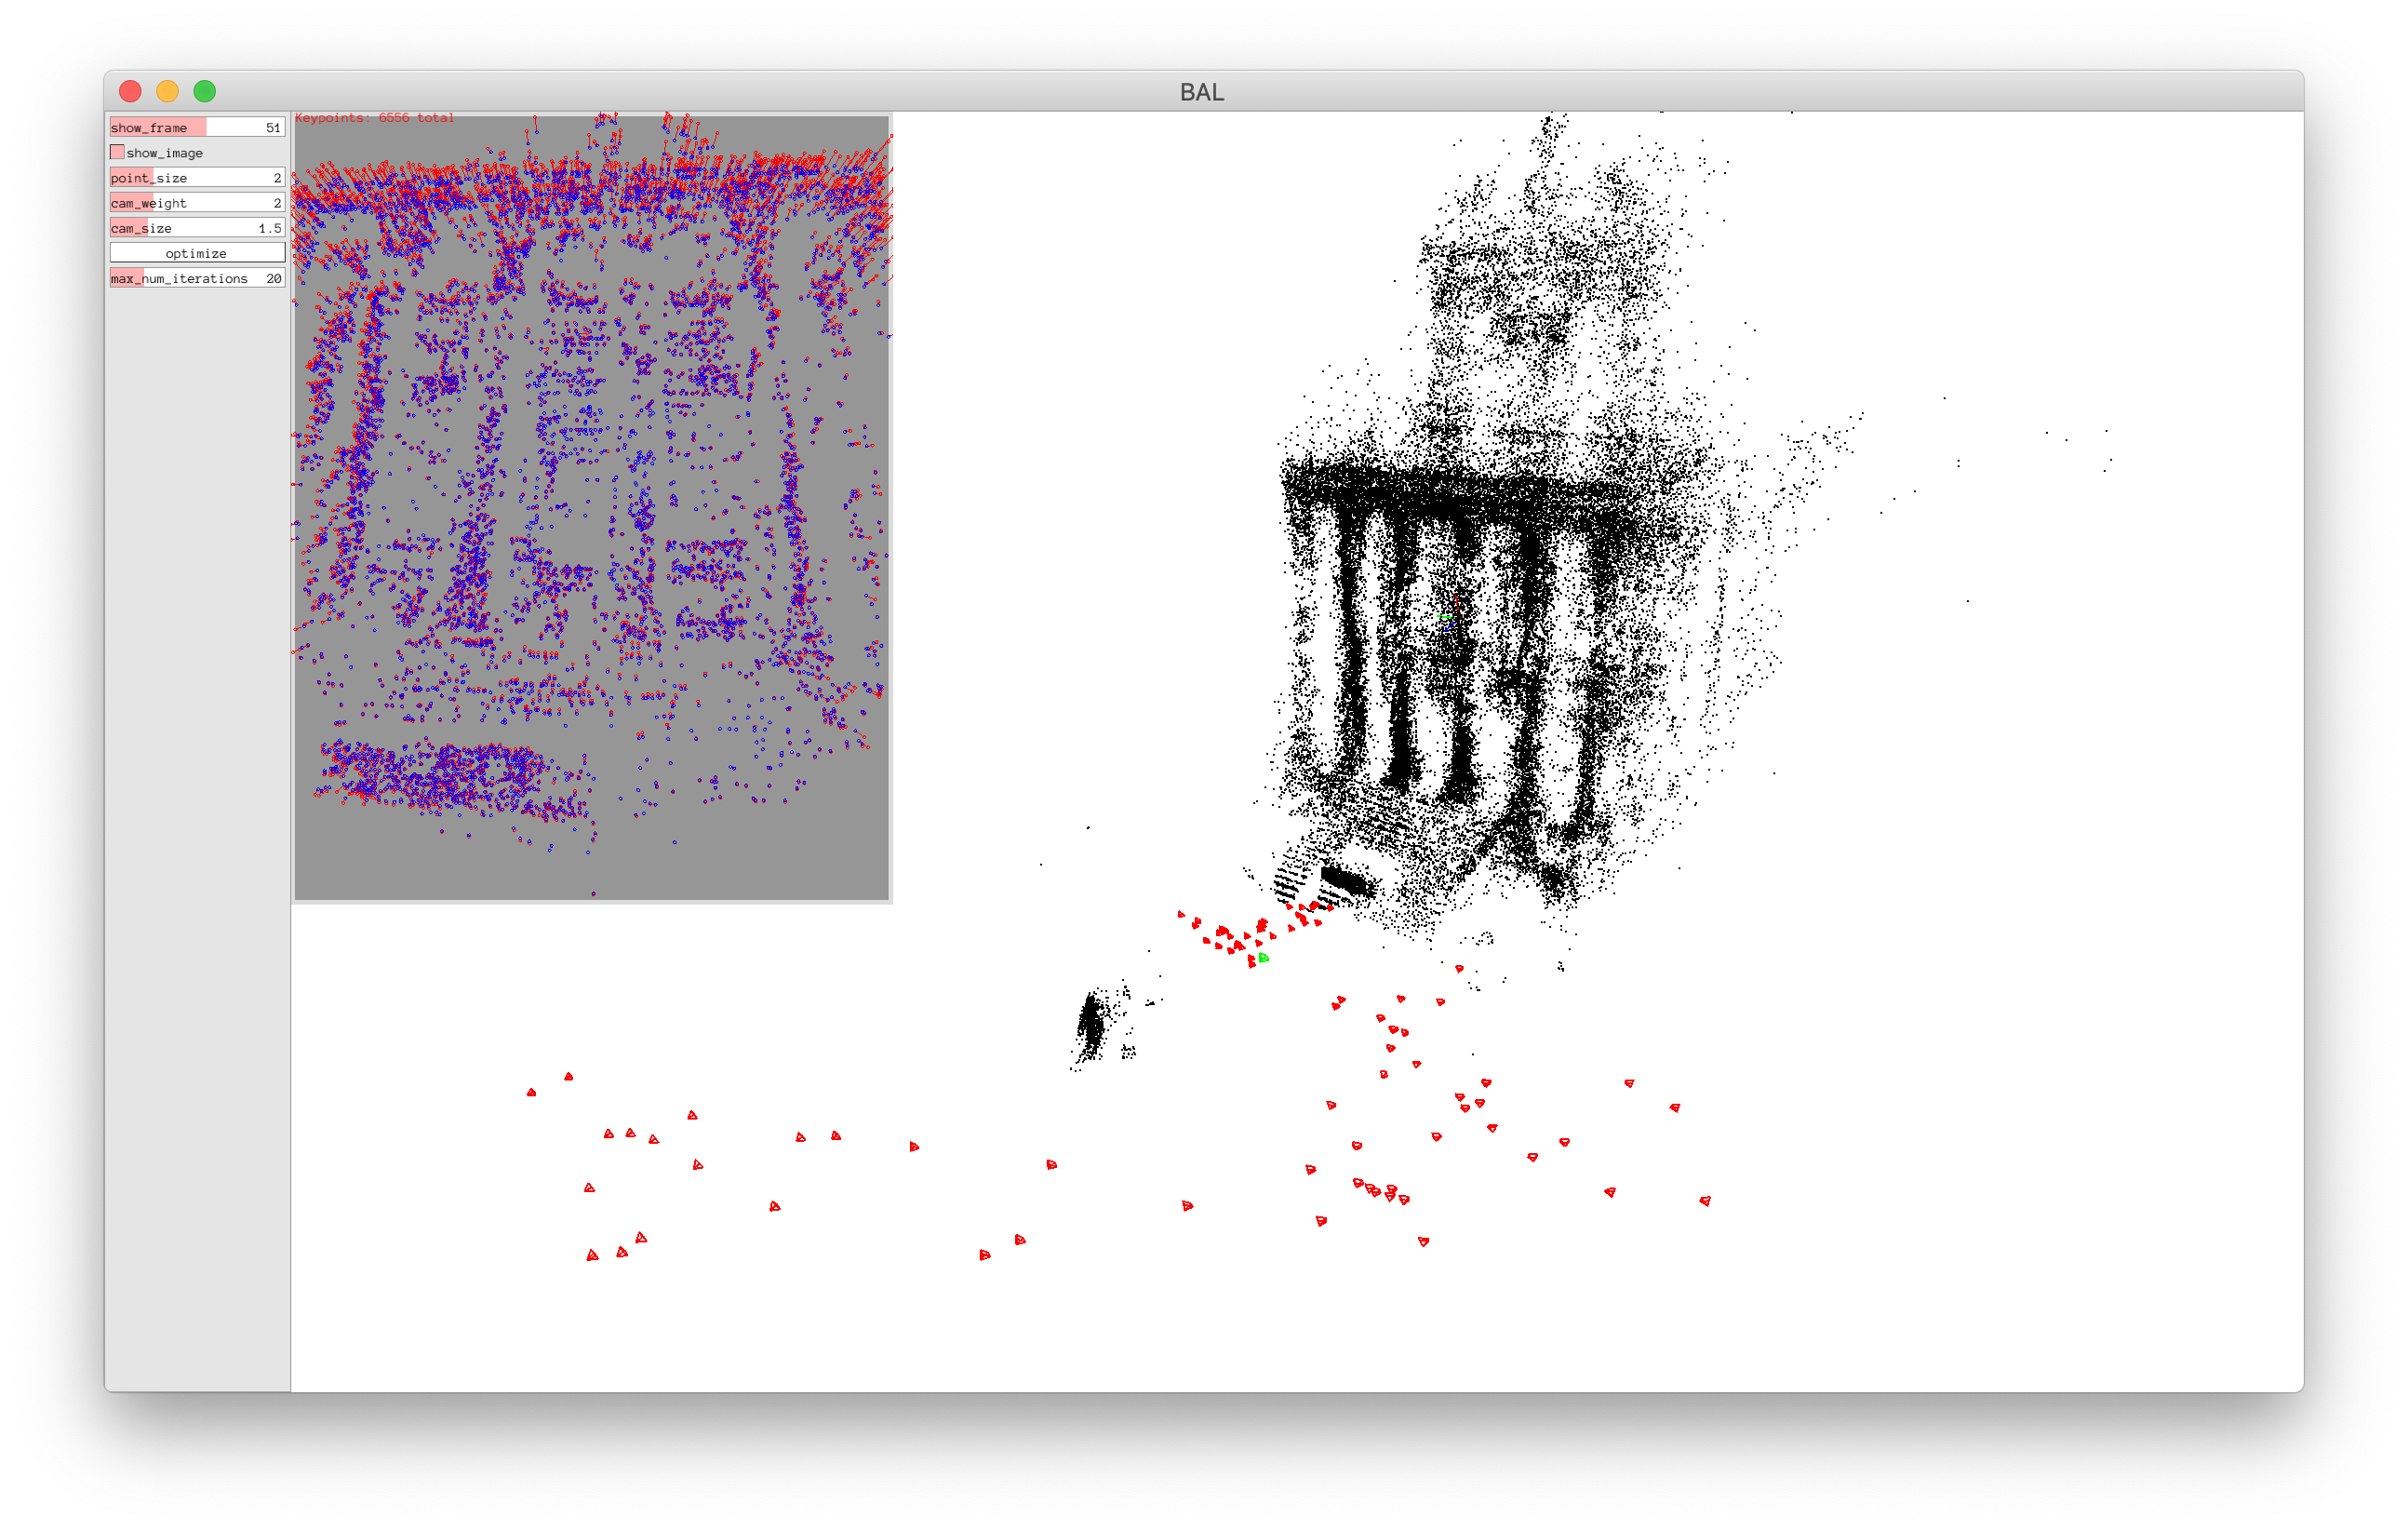
With a simple GUI application you can visualize the BAL problems, including 3D camera poses and landmark positions, as well as feature detections and landmark reprojections.
./bin/bal_gui --input data/rootba/bal/final/problem-93-61203-pre.txt
The main executable to run bundle adjustment is bal. This implements
bundle adjustment in all evaluated variants and can be configured from
the command line and/or a rootba_config.toml file.
There are also three additional variants, bal_qr, bal_sc and
bal_ceres, which override the solver_type option accordingly. They
can be useful during development, since they only link the
corresponding modules and thus might have faster compile times.
For example, you can run the square root solver with default parameters on one of the included test datasets with:
./bin/bal --input data/rootba/bal/ladybug/problem-49-7776-pre.txt
This generates a ba_log.json file with per-iteration log information
that can be evaluated and visualized.
Options can be configured in a rootba_config.toml configuration file
or from the command line, where the command line takes precedence.
The --help command line argument provides comprehensive
documentation of available options and you can generate a config file
with default values with:
./bin/bal --dump-config --config /dev/null > rootba_config.toml
For futher details and a discussion of the options corresponding to the evaluated solver variants from the CVPR'21 paper see Configuration.md.
The different variants of bundle adjustment all log their progress to
a ba_log.json or ba_log.ubjson file. Some basic information can be
displayed with the plot-logs.py script:
./scripts/plot-logs.py ba_log.json
You can also pass multiple files, or folders, which are searched for
ba_log.json and ba_log.ubjson files. In the plots, the name of the
containing folder is used as a label for each ba_log.json file.
Let's run a small example and compare solver performance:
mkdir -p ../rootba_testing/qr32/
mkdir -p ../rootba_testing/sc64/
./bin/bal -C ../rootba_testing/qr32/ --no-use-double --input ../../rootba/data/rootba/bal/ladybug/problem-49-7776-pre.txt
./bin/bal -C ../rootba_testing/sc64/ --solver-type SCHUR_COMPLEMENT --input ../../rootba/data/rootba/bal/ladybug/problem-49-7776-pre.txt
./scripts/plot-logs.py ../rootba_testing/
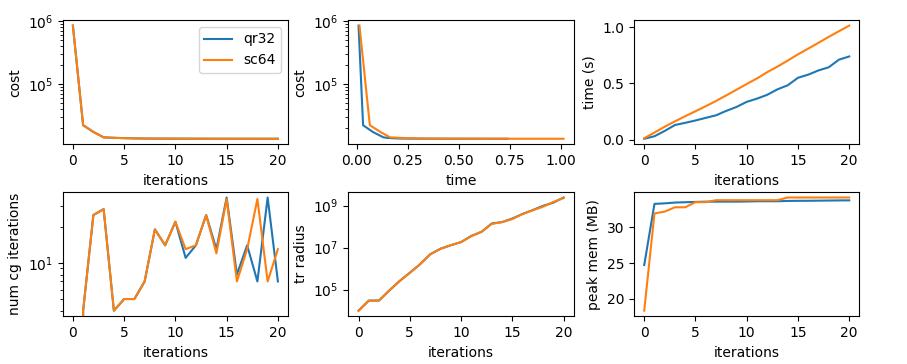
On this small example problem both solvers converge to the same cost and are similarly fast:
For scripts to run systematic experiments and do more sophisticated analysis of the generated log files, please follow the Batch Evaluation Tutorial.
This also includes instructions to reproduce the results presented in the CVPR'21 paper.
The following gives a brief overview over the layout of top-level folders in this repository.
bin: default destination for compiled binariesbuild: default cmake build folderci: utilities for CI such as scripts and docker filescmake: cmake utilities and find modules; note in particularSetupDependencies.cmake, which sets up cmake targets for third-party librariesdata: sample datasets for testingdocs: documentation beyond the main README, including resources such as imagesexamples: example config filesexternal: third-party libraries included as submodules or copies; also build and install folders generated by thebuild-external.shscriptspython: Python module for plotting and generating result tables from batch experiments.scripts: various utility scripts for building, developing, running experiments and plotting resultssrc: this contains the implementation, including headers, source files, and unit tests.test: additional tests
The main modules in the src folder are as follows.
Corresponding header and source files are found in the same folder
with extension .hpp and .cpp. If there are corresponding unit
tests they are found in the same folder with a .test.cpp file
extension.
app: executablesrootba: librariesbal: data structures for the optimization state; options; common utilities and loggingceres: everything related to our implementation with Cerescg: custom CG implementation including data structures for pre-conditionerscli: common utils for command line parsing and automatically registering options with the command lineoptions:generic options frameworkpangolin:everything related to the GUI implementationqr: custom QR solver main implementation detailssc: custom SC solver main implementation detailssolver: custom Levenberg-Marquardt solver loop and interface to the QR and SC implementationsutil: generic utilities
The code of the RootBA project is licensed under a BSD 3-Clause License.
Parts of the code are derived from Ceres Solver. Please also consider licenses of used third-party libraries. See ACKNOWLEDGEMENTS.


