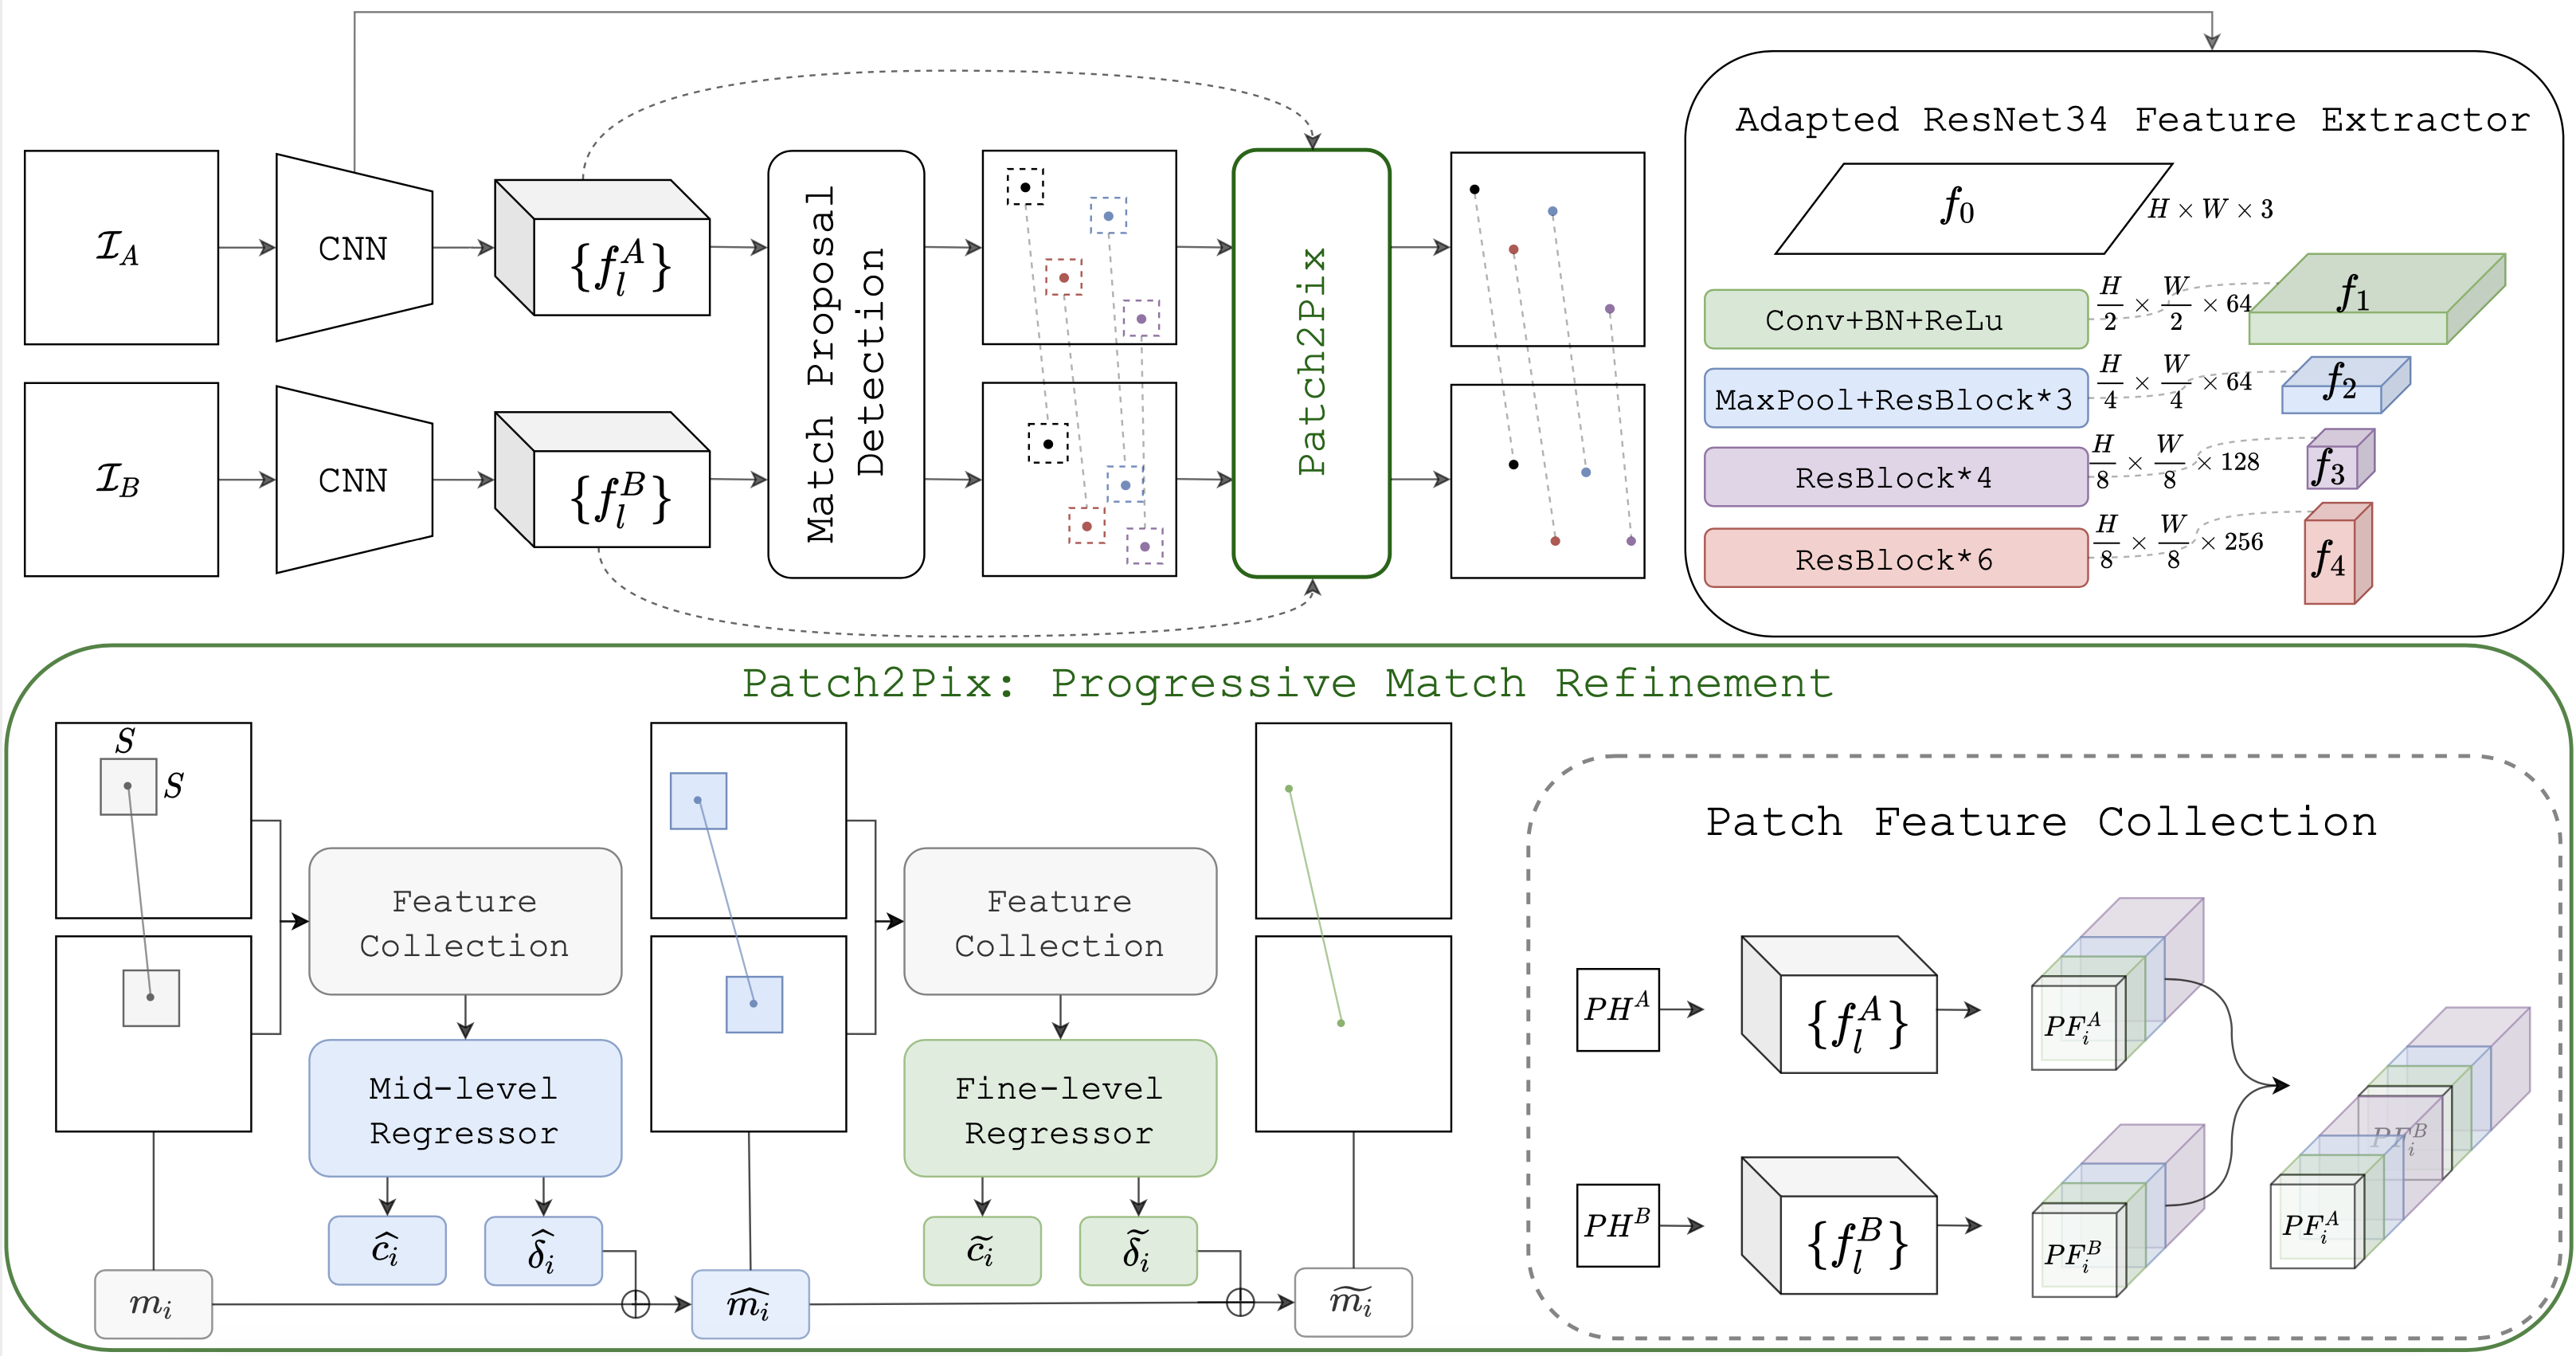
This repository contains the Pytorch implementation of our paper accepted at CVPR2021: Patch2Pix: Epipolar-Guided Pixel-Level Correspondences. [Paper] [Video][Slides].
 To use our code, first download the repository:
git clone git@github.com:GrumpyZhou/patch2pix.git
The code has been tested on Ubuntu (16.04&18.04) with Python 3.7 + Pytorch 1.7.0 + CUDA 10.2.
We recommend to use Anaconda to manage packages and reproduce the paper results. Run the following lines to automatically setup a ready environment for our code.
conda env create -f environment.yml
conda activte patch2pix
In order to run our examples, one needs to first download our pretrained Patch2Pix model. To further train a Patch2Pix model, one needs to download the pretrained NCNet. We provide the download links in pretrained/download.sh. To download both, one can run
cd pretrained
bash download.sh
❗️NOTICE❗️: In this repository, we only provide examples to estimate correspondences using our Patch2Pix implemenetation.
To reproduce our evalutions on HPatches, Aachen and InLoc benchmarks, we refer you to our toolbox for image matching: image-matching-toolbox. There, you can also find implementation to reproduce the results of other state-of-the-art methods that we compared to in our paper.
In our notebook examples/visualize_matches.ipynb , we give examples how to obtain matches given a pair of images using both Patch2Pix (our pretrained) and NCNet (our adapted). The example image pairs are borrowed from D2Net, one can easily replace it with your own examples.
Notice the followings are necessary only if you want to train a model yourself.
We use MegaDepth dataset for training. To keep more data for training, we didn't split a validation set from MegaDepth. Instead we use the validation splits of PhotoTourism. The following steps describe how to prepare the same training and validation data that we used.
Preapre Training Data
-
We preprocess MegaDepth dataset following the preprocessing steps proposed by D2Net. For details, please checkout their "Downloading and preprocessing the MegaDepth dataset" section in their github documentation.
-
Then place the processed MegaDepth dataset under data/ folder and name it as MegaDepth_undistort (or create a symbolic link for it).
-
One can directly download our pre-computred training pairs using our download script.
cd data_pairs
bash download.sh
In case one wants to generate pairs with different settings, we provide notebooks to generate pairs from scratch. Once you finish step 1 and 2, the training pairs can be generated using our notebook data_pairs/prep_megadepth_training_pairs.ipynb.
Preapre Validation Data
- Use our script to dowload and extract the subset of train and val sequences from the PhotoTourism dataset.
cd data
bash prepare_immatch_val_data.sh
- Precompute image pairwise overlappings for fast loading of validation pairs.
# Under the root folder: patch2pix/
python -m data_pairs.precompute_immatch_val_ovs \
		--data_root data/immatch_benchmark/val_dense
To train our best model:
python -m train_patch2pix --gpu 0 \
    --epochs 25 --batch 4 \
    --save_step 1 --plot_counts 20 --data_root 'data' \
    --change_stride --panc 8 --ptmax 400 \
    --pretrain 'pretrained/ncn_ivd_5ep.pth' \
    -lr 0.0005 -lrd 'multistep' 0.2 5 \
    --cls_dthres 50 5 --epi_dthres 50 5  \
    -o 'output/patch2pix'
The above command will save the log file and checkpoints to the output folder specified by -o. Our best model was trained on a 48GB GPU.
To train on a smaller GPU, e.g, with 12 GB, one can either set --batch 1 or --ptmax 250 which defines the maximum number of match proposals to be refined for each image pair.
However, those changes might also decrease the training performance according to our experience.
Notice, during the testing, our network only requires 12GB GPU.
Usage of Visdom Server Our training script is coded to monitor the training process using Visdom. To enable the monitoring, one needs to:
- Run a visdom sever on your localhost, for example:
# Feel free to change the port
python -m visdom.server -port 9333 \
-env_path ~/.visdom/patch2pix
- Append options
-vh 'localhost' -vp 9333to the commands of the training example above.
If you use our method or code in your project, please cite our paper:
@inproceedings{ZhouCVPRpatch2pix,
        author       = "Zhou, Qunjie and Sattler, Torsten and Leal-Taixe, Laura",
        title        = "Patch2Pix: Epipolar-Guided Pixel-Level Correspondences",
        booktitle    = "CVPR",
        year         = 2021,
}