This controller allows to calibrate robot force sensors to allow mc_rtc to remove the effect of gravity due to links attached to the force sensors (grippers/feet).
Robots currently supported:
HRP4LIRMMHRP4JHRP2DRCHRP5PJVRC1panda_default
To add your own robot, see the Adding your own robot/configuration section below.
Running this controller requires:
- Ceres library Note: On ubuntu 16.04 you need ceres 1.14
- mc_rtc
C++14
To calibrate, simply run this controller and follow the instructions in the GUI.
MainRobot: JVRC1 # one of the supported robots
Enabled: ForceSensorCalibration- As a safety, the controller will first check that none of the sensor readings are above a specified threshold (ensures that floating base robots are in the air)
- If the test fails, it'll display a message in the GUI. Click on
Continueonce the robot is in the air
- If the test fails, it'll display a message in the GUI. Click on
- Then you will be presented with a
Calibrationtab in the GUI:- Start calibration: perform the calibration motion (going to an initial posture, and making each sensor move simultaneously. Once the motion is completed, it'll run the calibration optimization, and move to the next
Check calibrationstate - Check calibration: loads the calibration results, perform the calibration motion again and displays live plots of the results. The calibrated force is expected to be close to
0N. You can either save the current calibration results if you are satisfied usingSave calibrationorSave and finish, or stop without keeping the calibration results usingFinish without saving. Note that saving might fail if you don't have the writing rights to the calibration directory. - Show forces: offers a GUI tab to display forces as arrows/live plots
- Once the check calibration state is finished, the robot will go back to halfsitting.
- If there is an error, the robot will go back to halfsitting.
- Start calibration: perform the calibration motion (going to an initial posture, and making each sensor move simultaneously. Once the motion is completed, it'll run the calibration optimization, and move to the next
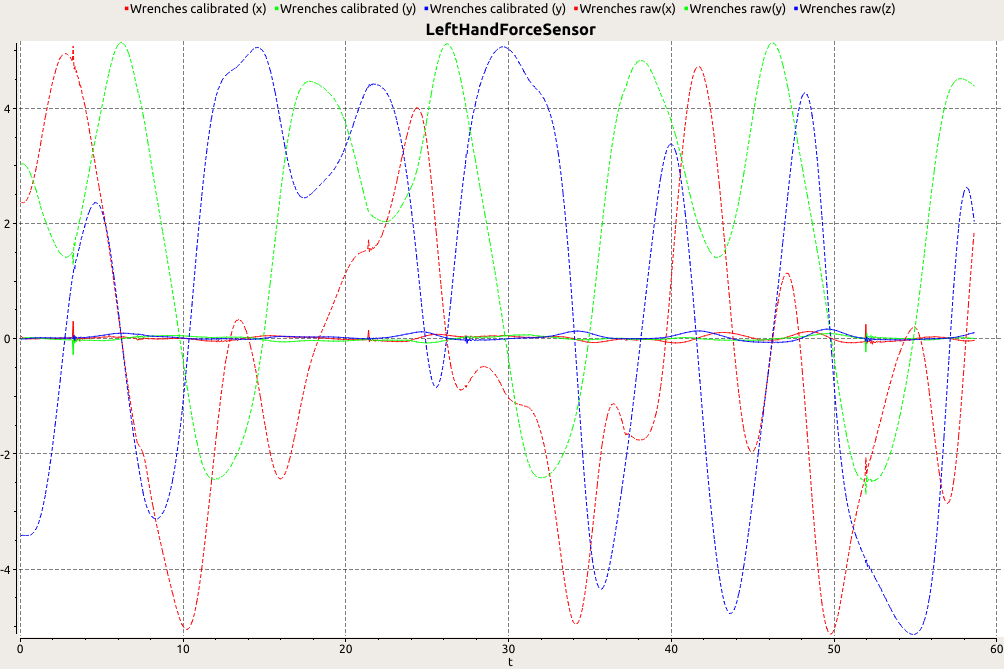
The expected result in the live plots should look similar to (dotted is the raw uncalibrated sensor measurement, solid is the calibrated force with gravity removed which should be close to zero)
For floating base robots, you need to have the robot in the air. In choreonoid, this can be achieved by changing the root joint type to fixed in the robot's wrl model.
For convenience, we provide *_fixed.cnoid variants of our main robots (JVRC1, HRP4LIRMM, HRP4J, HRP5P), use these variants to run the calibration controller in simulation.
HRP4:
Currently the real HRP4 has a force sensor with reading flipped along one of its axis. As a result, the choreonoid simulation and reality must be configured differently:
-
Choreonoid:
- Use
*_fixed.cnoid - Don't forget to use the robot module
HRP4ComanoidChoreonoidto have the correct force sensor frames
- Use
-
Real
- Use
HRP4Comanoidrobot module
- Use
To add your own robot, you should add an additional section with the same name as that of your robot in etc/ForceSensorCalibration.in.yaml and sumbit a pull request. Here is a brief summary of the yaml configuration parameters.
ObserverPipelines: a state observation pipeline see here for supported options. The calibration method requires the orientation of force sensors w.r.t gravity to be known. For floating base robots this means that you need to know at least the orientation of the floating base w.r.t gravity (roll/pitch), and the joint position in order to compute the sensor frame orientation from kinematics.forceSensors: Vector of force sensor names to calibratemaxPressureThreshold: Prevent calibration motion if any of the force sensors measures more than this threhold (norm of force).initial_posture: Initial robot posture from which the calibration motion starts.initial_posture: completion: eval: 0.06 target: L_HIP_R: [0.25] R_HIP_R: [-0.25]
motion: The calibration motion should move the joints prior to the force sensor and attempt to put the force sensor in as many orientations as possible. This section makes each joint move in a sinusoidal motion within the joint limits (or subrange of).motion: duration: 30 stiffness: 10 # posture task stiffness percentLimits: 0.8 # percentage of joint limits for all joints joints: - name: R_ANKLE_P period: 10 - name: L_ANKLE_P period: 15 - name: R_ANKLE_R period: 10 percentLimits: 0.5 # per-joint limits (optional) - name: L_ANKLE_R period: 15
verboseSolver[default=false]: When true show per-iteration results of the solverSinglularityThreshold: Prevents singular configuration (useful for fixed-based robots)0disables this feature
