- Overview
- Installation guide (Backend)
- Quick Start Guide (Frontend)
- RTCM and NTRIP Configuration
- Links
This project was developed in the context of my bachelor's thesis for the Applied Computer Science degree programme at Heilbronn University.
The required data, such as position and Satellites are received by the u-blox ZED-F9R pHAT and then passed on to the Raspberry Pi via UART to be further processed in the backend and sent on to the frontend application (Android).
The backend also serves as an interface for the frontend to communicate with the receiver to configure it. You can configure if which satellite systems you want to use to calculate your position or if you want to use rtcm data.
The Ublox Python Package by SparkFun Electronics was used for the implementation and extended with some additional functions, which were not provided.
In order to use RTCM correction data, a connection to an RTCM provider is established via NTRIP Client and the correction data received is sent back to the pHAT, which then computes a centimetre-precise position.
To run this programm you'll need at least the following hardware:
Frontend:
- Android Smartphone (Minimum API Level 30: Android 11.0)
Backend:
- Raspberry Pi 4 - 4GB Model
- SparkFun GPS-RTK Dead Reckoning pHAT for Raspberry Pi
- 15W USB-C power supply
- Micro SD card with Raspberry Pi OS installed
- keyboard and mouse
- GNSS Multi-Band Antenna (SMA)
- Interface Cable SMA to U.FL
Other: (Only if you wish to use rtcm)
- Credentials with a RTCM provider such as SAPOS
- NTRIP Client such as RTKNAVI
If you need help with setting up your raspberry pi for the first time, please check out this tutorial
Once your raspberry pi is ready, follow these steps to set up the backend.
If you do not have git installed, install it first
$ sudo apt update
$ sudo apt install git
Go to the directory where you want to clone the repository to
$ cd desiredFolder/Clone it via
$ git clone https://github.com/alschube/gnss-navigation-status.gitEnsure that GPIO Remote is activated.
You can do this via GUI under Settings > Interfaces (see picture below)
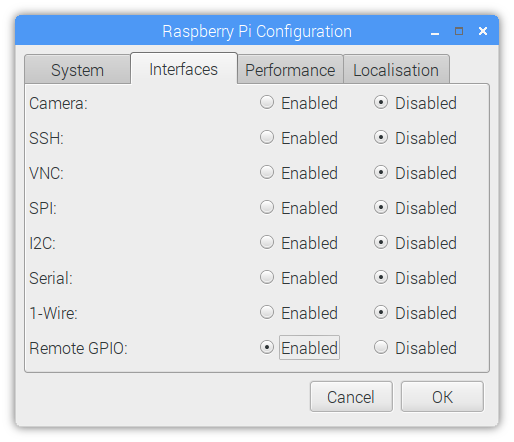
or you can do it on the command line and enable Remote GPIO.
$ sudo raspi-config Make sure you have at least Python Version 3.7 installed. If so, you can skip this step and go to the next chapter.
Otherwise follow the instructions below to install Python 3.8.4, which i worked with.
The first step is to install some required packages:
$ sudo apt install libffi-dev libbz2-dev liblzma-dev libsqlite3-dev libncurses5-
dev libgdbm-dev zlib1g-dev libreadline-dev libssl-dev tk-dev build-essential libncursesw5-dev libc6-dev openssl
To download version 3.8.4, type the following command:
$ wget https://www.python.org/ftp/python/3.8.4/Python-3.8.4.tar.xzThese are unpacked with:
$ tar xf Python-3.8.4.tar.xNavigate to the unzipped folder:
$ cd Python-3.8.4And prepares the configuration. This process can take a few minutes.
$ ./configureThe installation file is created via:
$ make -j -l 4After all, you install them with:
$ sudo make altinstallIn order not to have to enter python3.8 or pip3.8 all the time, you can add aliases.
$ echo "alias python3=python3.8" >> ~/.bashrc
$ echo "alias pip3=pip3.8" >> ~/.bashrc
Use the following command to load the new settings so that they take effect.
$ source ~/.bashrcIn order to run the programm you also need some additional python packages to install:
$ pip3 install serial
$ pip3 install spidevIf you got a new ZED-F9R you probably need to update the firmware version. Sometimes they are delivered with a test firmware version only and need to be updated as it was in my case.
To do so, download the latest firmware version from ZED-F9R Module Firmware. You'll find it under Documentation & Resources > Firmware Update > ZED-F9R HPS 1.20 firmware
After downloading you need to install it via u-center software. (Unless you haven't already installed, download from here and install it)
To install the firmware, open u-center, select the COM-Port where the receiver is connected (directly connect it via usb-c to your pc) and once the connection is established you can click Tools > Firmware Update

Select the downloaded firmware file, the baudrate (typically 115200), please check 'Enter safeboot before update', 'send training sequence' and 'use chip erase' options.

Click Send and the firmware will be uploaded.
The Receiver needs to be configured once to enable all required messages and protocols.
To do so, the provided setup.py script is sending several messages one after the other to the receiver over the UART1 of the Pi.
The script can be found in the backend folder.
Simply run it by opening cmd in the backend folder and typing:
$ python setup.pyTo finally run the backend, go to the backend folder and run it via:
$ python main_backend.pyThe program can be interrupted by pressing the key combination Ctrl + C twice.
-
To set up the frontend simply install the apk that is found under \gnss-navigation-status\frontend\app\release or under Releases (Version 1.0)
-
When you first open the app you have to configure the ip address of your raspberry pi in the settings tab. After clicking the connect Button a connection should be established.
-
In order to configure which satellite systems should be used you can check or uncheck them under the Settings Tab
-
In order to use RTCM correction you have to run an ntrip client and connect to a base station (see RTCM Chapter) and you need to activate it in the app in the Settings Tab
If you want to use RTCM corrections you have to install an ntrip client on your raspberry pi or laptop. I used rtknavi from the rtklib which can be downloaded from http://www.rtklib.com/
By clicking on the "I" on the top you can create a new input stream.

First you have to set the 'Transmit NMEA GPGGA to Base Station' to 'Latitude/Longitude' and provide your current position as accurate as possible (e.g. the position calculated by the app). Also check '(2) Base Station', select 'NTRIP Client' as type and click on the first '...' Button.

There you have to enter your credentials and the Mountpoint you wish to use. If you click on 'Ntrip...' you can select the desired Mountpoint from a list, copy and paste it into the input field.
After that you need to output the received RTCM data. For that you have to click on the "L" Button in the upper right corner.

Check '(7) Base Station' and 'TCP Client' as type. Open the Options by clicking on the '...' Button right beside it. There you have to type your raspberry pi's ip address and the port of the TCP Server (the backend) 8766.

You can confirm and go back to the main window. If you click start, the Ntrip client tries to communicate with the base station and transmitts your position in order to get correction data. This can take up to some minutes. If you see bars in the diagram in the center below, it is working.
You can now activate rtcm in the app (if not already done) and see how the calculated position gets more and more accurate.