Owen Jow, owen@eng.ucsd.edu
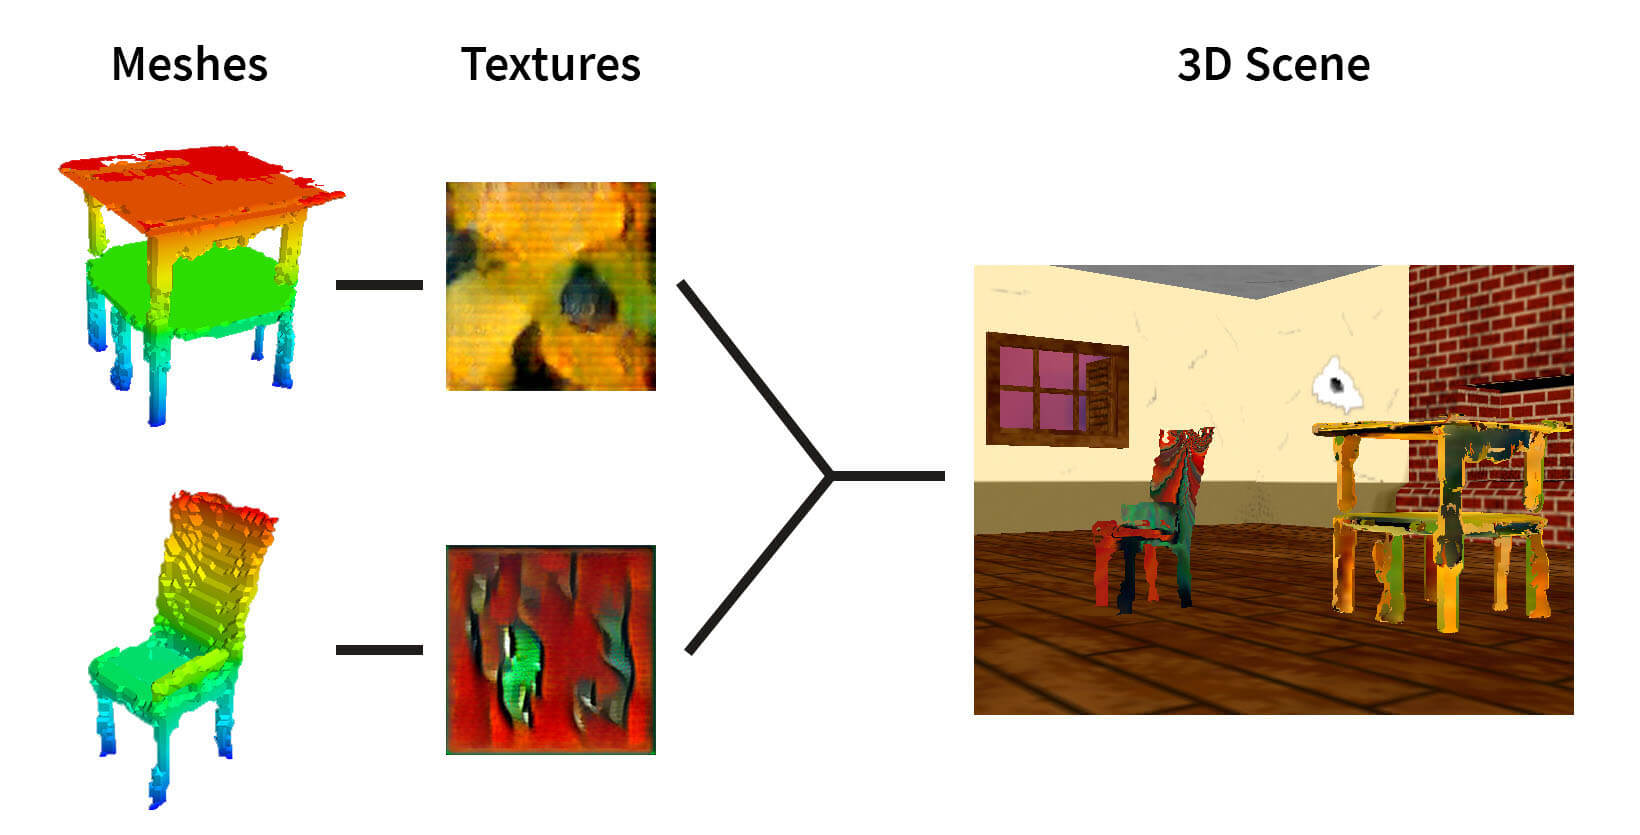
I revisit the 3D world of my "generative visual" project, this time endeavoring to generate and place stylized objects in the scene according to an ML system's schizophrenic guidance. In a sentence, I aim to use ML to compose a stylized 3D scene (though without using 2D image stylization as in the previous project). Given the infinite onslaught of synthesized objects, I envision the scene growing into a mini metropolis, and intend for it to represent "inexorable" temporal processes such as entropy, virtual information clutter, and the proliferation of humanity's creations. The project involves several components, for which I provide brief descriptions below. Basically, I get some ML models to generate meshes, textures, and layouts to use for rendering. I employ models and algorithms such as Wu, Zhang et al.'s 3D-GAN, Karnewar et al.'s MSG-GAN (similar to StyleGAN which was covered in class), convolutional denoising VAEs, marching cubes, mesh parameterization, and simple rasterization-based rendering. During the showcase, I will bring an interactive laptop demo in which users can walk around the scene as it is being constructed.
You can find my project report here.
- [1] Voxel object generation. I use 3D-GAN (Wu, Zhang et al.) to generate voxel objects.
- [3] Mesh stylization. I "stylize" the meshes by generating a texture (1, 2) to apply to each.
- [4] Scene layout design. I use ML to determine the placement of objects in the scene.
- [2] Voxel/mesh conversion. I convert the voxel objects to meshes using marching cubes, and UV map the meshes according to a cut-based parameterization method (or via Blender's Smart UV Project, which is also cut-based).
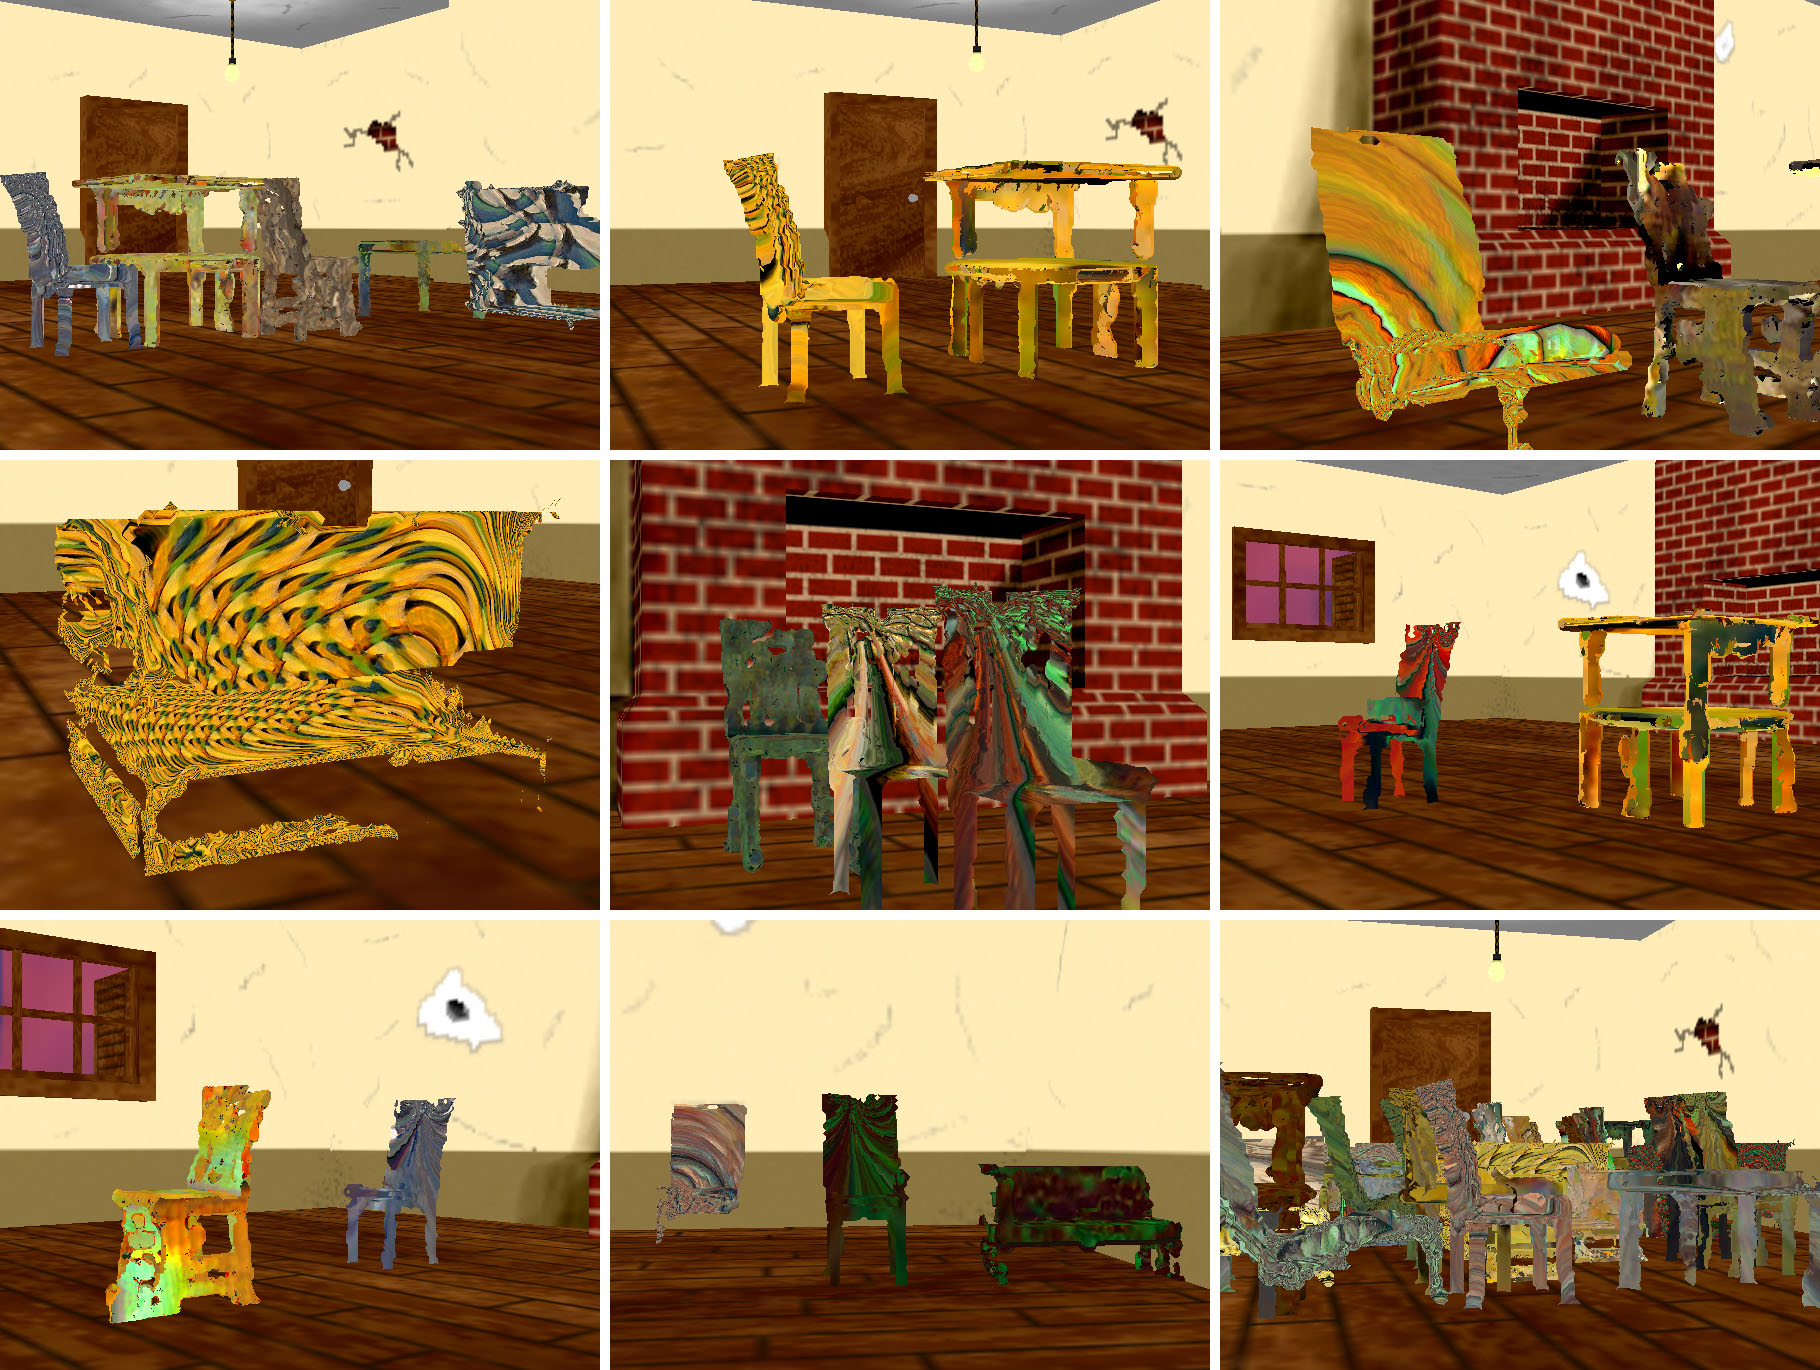
- [5] Real-time scene construction. I build up the scene with the generated objects in an animated fashion.
- [6] Offline scene construction. I also provide an option to write out the scene construction as a video.
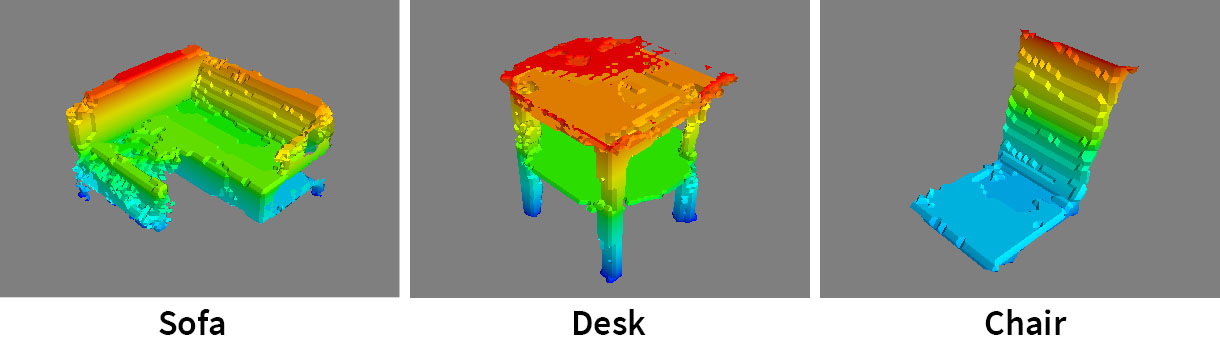
- I synthesize objects for three different classes: chair, desk, and sofa. I'm putting these objects in a room, so I think it's appropriate for them to be furniture.
- Why voxels? They lend well to layout generation, seeing as you can easily describe a set of voxel objects using a 2D top-down grid. Also, voxels look artificial, which contributes to the theme of creation.
- I convert the voxel objects to OBJ triangle meshes in order to reduce the amount of individual geometry that Panda3D has to deal with (on the premise that I don't want to write a voxel engine).
- Unfortunately, the converted meshes tend to be degenerate, and even a slew of online remeshing/repair software hasn't seemed to be able to fix them to the point where a lot of common geometry processing operations (e.g. geodesic distances, harmonic map parameterizations) will actually work properly. This is why I had to use the simple parameterization scheme.
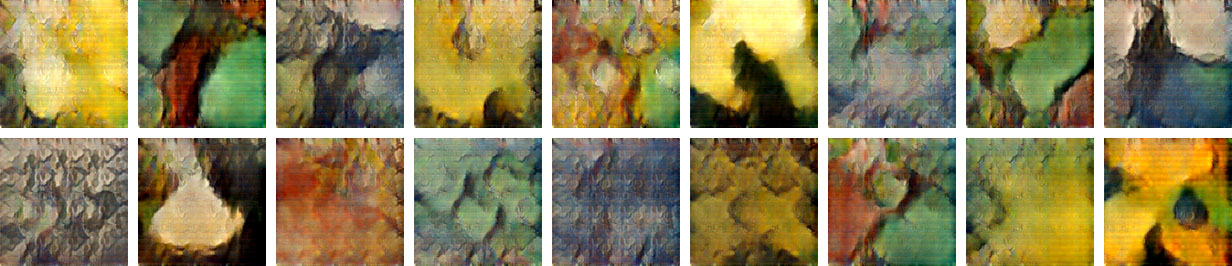
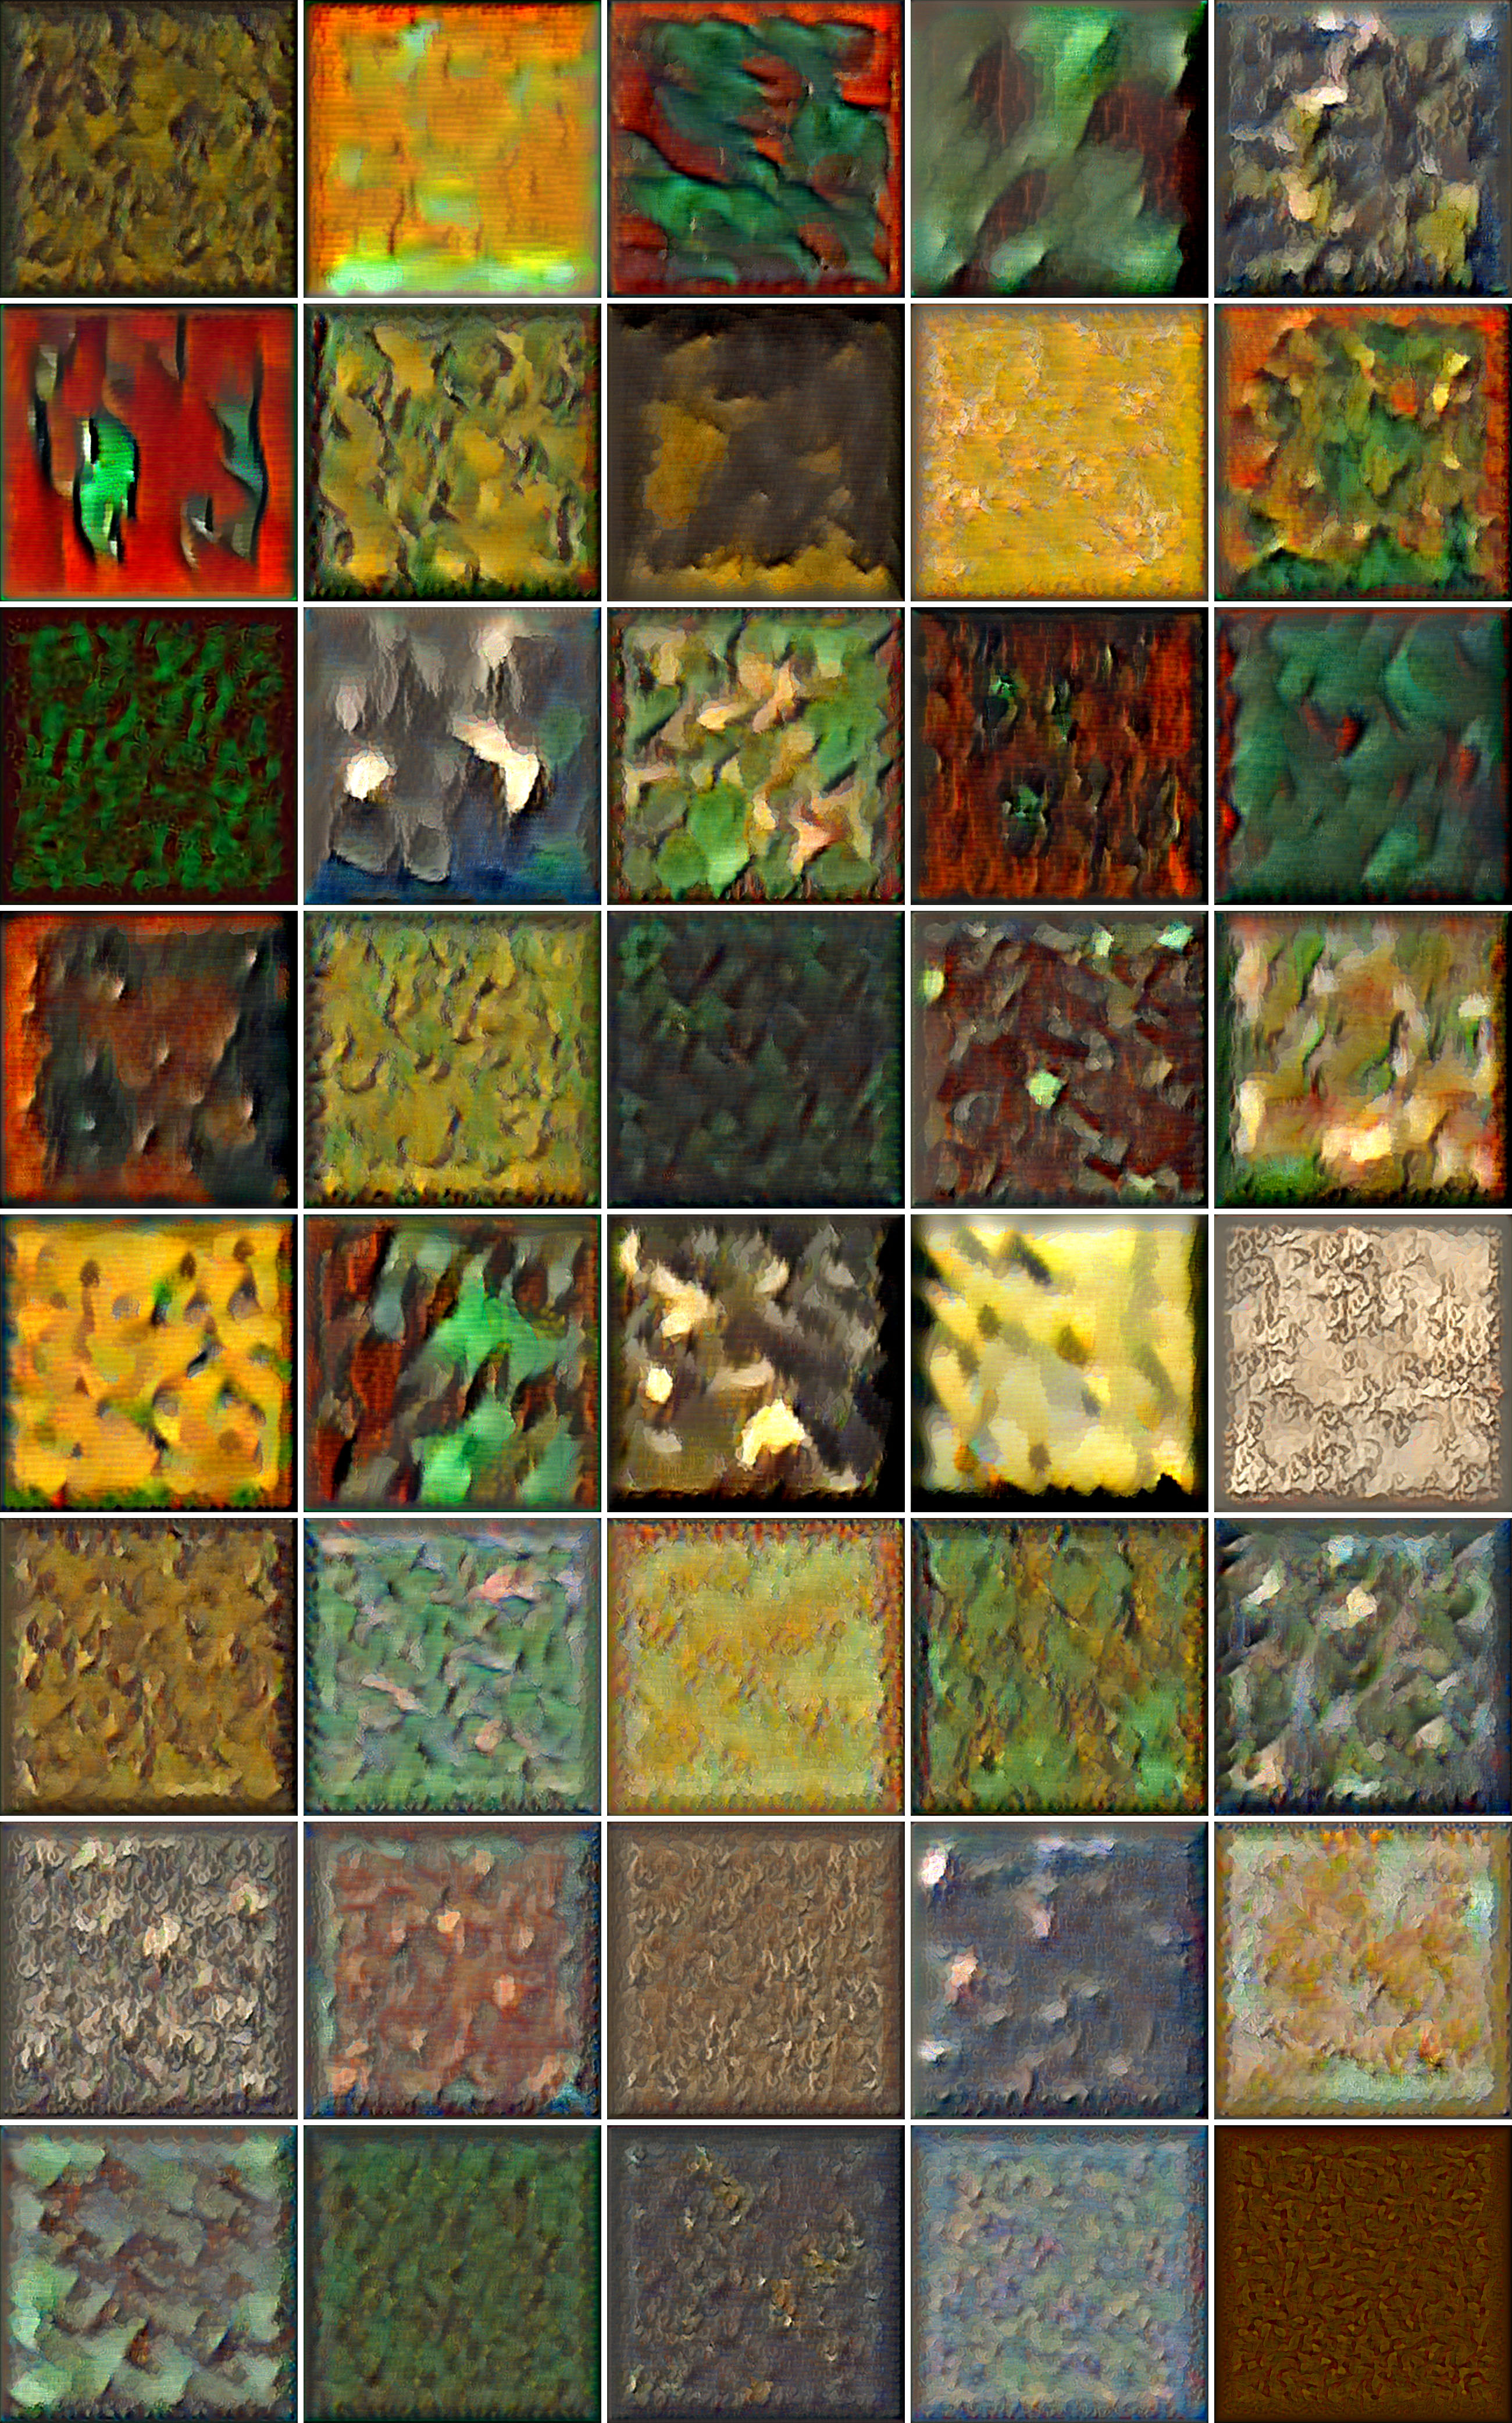
- I use GAN-based unconditional image generation to generate mesh textures. I choose to use MSG-GAN for its purported stability and because StyleGAN sounds like it might take longer to train.
- I also apply a synthesis method on top of this, so that I can generate additional textures at different resolutions.
- I train a generator as part of a convolutional VAE (CVAE) to create top-down layout sampling maps. These maps are grayscale and [0, 1]-normalized such that the value at each location represents the probability that I place an object there (considering the top-down view of the room at the same resolution as the layout).
- The CVAE is trained on satellite imagery. Alternatively, it could be trained on any grayscale image data. For example, if it were trained on MNIST, then the scenes would build up like extruded 3D numbers.
- The network is not trained for high-fidelity reconstruction. I do not regard this as important since (a) the maps are just used for sampling and (b) the use case is primarily artistic, not reconstructive. It's the thought that counts. :)
- I allow users to add objects to the 3D scene in front of the current camera.
- I also allow users to delete objects, but this functionality is essentially and intentionally ineffectual, since the rate of growth is faster than the maximum rate of deletion.
- Users can orbit or walk around the scene as it grows.
- I drop the objects from the sky as if they're coming from the "creator." An object will fall until it approximately hits the ground, and in this way the scene is slowly built up. This process can create amalgamations of objects, which might contribute to a sense of ML creativity (e.g. sofa + sofa = ?).
- In this mode, the program will save an animation depicting the layer-by-layer construction of the scene.
- As part of the animation, I add brief flashes of simplicity (i.e. records of the past) in the ever-growing clutter.
- The scene begins as an empty room with only a window and a fireplace, but then the ML-made objects take over.
- You can download a pre-trained 3D-GAN model according to the instructions in the repo.
- You can download a pre-trained MSG-GAN model from this link.
- This is the model which is used for generating artistic mesh textures. I trained it for 730 epochs on a dataset of Van Gogh paintings. I think it could stand to be trained for more.
- Note that you can download and preprocess these Van Gogh paintings by following the instructions in the stylization usage section. The paintings come from The Met Collection.
- You can download a pre-trained scene layout model from this link.
- This is the convolutional VAE model which is used to generate layout sampling maps. I trained it for 5000 epochs on 700 images from the RESISC45 satellite imagery dataset.
- Speaking of which, you can download the RESISC45 dataset from this link.
renderloop.py: The main file. Launches the rendering loop.prepare_assets.sh: Generates meshes, textures, and layouts in one fell swoop.utils/vox2mesh.py: Converts voxel grids to meshes and exports the meshes as OBJs.utils/preprocess_art.py: Preprocesses and augments the art dataset.utils/convert_all.sh: Postprocesses all generated voxel objects.utils/finalize_textures.sh: Synthesizes additional textures.utils/remove_bad_meshes.sh: Removes meshes without texture coordinates.utils/train_msg_gan.sh: Convenience script for training the MSG-GAN (for use on the cluster).utils/write_video.py: Takes a bunch of images and turns them into a video.utils/uvmap_meshes.py: Performs UV mapping using Blender's "smart projection."3dgan-release/main.lua: Generates voxel objects.3dgan-release/visualization/python/postprocess.py: Postprocesses voxel objects.BMSG-GAN/sourcecode/train.py: Trains the art texture generator.BMSG-GAN/sourcecode/generate_samples.py: Generates new art textures.mesh-parameterization/src/main.cpp: Adds texture coordinates to OBJs.mesh-parameterization/src/parameterize_mesh.cpp: Does mesh parameterization.The-Metropolitan-Museum-of-Art-Image-Downloader/met_download.py: Downloads art data.subjective-functions/synthesize.py: Performs texture synthesis from input samples.sdae/train.py: Trains the convolutional VAE for scene layout generation.sdae/generate_samples.py: Generates scene layouts using the trained VAE.
git submodule update --init --recursive
for submod in mesh-parameterization Manifold; do
    cd $submod
    mkdir build
    cd build
    cmake ..
    make
    cd ../..
done
- Download the RESISC45 dataset.
- Download the room scene and place it in the
assets/folder, such that the resulting path isassets/bedroom/.
First edit the parameters at the beginning of prepare_assets.sh. Then run
./prepare_assets.sh # components [1]-[4]
This will take some time, and you should probably look at the script and run everything individually to make sure nothing fails. If you don't want to generate everything yourself, I have released a small set of sample assets that you can use.
python3 renderloop.py [--no_autospawn] # component [5]
cd 3dgan-release
th main.lua -gpu 1 -class all -bs 50 -sample -ss 150
./utils/convert_all.sh 3dgan-release/output <mesh dir>
Postprocess the voxel object (binarize and keep only the largest connected component).
cd 3dgan-release/visualization/python
python postprocess.py <mat path> -t 0.1 -i 1 -mc 2
Perform the voxel-to-mesh conversion. The result will be written to an OBJ file.
python3 utils/vox2mesh.py <postprocessed mat path>
Assign texture coordinates. You have two options here. The first is to use the naive algorithm that I implemented:
cd mesh-parameterization/build
./add-texcoords <in.obj> <out.obj>
The other option is to use Blender. (You will need to install Blender. This script is meant for v2.79.)
blender --background --python utils/uvmap_meshes.py -- <in.obj> <out.obj>
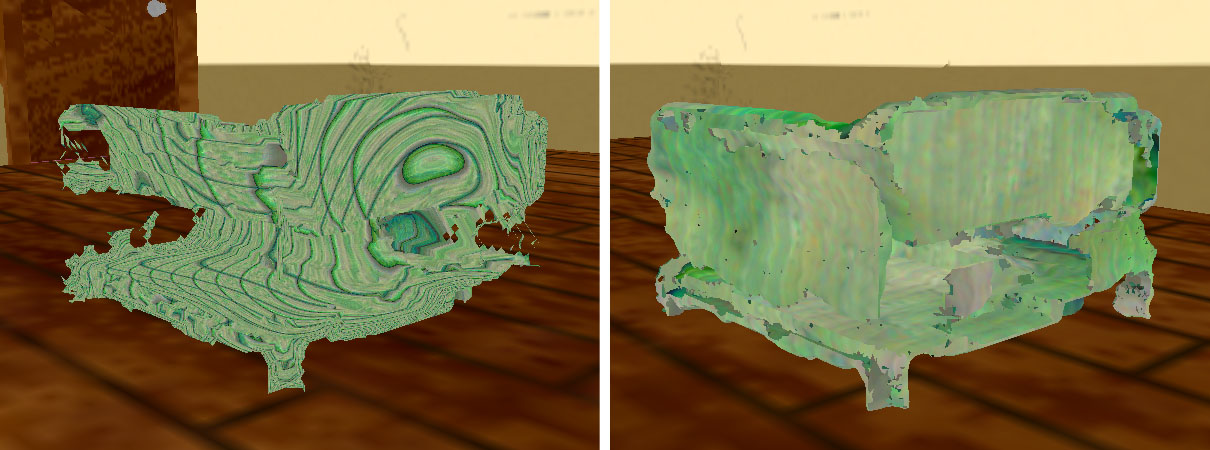
There is a tradeoff. I think my parameterization often yields more aesthetically-pleasing texturizations, but it also retains only the largest connected component in the OBJ file, meaning it creates ugly holes in the mesh. By contrast, Blender's UV-mapping algorithm is almost certainly more robust and will preserve the full shape of the object. Note that the utils/convert_all.sh script uses Blender's mapping by default. Here is a visual comparison of the two methods applied to the same mesh and texture (my output is on the left, and Blender's output is on the right):
If you use Blender, I recommend you first convert your mesh into a watertight manifold:
cd Manifold/build
./manifold <in.obj> <out.obj>
Download training data (public-domain Met art).
cd openaccess
git lfs pull
cd ../The-Metropolitan-Museum-of-Art-Image-Downloader
python met_download.py --csv=../openaccess/MetObjects.csv --out=<data dir> --artist="Vincent van Gogh"
rm <data dir>/piece_info.csv
Preprocess the training data.
python3 utils/preprocess_art.py <old data dir> <new data dir> --no_boundary --init_rescale 0.6
Train the MSG-GAN on the art data.
cd BMSG-GAN
export SM_CHANNEL_TRAINING=<data dir>
export SM_MODEL_DIR=<models dir>/exp_1
python3 sourcecode/train.py --depth=6 \
                            --latent_size=512 \
                            --num_epochs=500 \
                            --batch_size=5 \
                            --feedback_factor=1 \
                            --checkpoint_factor=20 \
                            --flip_augment=True \
                            --sample_dir=samples/exp_1 \
                            --model_dir=<models dir>/exp_1 \
                            --images_dir=<data dir>
Use the trained MSG-GAN to generate textures for meshes.
cd BMSG-GAN
python3 sourcecode/generate_samples.py --generator_file=<models dir>/exp_1/<checkpoint> \
                                       --latent_size=512 \
                                       --depth=6 \
                                       --out_depth=5 \
                                       --num_samples=300 \
                                       --out_dir=<texture dir>
Synthesize additional textures at a desired resolution.
./utils/finalize_textures.sh
Train the layout design network. (Prerequisite: download the RESISC45 dataset.)
cd sdae
python3 train.py --batch_size 32 \
                 --learning_rate 0.001 \
                 --num_epochs 5000 \
                 --model_class CVAE \
                 --dataset_key resisc \
                 --noise_type gs \
                 --gaussian_stdev 0.4 \
                 --save_path ./ckpt/cvae.pth \
                 --weight_decay 0.0000001 \
                 --dataset_path <resisc data path>
Use the trained network to generate layouts.
cd sdae
python3 generate_samples.py --model_class CVAE \
                            --restore_path ./ckpt/cvae.pth \
                            --num 30 \
                            --sample_h 256 \
                            --sample_w 256 \
                            --out_dir <layouts dir>
Set paths in the config file, then run
python3 renderloop.py [--no_autospawn]
- You can change the camera position with the arrow keys.
- You can change the camera yaw with the A and D keys.
- You can change the camera pitch with the W and S keys.
- You can use the F key to add an object in front of the camera.
- You can use the U key to delete an object (sometimes).
- You can quit the program using Q or ESC.
- You can save a snapshot by hitting the spacebar.
If you pass the --no_autospawn flag, then objects will not be automatically added, and you can use the application in somewhat of an "interior design" sense (by adding the objects yourself).
Set paths in the config file, then run
python3 renderloop.py --offline
SNELGROVE OUTPUT

To run 3D-GAN, you will need to install Torch (see this and maybe this). For mesh visualization, you may want to install mayavi (this can be done via pip). To download the Met catalog, you will need Git LFS.
I ran most of the computation-heavy code on a desktop computer with Ubuntu 18.04. You can also train the MSG-GAN on Jupyterhub, using e.g. utils/train_msg_gan.sh (I have confirmed that this works).
If you're using Python 2, you will need to edit one of the lines in renderloop.py. In BeautyApp.get_camera_image, change
image = np.frombuffer(data, np.uint8)
to
image = np.frombuffer(data.get_data(), np.uint8)
If you're running this on macOS, you should invoke python3 renderloop.py with sudo. Otherwise keyboard monitoring won't work due to security restrictions (see here).
- Directly generate polygon meshes, e.g. based on this paper.
- Why didn't I do this? I wanted voxels for the obvious artificiality and for convenience during layout generation.
- Generate photorealistic materials, e.g. based on this paper.
- Why didn't I do this? I wanted the objects to have a stylized quality to them, as opposed to being realistic.
- Generate voxel objects from sketches, e.g. based on this project.
- Why didn't I do this? Too much unnecessary overhead; doesn't really add to final product if non-interactive.
- Train the object generator on my own dataset, e.g. based on this project.
- Why didn't I do this? Not enough time.
- Generate higher-resolution voxel objects, e.g. based on this project.
- Why didn't I do this? Not enough time.
- More mesh cleanup, e.g. using PyMesh, CGAL,
libigl, etc.- Why didn't I do this? Not enough time.
- Generate a new sampling map for every individual object, conditioned on the existing layout.
- Why didn't I do this? This would imply that at each step of the construction process, I would need to perform a forward pass for a network. I wanted to precompute the sampling maps so that I could safely run the program on a laptop in real-time during the showcase.
- Papers
- Repositories
3dgan-releaseBMSG-GANsubjective-functionslibiglgeometry-processing-parameterizationmesh-parameterization(this is my repository, but...)- The Met Image Downloader
metmuseum/openaccesssdae(scene design autoencoder) [aka "stacked denoising autoencoder"]Manifold
- Other