This repository contains code for automatically sending analogue sensed values from a RP2040-based board (such as a Raspberry Pi Pico board) to a flight controller via MAVLink.
The Micropython framework is required to be installed on the RP2040, in order to run the code.
This allows the sensed values to appear in the GCS.
- Connect the RP2040 to a spare UART on the flight controller. Only the +5V, RX, TX and GND lines need to be connected
- Connect any desired sensors to the A0, A1, A2 ports on the RP2040
- Ensure the UART on the flight controller is set to MAVLink2, 57600 baud
- Ensure Micropython is installed on the RP2040. Use the
upload.pyscript to upload the code to the RP2040.
The code will automatically run on boot, flashing a LED each time a MAVLink heartbeat packet is received.
The RP2040 will send readings from the analogue ports A0, A1 and A2 at 1 second intervals. The readings are in volts.
The readings can be viewed at a GCS, such as Mission Planner or MAVProxy.
In MAVProxy, use the following command:
graph NAMED_VALUE_FLOAT[ADC0].value NAMED_VALUE_FLOAT[ADC1].value NAMED_VALUE_FLOAT[ADC2].value
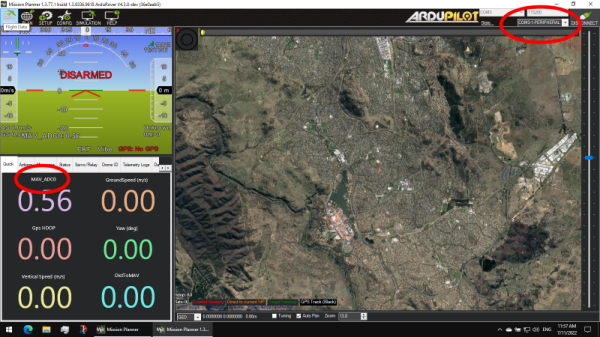
In Mission Planner, select the "peripheral" component, then right click in the "quick" tab and select the ADC value to display:

Due to resource constraints, a limited MAVLink interpreter is included (pymavminimal.py and mavcrc.py). Message
signing is not available. See main.py for a basic example of sending and recieving MAVLink messages.
The follow messages are supported:
AHRS (163)
DATA16 (169)
DATA32 (170)
DATA64 (171)
DATA96 (172)
HEARTBEAT (0)
SYS_STATUS (1)
SYSTEM_TIME (2)
GPS_RAW_INT (24)
ATTITUDE (30)
VFR_HUD (74)
COMMAND_INT (75)
COMMAND_LONG (76)
COMMAND_ACK (77)
NAMED_VALUE_FLOAT (251)
NAMED_VALUE_INT (252)
STATUSTEXT (253)
SCALED_IMU (26)