Project video: https://my-server.dk/public/videos/Demo.mp4
In this repository I’ll share source code that I wrote to run a small rover. I started this rover as a side-project in my free time about a year after starting my studies as a mechatronics student. In the beginning it was meant to be a simple and universal hardware platform that I could use to test software ideas on and improve my coding skills but also get to know real-life challenges that might appear in process of designing & building full hardware-software solutions; and how to get both parts to play nicely together :) . But more than anything it was meant to be educational project for myself, to try and write good and reusable code. Platform itself is built around a rather unconventional chip, TM4C1294, a versatile and powerful Cortex-M4F microcontroller from Texas Instrument with a lot of peripherals and GPIOs. Choice of this MCU complicated the process of adding new sensors and peripherals so most of them were implemented from scratch, but TI has nice SDK, documentation and forum for any potential problems.
In the last update of rover platform, new parts were mostly designed in CAD and 3D printed to fit the existing platform. There were several major changes:
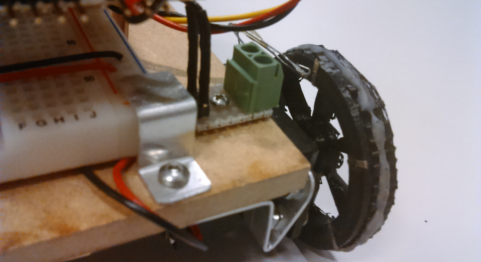
- Cooler wheels which are a)wider than its predecessor to provide more space on the inside of the wheel to place IR sender for optical encoders; b) bigger in diameter (7cm) to achieve greater speeds on the slow 50RPM motors; c) have slots on the outside for adding rubber rings to improve traction.
- Plastic, 3D printed encoder discs with 40 slits per rotation. They are coarser, providing poorer resolution than previous ones (laser-printed on transparent foil), but are more robust to problems with light that previous ones experienced.
- 2D gimbal for radar Instead of 1DOF that previous radar had, new gimbal allows IR sensor to move in both horizontal and vertical plane. This is not so important for IR sensor but I plan to attach a camera on this rover in future so this was a nice-to-have feature.
- Addition of ESP8266 WiFi module with its own mount
As of last version, hardware platform includes 2 motorized back wheels equipped with 40 ppr (points-per-rotation) relative optical encoders and front caster wheel. IR distance sensor on a 2D gimbal mounted on front of the rover, ESP8266 wifi module and MPU9250 9DOF motion sensor. Couple of power regulators for 5V and 3.3V electronics, as well as full H-bridge with input voltage regulator for varying both direction and speed of each individual motor.
Software was designed with several ideas in mind: portability, modularity, maintainability. Portability was tried to achieve through the use of Hardware Abstraction Layer (HAL) which maps all hardware-specific function calls to a unified interface for high-level modules to use. Once the code is ported to another hardware, only (ideally) implementation of HAL functions should be changed. Modularity meant coupling code that refers to a certain sensor or behavior into a single header/source file. Swapping any of the current sensors could then be done by simpling swapping old module with new one that uses the same public interface, but can have different internal behavior. Lastly, maintainability referred to keeping track of what was changed and where (through change-log in header files), documenting code together with explaining some out-of-ordinary decisions taken in the process of writing, keeping consistency in naming (variables, macros, functions...) and above everything, keeping it simple ^^

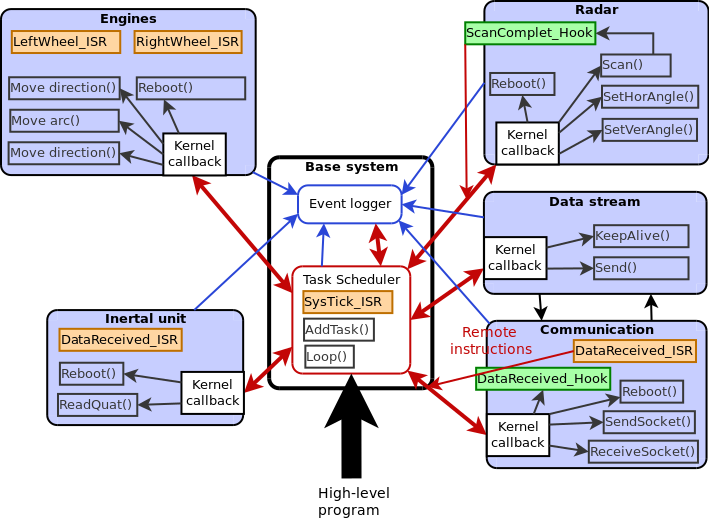
General software behavior is implemented through tasks, coordinated by the task scheduler (TS). For clarification, this scheduler is implemented as list of tasks sorted by desired start-of-execution time (rather then deadline), and each task is run to completion, without preemption or priorities. Public interface on TS allows everyone to schedule tasks to start at a specific point in time, single or periodic, with finite or infinite number of repeats. Tasks are classified by the 'taskUID' and grouped with the module they belong to noted with 'libUID'. To know which module offers services within the task scheduler, it needs to register it's callback function(e.g. TS_RegCallback(&_radKer, RADAR_UID);) within TS when doing initialization sequence. TS is only aware of different modules offering services, but not which services they offer, so requesting service from invalid module with get caught by TS, but requesting illegal service from valid module is handled within the module itself. Communication between TS and module (e.g. radar) is done through object 'struct _kernelEntry' to which TS writes all data for requesting the service, and then calls callback function of the module. TS was designed to easier handle periodic execution of internal tasks, but also to allow remote injection of new tasks (from GUI client). Part of a base system, together with TS, is event logger, a mechanism to report outcome of execution of different tasks so that whoever scheduled the task doesn't need to block and wait for return value.

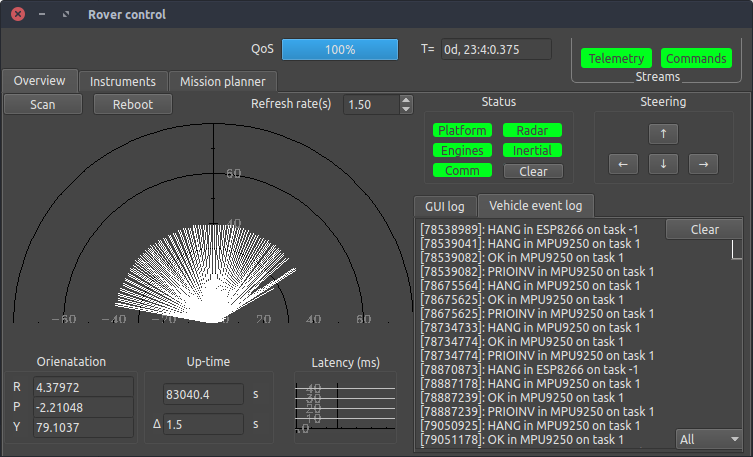
Part of this project is also a GUI application, created to monitor status of the rover, and issue remote tasks. It can be used for simple access to sensor, or creating more complex missions which involve a series of tasks performed by various on-board instruments in a time-synchronized manner.

For more info on GUI visit: https://github.com/vedranMv/roverGUI
First design iteration of platform was assembled from whatever scrap material was available at the time. It was steered around by two motorized back wheels, and one front caster wheel. In front, the vehicle had and IR distance sensor (Sharp GP2Y0A21YK) rotated on a servo motor to provide a radar-like view in a horizontal plane in front of it to detect any possible obstacles Each motorized wheel had an improvised “mechanical position encoder”, which essentially consisted of two wires sliding on the side of the plastic wheel. On that side, wheel had 6 metal pieces evenly distributed over the circumference so when the sliding wires would come in contact with the metal pieces it would close the circuit producing a detectable signal. Total resolution was accordingly 6 points per revolution, or one signal every 60°. Motors on each wheel were controlled through H-bridge from where it was possible to change the direction of rotation and speed (PWM signal fed as a power-input to H-bridge).
First project to utilize this platform was a WiFi - controlled rover which featured TI’s CC3000 chip to bring Internet to the platform. The rover was then communicating with an online server through GET requests and delivering/receiving data through PHP scripts on the server. Scripts were also rover’s interface to a MySQL database, a permanent storage of data and settings. On the other side, controls were issued through GUI, sent directly to online database, from where they could be sent to the rover in first successive connection. GUI was implemented in VB.Net and allowed to control the movement of the vehicle (distance and direction to move), request a radar scan (and plot result of that scan) as well as move a 3 DOF robot arm that was added as a part of this project. Video of this project can be seen here: https://my-server.dk/public/videos/MOV_0495.mp4
Conclusion
The project provided a fun intro to what this platform could potentially become and pointed out some problems in the design. Firstly, for any applications that include Internet communication, having a free online account for hosting webpage/database is not convenient. Firstly because the speed is very slow which could partially be seen in video above, where each command sent from GUI took few seconds to propagate to rover. Secondly, most free web hostings will not be happy with hosting PHP scripts which are used for this purpose and will delete your account in short time saying that’s not the service they provide. Hardwarewise, “mechanical position encoders” were a mess to work with, due to the way they were implemented they would trigger multiple times on a single pass and required different software workarounds to function properly. Their main use here was to move the car for the distance specified in GUI application (or as close to it as possible).
Second project that made use of this platform was an attempt of making a self-balancing 2-wheeled robot. The platform from above was essentially placed in vertical position from where it tried to keep the balance on two motorized back wheels. Angular position of the platform was calculated from raw accelerometer and gyroscope data provided by MPU9250 module (at the time I didn’t know it supports DMP feature) and passed through the complementary filter to get roll/pitch/yaw angles. And a simple PI controller was used to minimize the error from the starting position. Video: https://my-server.dk/public/videos/MOV_0584.mp4
Conclusion
This wasn’t a particularly successful project and there were many hardware & software problems along the way. Firstly, the wight distribution wasn’t optimal and in order to maintain equilibrium platform had to be at an angle instead of straight up. Secondly, motors weren’t responsive enough and had troubles reacting to controller’s signal in a decent time, and in general were very slow (max 60 RPM and 7.4V).
Goal of this project was to utilize the IR distance sensor mounted on the servo motor in order to provide information about potential obstacles in front of the rover and and guide it around them. The test setup consisted of a small maze the robot needed to go through, relying only on the sensory feedback about distance, and then using it to calculate where to move and for how much. At this point, the mechanical encoders were not suitable any more, instead they were replaced by homemade optical encoders, where a slit pattern with 90 slits (points per revolution/ppr) was printed on a transparent foil using laser printer and glued to the back of a wheel. Small IR sender-receiver was then fitted partly inside the wheel (IR sender) and partly outside of it (IR receiver), having a printed disk moving through the space in the middle interrupting beam of light. This allowed for much better navigation bringing the minimum step the car can move down from around 5.2 cm (1 encoder point on 6ppr disk, 5cm wheel dia) to 0.35 mm (1 encoder point on 90ppr disk, 5cm wheel dia). Video: https://my-server.dk/public/videos/MOV_0537.mp4

