(…)
This work and all its documentation is licensed under the Creative Commons Attribution-ShareAlike 4.0 International (CC BY-SA 4.0) License.
This program is free software: you can redistribute it and/or modify it under the terms of the GNU General Public License as published by the Free Software Foundation, either version 3 of the License, or (at your option) any later version.
This program is distributed in the hope that it will be useful, but WITHOUT ANY WARRANTY; without even the implied warranty of MERCHANTABILITY or FITNESS FOR A PARTICULAR PURPOSE. See the GNU General Public License for more details.
- Preliminary aspects
- Install a release
- Build from source
- Usage
Linux and Windows.
- Language: C (gnu17 - ISO C 2017 [
ISO/IEC 9899:2018] with GNU extensions) - Compiler: GCC / Clang / MinGW-w64-GCC
- Graphics API: Vulkan
mindmap
  root(("Engine (shared)"))
    ("Hot-reloadable code (shared)")
      ("Game (exec)")
    ("Test (exec)")
    ("Editor (exec)")
- Lightweight build system (GNU Make)
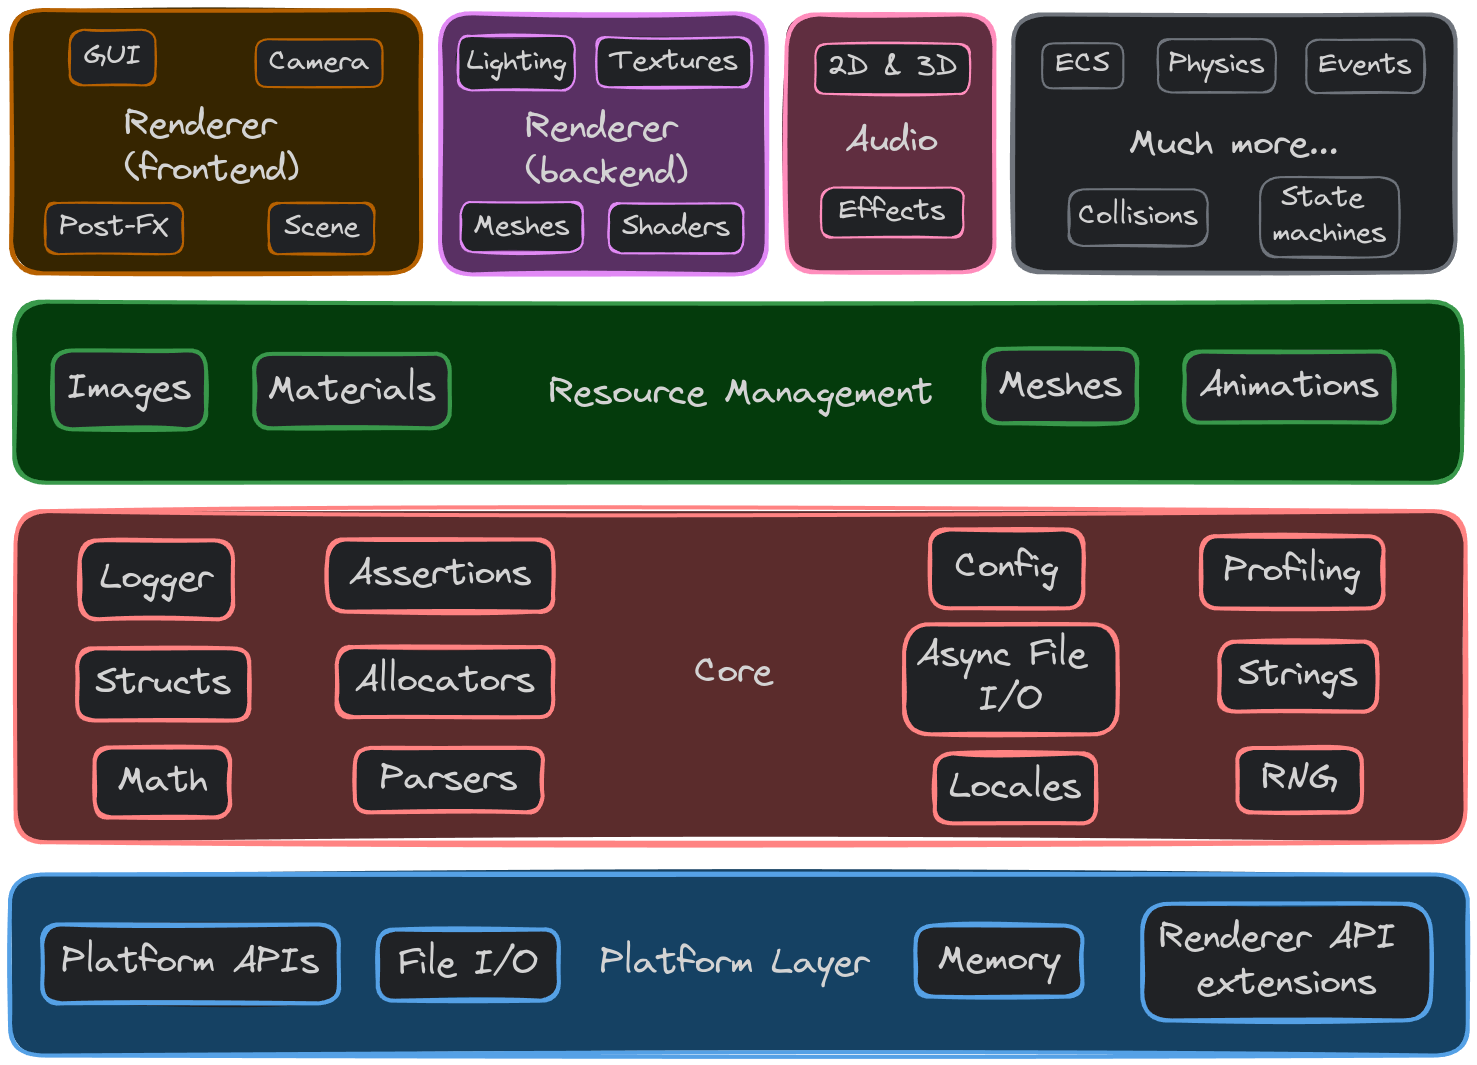
- Low-level utilities (dynamic arrays, string handling, etc.)
- Platform layer (OS-based abstractions for windowing, input, console interaction, etc.)
- Logger (debugging purposes)
- File I/O capabilities
- Application layer
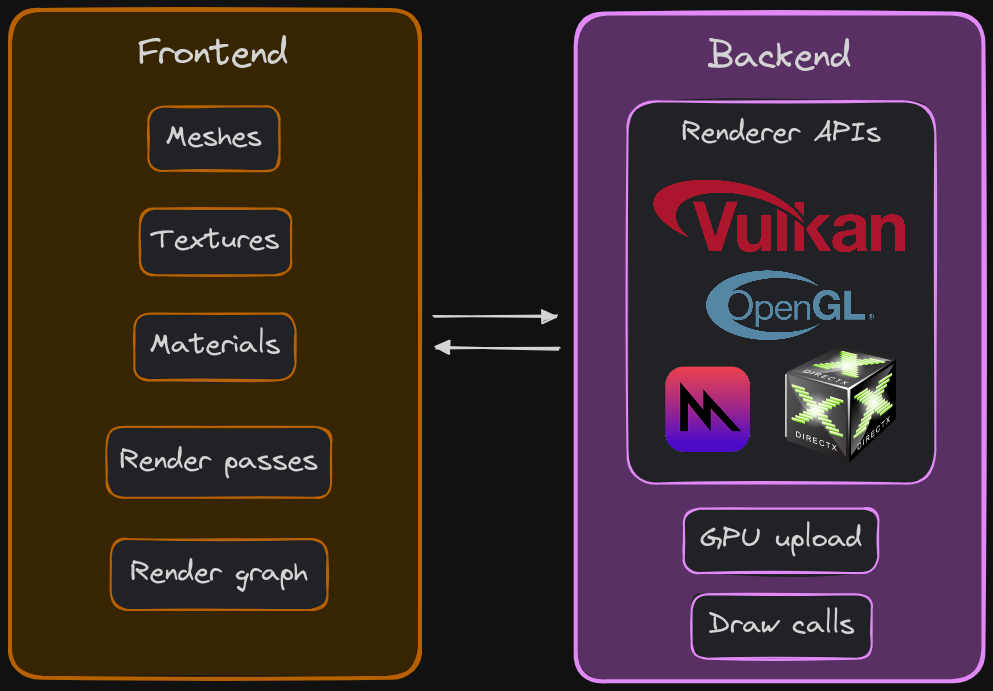
- Renderer and API abstraction layer
- Memory management (custom allocators, etc.)
- Entity Component System (ECS)
- Profiling and debugging utilities
- Scripts support via hot-realoadable modules
- Physics system
| Feature | Status | Feature | Status | Feature | Status |
|---|---|---|---|---|---|
| Platform layer | ✅ | Keyboard support | ✅ | Texture format conversion tool | ❌ |
| Desktop GNU/Linux support | ✅ | Mouse support | ❌ | Resource hot-reloading | ❌ |
| Desktop Windows support | ❌ | Gamepad support | ❌ | Entity Component System (ECS) | ❌ |
| Desktop macOS support | ❌ | Touchscreen/mobile support | ❌ | Scenes | ❌ |
| Mobile Android support (runtime) | ❌ | String library (basic) | ✅ | Scene format | ❌ |
| Mobile iOS support (runtime) | ❌ | String library (struct based) | ❌ | Scene load/save procedures | ❌ |
| Dynamic array | ✅ | Math library | ✅ | Prefabs | ❌ |
| Free list | ❌ | SIMD support for math library | ❌ | Raycasting | ❌ |
| Hash table | ✅ | Linear allocator | ✅ | Object picking | ❌ |
| Stack | ❌ | Dynamic allocator | ❌ | Gizmos | ❌ |
| Queue | ❌ | Pool allocator | ❌ | Editor (world) | ❌ |
| Ring | ❌ | System manager & interface | ❌ | Audio | ❌ |
| Pool | ❌ | Multithreading | ❌ | Physics | ❌ |
| Binary Search Tree (BST) | ❌ | Job system | ❌ | Networking | ❌ |
| Logger (basic) | ✅ | Resource system | ✅ | Profiling | ❌ |
| Multithreaded logging | ❌ | Binary resource loader | ✅ | Game/editor logic hot-reloading | ❌ |
| Logger channel grouping | ❌ | Text resource loader | ✅ | Keymaps/keybindings | ❌ |
| Clock (basic) | ✅ | Image resource loader | ✅ | Configurable global settings | ❌ |
| Clock (advanced) | ❌ | Material resource loader | ✅ | Configurable engine settings | ❌ |
| Events (basic) | ✅ | Bitmap font resource loader | ❌ | Timeline system | ❌ |
| Event broadcast | ❌ | System font resource loader | ❌ | Skeletal animation system | ❌ |
| Event polling | ❌ | Scene resource loader | ❌ | Terrain | ❌ |
| Multithreaded events | ❌ | Texture format (binary) | ❌ | Skybox & skysphere | ❌ |
| Feature | Status | Feature | Status |
|---|---|---|---|
| Renderer front/backend architecture | ✅ | 2D/3D geometry generation | ❌ |
| Vulkan API backend support | ✅ | Multiple renderpass support | ✅ |
| OpenGL API backend support | ❌ | Configurable renderpasses | ❌ |
| Direct3D API backend support | ❌ | Phong reflection/lighting model | ❌ |
| Metal API backend support | ❌ | Specular maps | ❌ |
| Textures | ✅ | Normal maps | ❌ |
| Geometry | ✅ | Physically Based Rendering (PBR) | ❌ |
| Materials (basic) | ✅ | Multithreading support for Vulkan renderer | ❌ |
| Materials (advanced) | ❌ | Multithreading support for D3D12 renderer | ❌ |
| Render targets/textures support | ✅ | 2D/3D batch rendering | ❌ |
| Feature | Status | Feature | Status |
|---|---|---|---|
| UI system | ❌ | Text (basic) control | ❌ |
| Layering | ❌ | Text (rich) control | ❌ |
| UI file format | ❌ | Button control | ❌ |
| Load/save procedures | ❌ | Checkbox control | ❌ |
| Editor (UI) | ❌ | Radio button control | ❌ |
| Control focus (TAB-ing) | ❌ | Tab control | ❌ |
| Docking | ❌ | Window/modal control | ❌ |
| Drag-and-Drop support | ❌ | Resizable multi-panel control | ❌ |
| Base control (show/hide, position) | ❌ | Scrollbar control | ❌ |
| Panel control | ❌ | Scroll container control | ❌ |
| Image box control | ❌ | Textbox/textarea control | ❌ |
| Viewport control | ❌ | In-game debug console control | ❌ |
| Feature | Status |
|---|---|
| README-type documentation | ✅ |
| White paper | ❌ |
| Reference Manual (Info, HTML, PostScript, PDF) | ❌ |
| API auto-generated code documentation (Man, HTML, PostScript, PDF) | ❌ |
(…)
(…)
flowchart TB
  A[Initialization] --> B[Prepare frame]
  B --> C[Set state on GPU]
  C --> D[Present to screen]
  D --> E{Still running?}
  E --> |Yes| B
  E --> |No| F[Shutdown]
(…)
- Phase 0:
- Graphics API instantiation
- Clear screen to solid color
- Phase 1:
- Static meshes
- Textures
- Materials
- Phong reflection model (basic lighting)
- Phase 2:
- Render targets/textures
- Terrain
- Skybox
- Water
- Phase 3:
- Post FX
- Pipeline (configurable)
- Phase 4:
- Physically Based Rendering (PBR) (advanced lighting)
flowchart TB
  A[Vertex & Index Buffers] --> |Input Assembler| B[Vertex Shader]
  B --> C[Tessellation]
  C --> D[Geometry Shader]
  D --> |Rasterization| E[Fragment Shader]
  E --> |Color Blending| F[Framebuffer]
(…)
flowchart TB
  A[SPIR-V]
  B[GLSL] --> A
  C[HLSL] --> A
(…)
(…)
(…)
(…)
(…)
A free list is a data structure which mantains the locations and sizes of memory blocks as they are allocated and freed. Effectively, it only tracks the actual allocations themselves.
It uses a linked list internally, which typically means dynamic allocations have to occur for each node. However, in this implementation it only happens a single time and up front, to likely reduce the overhead.
There are two possible ways to implement an allocation:
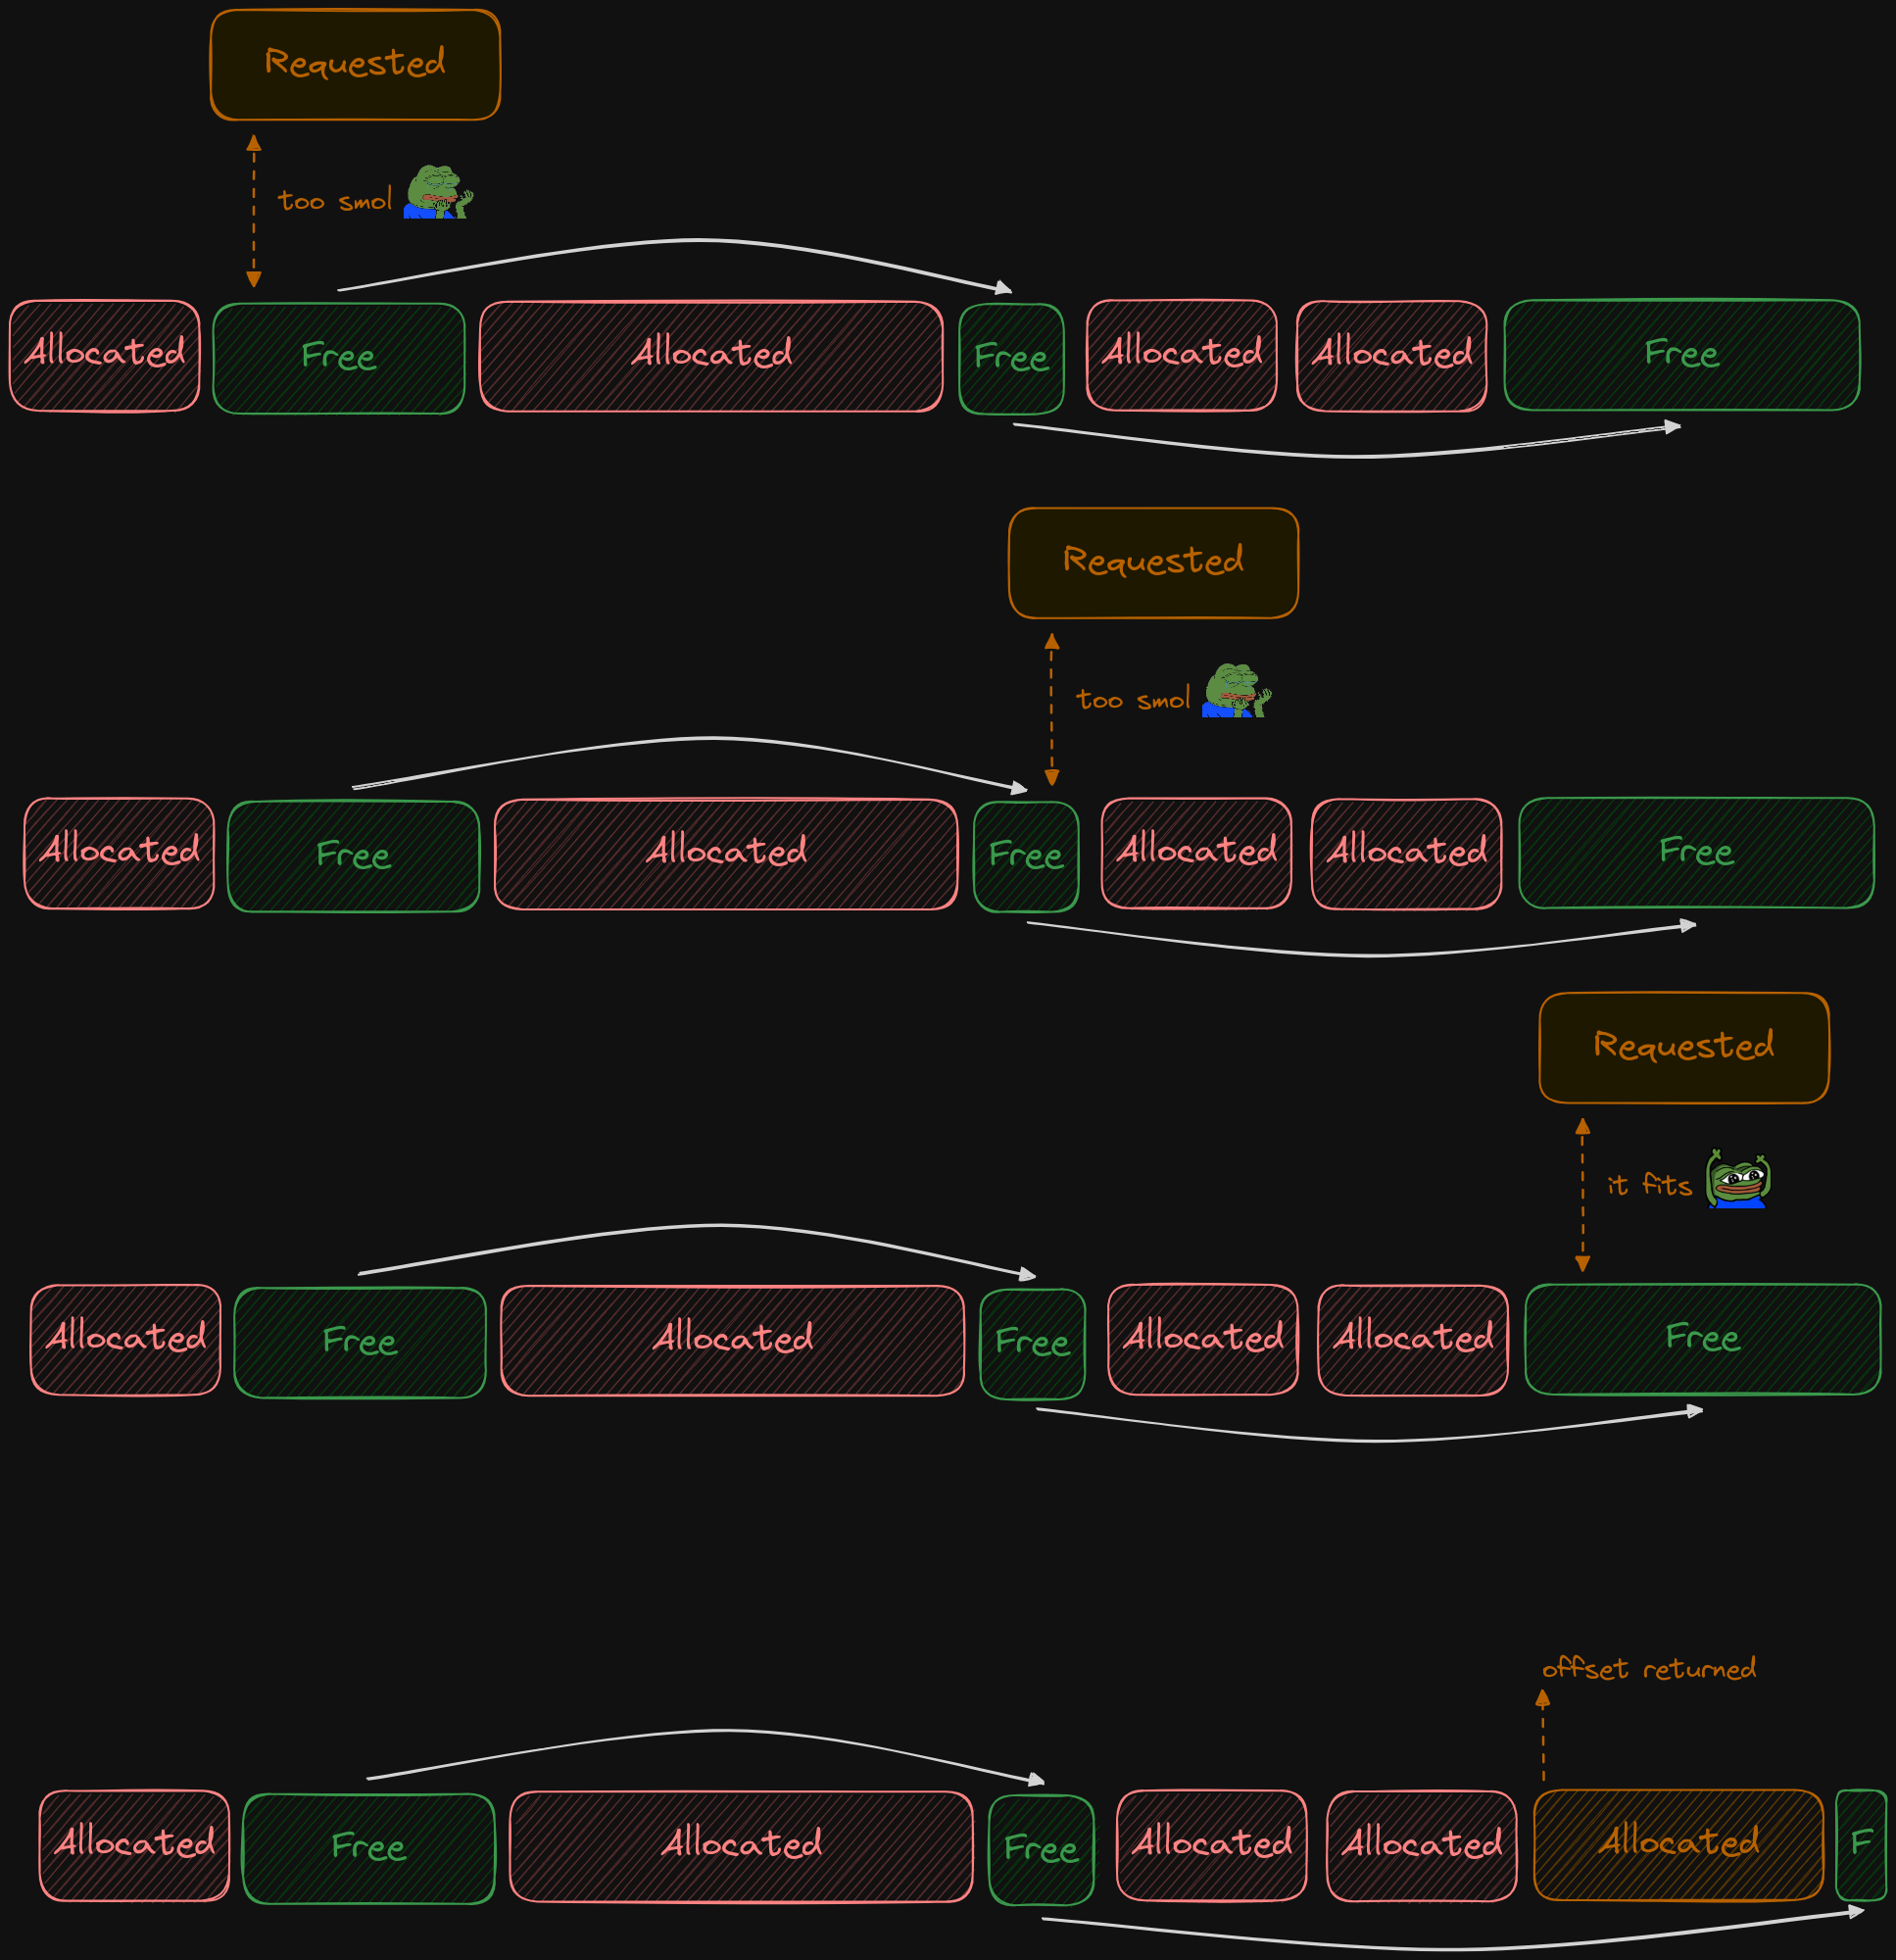
- First fit: Use the first block of memory that can hold the requested amount. It is fast to perform the allocation, and it stops searching at the first match. However, it can lead to memory fragmentation quite often.
- Best fit: Search all blocks of memory for the closest match in size. It is slow to perform the allocation, as it has to search through the entire list. However, it can be slightly better at preventing memory fragmentation depending on the specific setup.
After research and testing, the theoretical benefits of a best fit solution doesn’t outweight the costs, so the selected method has been the first fit (1).
- When a request comes in for memory allocation, the system checks the free list to see if there’s an available block that can fulfill the request. This is done by iterating over the free list until a suitable block is found.
- Once a suitable block is found, it is removed from the free list. This means updating the links between the other blocks in the list to exclude the newly allocated block.
- The block is then marked as being in use. This could involve changing a status flag or similar mechanism.
- Finally, the address of the allocated block, or in this case an offset, is returned to the requester.
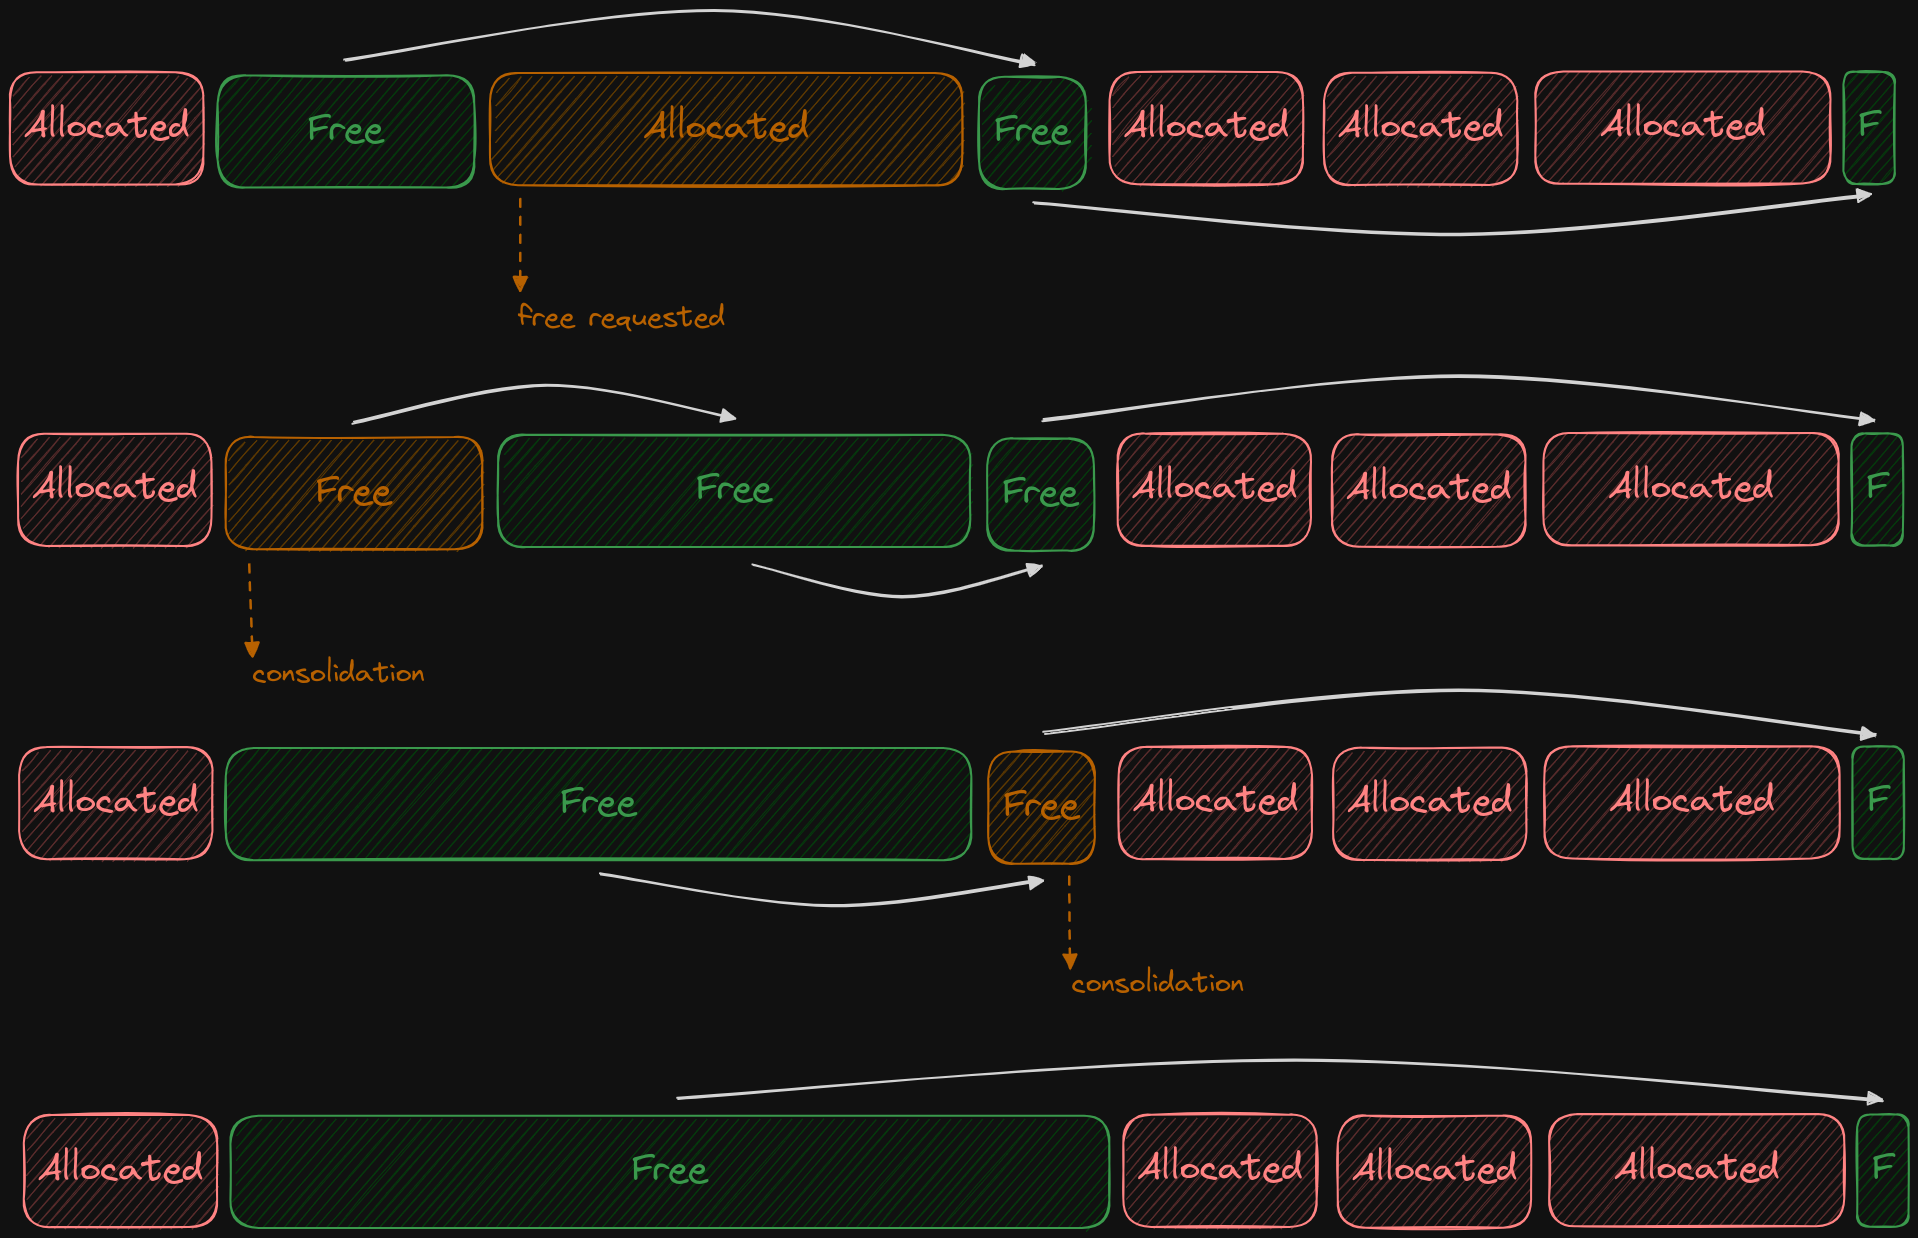
- When a block is no longer in use and needs to be returned to the free list, it is first marked as available again. This might involve clearing a status flag or similar mechanism.
- The block is then added back to the free list. This involves updating the links between the other blocks in the list to include the newly freed block.
- Finally, the system may need to perform some form of compaction operation to ensure that the free list remains efficient. This could involve moving the freed block to a different location in memory if doing so would make the free list more compact or efficient.
(…)
(…)
(…)
(…)
(…)
(…)
(…)
(…)
(…)
$ git clone --recurse-submodules https://github.com/iwas-coder/wge(…)
$  git clone https://github.com/iwas-coder/wge && cd wge
$  git submodule init
$ git submodule updateWGE ships with a ready-to-go Makefile, so GNU Make is needed in order to build the engine. It is as simple as doing:
$ makeBy default, it targets the Linux platform (e.g. GNU/Linux). In order to build the project for Windows, it will be needed the MinGW-w64 compiler suite in order to cross-compile it. With all that setup, it can be specified by doing:
$ make TARGET=windows(…)


