PyTorch (v1.0.0) re-implementation of ENet: A Deep Neural Network Architecture for Real-Time Semantic Segmentation, ported from the excellent PyTorch impelentation ENet-ScanNet, which was in-turn ported from the lua-torch implementation ENet-training created by the authors.
This implementation has been tailored to suit the ScanNet dataset.
The primary change from ENet is that this repository supports a variant ENetDepth, which is a 2.5D (i.e., RGB + Depth) version of ENet. It takes a color image and its corresponding depth image as input, and performs semantic segmentation. ENetDepth provides a huge boost in performance (+0.17 mIoU over ENet), so use it whenever you can.
On an NVIDIA GeForce GTX 1060, ENetDepth operates at a rate of about 40 Hz! Should run faster on a better GPU.
- Python 3 and pip.
- Set up a virtual environment (recommended).
- Install dependencies using pip:
pip install -r requirements.txt.
To obtain ScanNet, instructions are available in the README of this repository. The entire dataset is huge (1.4 TB or so)! However, you could choose to download only specific scenes. For training a well-performing ENet, one would need about 75-100 scenes from ScanNet.
A pretrained model ships with the repository. It is in the save directory.
IMPORTANT: Make sure to edit
save/ENetDepth-scannet20_summary.txtand specify paths to ScanNet data, in order for the pretrained model to work.
Data preparation for ENet is identical to that for 3DMV.
For more information, see data preparation.
Run main.py, the main script file used for training and/or testing the model. The code has a lot of options. Make sure to read through most of them, before training/testing.
usage: main.py [-h] [--mode {train,test,inference,full}] [--resume]
               [--generate-images] [--arch {rgb,rgbd}]
               [--seg-classes {nyu40,scannet20}] [--batch-size BATCH_SIZE]
               [--epochs EPOCHS] [--learning-rate LEARNING_RATE]
               [--beta0 BETA0] [--beta1 BETA1] [--lr-decay LR_DECAY]
               [--lr-decay-epochs LR_DECAY_EPOCHS]
               [--weight-decay WEIGHT_DECAY] [--dataset {scannet}]
               [--dataset-dir DATASET_DIR] [--trainFile TRAINFILE]
               [--valFile VALFILE] [--testFile TESTFILE] [--height HEIGHT]
               [--width WIDTH] [--weighing {enet,mfb,none}]
               [--class-weights-file CLASS_WEIGHTS_FILE] [--with-unlabeled]
               [--workers WORKERS] [--print-step PRINT_STEP] [--imshow-batch]
               [--device DEVICE] [--name NAME] [--save-dir SAVE_DIR]
               [--validate-every VALIDATE_EVERY]
For help on the optional arguments run: python main.py -h
python main.py -b 64 --epochs 200 --dataset-dir /path/to/scannet/scannetv2_images/ --trainFile cache/train.txt --valFile cache/val.txt --testFile cache/test.txt --print-step 25 --seg-classes scannet20 --class-weights-file cache/class_weights_scannet20.txt --name ENetDepth --lr-decay-epochs 60 -lr 1e-3 --beta0 0.7 --arch rgbd --validate-every 10
Training for 200 epochs will take about 5-6 hours on an NVIDIA GeForce GTX TITANX GPU.
python main.py -b 64 --epochs 200 --dataset-dir /path/to/scannet/scannetv2_images/ --trainFile cache/train.txt --valFile cache/val.txt --testFile cache/test.txt --print-step 25 --seg-classes scannet20 --class-weights-file cache/class_weights_scannet20.txt --name ENetDepth --lr-decay-epochs 60 -lr 1e-3 --beta0 0.7 --arch rgbd --validate-every 10 --resume
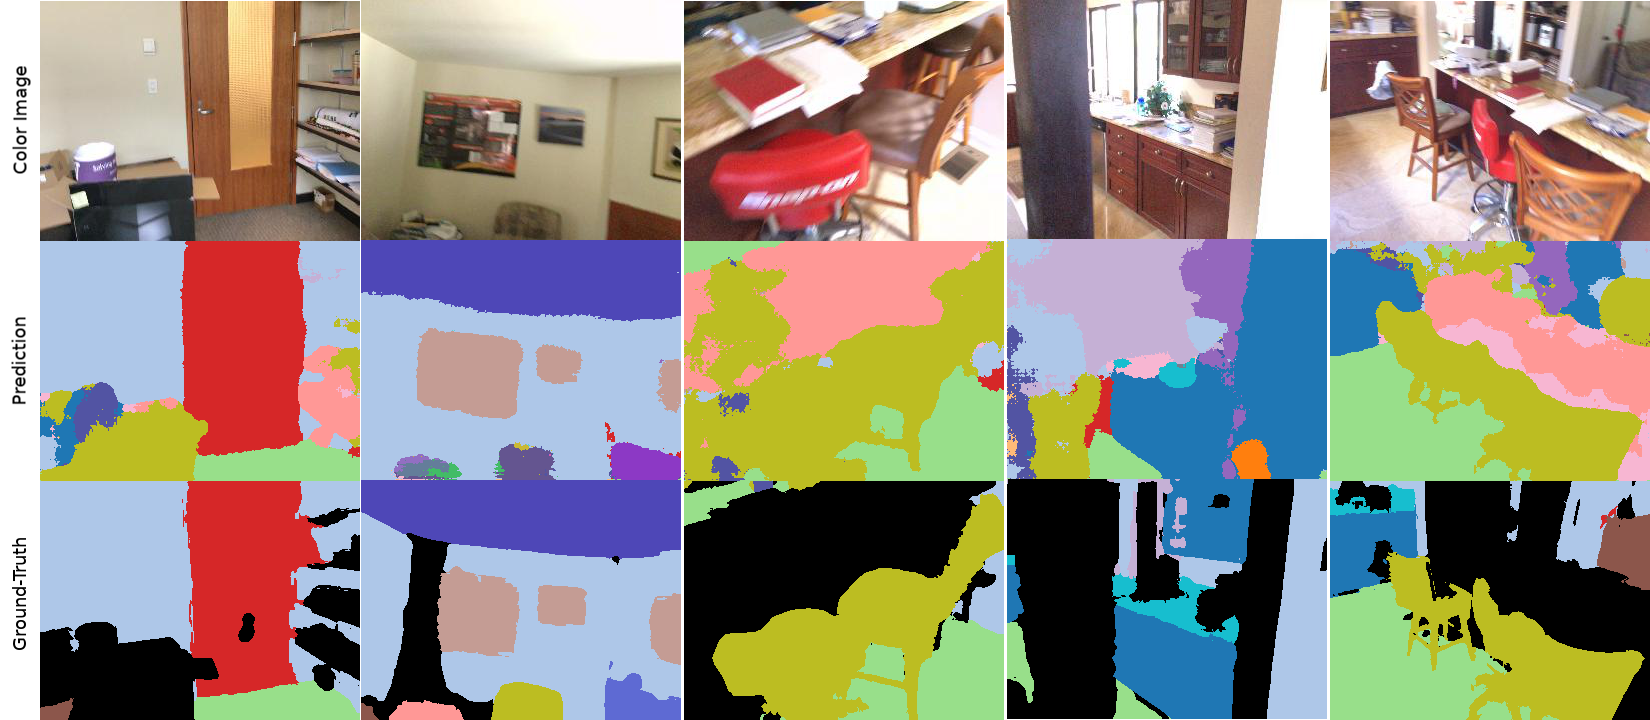
Once you're all trained and set, you can use inference.py to generate the cool-looking qualitative results on top of this README. A sample inference.py call would look like
python inference.py --mode inference -b 2 --epochs 1 --dataset-dir /path/to/scannet/scannetv2_images/ --trainFile cache/train.txt --valFile cache/val.txt --testFile cache/test.txt --arch rgbd --print-step 1 --seg-classes scannet20 --class-weights-file cache/class_weights_scannet20.txt --name ENetDepth --generate-images
This will create a directory named ENetDepth_images in the save directory.
data: Contains instructions on how to download the datasets and the code that handles data loading.metric: Evaluation-related metrics.models: ENet model definition.save: By default,main.pywill save models in this folder. The pre-trained models can also be found here.
args.py: Contains all command-line options.main.py: Main script file used for training and/or testing the model.test.py: Defines theTestclass which is responsible for testing the model.train.py: Defines theTrainclass which is responsible for training the model.transforms.py: Defines image transformations to convert an RGB image encoding classes to atorch.LongTensorand vice versa.
